Viewing entries tagged
keep learning

Reflection Over X Axis and Y Axis—Step-by-Step Guide

Reflection Over X Axis and Y Axis—Step-by-Step Guide

Reflection Over X Axis and Y Axis: Student Guide

Math Skills: Perform a reflection over x axis, Perform a reflection over y axis, Reflections on the coordinate plane

Understanding how to perform a reflection over x axis or a reflection over y axis is an important algebra skill that students can easily master with some study and practice.

In real life, a reflection is a concept that everyone is familiar with, as many of us look a mirror at least once every day.

Similarly, in math, a reflection is a type of transformation where the mirror image of a point, line, or figure is displayed on the coordinate plane.

This free student guide on How to Perform Reflection Over X Axis and How to Perform Reflection Over Y Axis will teach you how to perform reflections on the coordinate plane in a simple step-by-step way.

Table of Contents | Jump to:

Reflections in Real-Life (Photo by Tim Stief via Unsplash)

Reflections in Math: Reflection over the x axis example.

What is a Reflection Over the X-Axis?

In math, a reflection over x axis of a point, a line, or a figure involves reflecting the image over the x axis to create a mirror image.

In the case of a reflection over the x axis, the horizontal line on the coordinate plane that passes through the origin (the x-axis) would be called the axis of reflection.

In other words, whenever something is reflected over the x axis, it is essentially “flipped” across the axis on the coordinate plane.

Rule: Whenever a point is reflected over the x-axis, the following rule applies:

  • x-coordinates stay the same

  • y-coordinates change signs (positive becomes negative and vice versa)

  • Rule: (x,y) → (x,-y)

For example, if we reflected the coordinate points A (2,6) and B (7, 3) over the x-axis, the new reflected points, A’ and B’, would become:

  • A (2,6) → A’ (2,-6)

  • B (7,3) → B’ (7, -3)

Again, notice, after a reflection over x axis, that the x-coordinates did not change, but the signs of the y-coordinates were reversed (positive values became negative)

Figure 01 below shows what it would look like if we took line segment AB (with coordinates A (2,6) and B (7, 3)) and reflected it over the x-axis to create the image of line segment A’B’.


Figure 01: The reflection over x axis rule states that (x,y) → (x,-y).


What is a Reflection Over the Y-Axis?

Similarly, a reflection over y axis of a point also involves reflecting the image over the y axis to create a mirror image.

Whenever you have to reflect a point over the y axis, you are reflecting over the vertical line on the coordinate plane that passes through the origin (i.e. the y-axis is the axis of reflection).

Rule: Whenever a point is reflected over the y-axis, the following rule applies:

  • x-coordinates change signs (positive becomes negative and vice versa)

  • y-coordinates stay the same

  • Rule: (x,y) → (-x,y)

For example, if we took line segment AB, with coordinate points A (2,6) and B (7, 3), from the previous example and reflected over y axis, the new coordinate points, A’ and B’, would be:

  • A (2,6) → A’ (-2,6)

  • B (7,3) → B’ (-7, 3)

In the case of reflection over y axis, notice that the signs of the x-coordinate values were reversed (positive became negative) and that the y-coordinate values were unchanged.

Figure 02 below illustrates this rule and what the image of AB would look like after it was reflected over the y axis.


Figure 02: The reflection over y axis rule states that (x,y) → (-x, y).


The chart below displays the difference between reflecting line segment AB over the x-axis versus reflecting over the y-axis.

 
Original Point Reflected over X-Axis Reflected over Y-Axis
A (2, 6) A′ (2, -6) A″ (-2, 6)
B (7, 3) B′ (7, -3) B″ (-7, 3)
 

Now that you have a better understanding of the difference between a reflection over x axis and a reflection over y axis, you are ready to work through a few practice problems.

Before moving onto the next section, make sure that you have a firm grasp of the following key points:

  • On the coordinate plane, the x-axis is a horizontal line () that passes through the origin, while the y-axis is a vertical line (↕) that passes through the origin. The difference between the x-axis and the y-axis is illustrated in Figure 03 below.

  • The rule for a reflection over the x axis is: (x,y) → (x,-y)

  • The rule for a reflection over the y axis is: (x,y) → (-x, y)


Figure 03: The x-axis is a horizontal line and the y-axis is a vertical line.


Reflection Over X Axis and Y Axis Examples

Reflection Over X Axis Example #1

Problem: Reflect the point P (5,8) over the x-axis.

For our first example, we will take a given point and perform a reflection over x axis.

Quick Tip: Remember that the rule for reflecting a coordinate point over the x-axis is (x,y) → (x,-y), so you only have the change the sign of the y-coordinate.

Step 1: Apply the reflection over the x-axis rule:

  • Given Point: P (5,8)

  • Rule: P (5,8) → P’ (5, -8)

Step 2: Plot P’ (5,-8) on the coordinate plane to complete the reflection.


Final Answer: The reflected point is P’ (5,-8)

Example #1: Reflection over x axis of one coordinate point.

Reflection Over X Axis Example #2

Problem: Reflect line segment RS, with endpoints R(-3,-4) and S(2,-5), over the x axis.

For this next example of how to perform reflection over x axis, we have to reflect an entire line segment, and we can do that by applying the rule (x,y) → (x,-y) to both endpoints and then plotting those new points and constructing the line segment R’S’.

Step 1: Apply the rule to each given point.

  • Given Points: R(-3,-4) and S(2,-5)

  • Rule: R(-3,-4) → R’(-3,4)

  • Rule: S(2,-5) → S’(2,5)

Example #2: Reflection over x axis of a line segment.

Step 2: Plot the endpoints R’ and S’ and construct the reflected line segment (i.e. connect R’ and S’ with a straight line).

Final Answer: The reflected line segment R’S’ has endpoints at R’ (-3, 4) and S’ (2, 5).

The chart below shows how the coordinates of points R and S were transformed after a reflection over the x axis.

 
Point Coordinates Reflected Over X-Axis
R (-3, -4) R′ = (-3, 4)
S (2, -5) S′ = (2, 5)
 

Reflection Over X Axis Example #3

Now, let’s try a problem where we have to reflect an entire figure over the x-axis.

Problem: Reflect △ABC over the x-axis if the figure has vertices at:

  • A (2, 8)

  • B (6, 4)

  • C (4, -2)

Step 1: Apply the rule (x,y) → (x,-y) to each point:

  • A (2, 8) → A’ (2, -8)

  • B (6, 4) → B’ (6, -4)

  • C (4, -2) → C’ (4, 2)

Example #3: Reflection over x axis of a figure.

Step 2: Plot and label points A’, B’, and C’ on the coordinate plane and construct △A’B’C’ as shown in Figure 04 below. Notice how points A and B are reflected below the x-axis, while point C is reflected above the x-axis, which creates a symmetrical mirror image between △ABC and △A’B’C’.


Figure 04: How to perform a reflection over the x axis of a figure (completed)


Reflection Over Y Axis Example #1

Problem: Reflect the point K (-8,6) over the y-axis.

Let’s start off by reflecting a single coordinate point over the y axis.

Quick Tip: The rule for reflecting a point over the y-axis is (x,y) → (-x,y), so you only have the change the sign of the x-coordinate.

Step 1: Apply the reflection over y-axis rule:

  • Given Point: K (-8,6)

  • Rule: K (-8,6) → K (‘-8,6)

Step 2: Plot K’ on the graph.

Final Answer: After K (-8,6) is reflected over the y-axis, the coordinates of K’ are (8,6).

Example #1: Reflection over y axis of a point.

Reflection Over Y Axis Example #2

Our next example of how to perform reflection over y axis involves a line segment.

Problem: Reflect segment CD over the y-axis, where:

  • C (2,7)

  • D (9,-5)

Step 1: Apple the rule (x,y) → (-x,y) to each point:

  • C (2,7) → C’ (-2,7

  • D (9,-5) → D’ (-9,-5)

Step 2: Plot C’ and D’ and construct the reflected line segment C’D’.

Final Answer: Line segment C’D’ has endpoints at C’ (-2,7) and D’ (-9,-5).

Example #2: Reflection over y axis of a line segment.

The chart below shows how the coordinates of points C and D were transformed after a reflection over the y axis.

 
Point Original Coordinates Reflected Over Y-Axis
C (2, 7) C′ = (-2, 7)
D (9, -5) D′ = (-9, -5)
 

Video Tutorial: Reflections on the Coordinate Plane

If you need some extra help with learning how to reflect over the x-axis or over the y-axis, then check out our free Reflections on the Coordinate Plane Video Tutorial, which includes a review of key concepts and vocabulary related to reflections as well step-by-step explanations of how to solve a variety of problems.

If you like the video, please subscribe to our channel, give it a thumbs up, and/or leave a positive comment. Thank you in advance for your support.


Reflection over X Axis and Y Axis Worksheet

Preview: Free Reflection Over X Axis and Y Axis Worksheet.

Now that you have a better understanding of how to reflect a point, line, or figure over the x and y axis, it’s time to try some problems on your own to assess your overall understanding.

The free PDF worksheet below includes several practice problems for performing a reflection over the x-axis and over the y-axis. We recommend trying each problem on your own and then checking your solutions by comparing them to the answer key.

If you solve more than 85% of the problems correctly, then you likely have a strong understanding of how to perform a reflection on the coordinate plane. However, if you are still struggling, you can go back and work through the step-by-step problems in the guide for a second time. The more that you practice this skill, the better you will understand it!

Click here to download your free Reflections Over the X and Y-Axis PDF Worksheet.

And click here to access hundreds of free Algebra and Geometry practice worksheets with answer keys.


More Math Resources and Tutorials You Will Love:

Log Rules Explained! (Free Chart)

Comment

Log Rules Explained! (Free Chart)

Everything you need to know about the natural log rules.

The Natural Log Rules Explained

In math, log rules (also known as logarithm rules) are a set of rules or laws that you can use whenever you have to simplify a math expression containing logarithms. Basically, log rules are a useful tool that, when used correctly, make logarithms and logarithmic equations simpler and easier to work with when solving problems.

Once you become more familiar with the log rules and how to use the, you will be able to apply them to a variety of math problems involving logarithms. In fact, understanding and remembering the log rules is essentially a requirement when it comes to working with logarithmic expressions, so understanding these rules is essential for any student who is currently learning about logarithms.

The following free guide to the Log Rules shares and explains the rules of logs (including exponent log rules), what they represent, and, most importantly, how you can use them to simplify a given logarithmic expression.

You have the option of clicking on any of the text links below to jump to any one section of this log rules guide, or you can work through each section in order—the choice is up to you!

When you reach the end of this free guide on the rules of logs, you will have gained a solid understanding of the natural log rules and how to apply them to solving complex math problems. Let’s get started!


Figure 01: What is the relationship between the logarithmic function and the exponential function?


Quick Review: Logarithms

While this first section is optional, we recommend that you start off with a quick recap of some key math concepts and vocabulary terms related to logs.

The first important thing to understand is that logarithmic functions and exponential functions go hand-in-hand, as they are considered inverses of each other. So, make sure that you have a strong understanding of the laws of exponents before moving forward.

Since the logarithmic function is an inverse of the exponential function, we can say that:

  • aˣ = M logₐM = x

  • logₐM = x aˣ = M

The log of any value, M, can be expressed in exponential form as the exponent to which the base value of the logarithm must be raised to in order to equal M.

Understanding this inverse relationship between the logarithmic function and the exponential function will help you to better understand the log rules described in the following sections of this guide.

Learning natural log rules shared in the next section will help you to break down complex log expressions into simpler terms, which is a critical skill when it comes to learning how to successfully work with logs, how to model situations using logs, and how to solve a variety of math problems that involve logs.


What are the Log Rules?

The natural log rules are set of laws that you can use to simplify, expand, or solve logarithmic functions and equations.

The chart in Figure 02 below illustrates all of the log rules. Simply click the blue text link below the chart to download it as a printable PDF, which you can use as a study tool and a reference guide.

The section that follows the log rules chart will share an in-depth explanation of each of the log rules along with examples.


Figure 02: The Natural Log Rules and the Change of Base Formula


Each of the following log rules apply provided that:

  • a≠1 and a>0, b≠1 and b>0, a=b, and M, N, and x are real numbers where M>0 and N>0

Log Rules: The Product Rule

The first of the natural log rules that we will cover in this guide is the product rule:
  • logₐ(MN) = logₐM + logₐN


Figure 03: The product rule of logarithms.
 

The product rule states that the logarithm a product equals the sum of the logarithms of the factors that make up the product.

For example, we could use the product rule to expand log₃(xy) as follows:

  • log₃(xy) = log₃x + log₃y

Pretty straightforward, right? The product rule of logarithms is a simple tool that will allow you to expand logarithmic expressions and equations, which often makes them easier to work with.


Log Rules: The Quotient Rule

The second of the natural log rules that we will cover in this guide is called the quotient rule, which states that:

  • logₐ(M/N) = logₐM - logₐN; or

  • logₐ(MN) = logₐM - logₐN


Figure 04: Natural Log Rules: The Quotient Rule


The quotient rule of logs says that the logarithm a quotient equals the difference of the logarithms that are being divided (i.e. it equals the logarithm of the numerator value minus the logarithm of the denominator value).

For example, we could use the quotient rule to expand log₇(x/y) as follows:

  • log₇(x/y) = log₇x - log₇y

Notice that the product rule and the quotient rule of logarithms are very similar to the corresponding laws of exponents, which should make sense because the logarithmic function and the exponential function are inverses of each other.


Log Rules: The Power Rule

The next natural log rule is called the power rule, which states that:

  • logₐ(Mˣ) = x logₐM


Figure 05: Log Rules: The Power Rule


The power rule of logarithms says that the log of a number raised to an exponent is equal to the product of the exponent value and the logarithm of the base value.

For example, we could use the power rule to rewrite log₄(k⁸) as follows:

  • log₄(k⁸) = 8 log₄k

The power rule of logarithms is extremely useful and it often comes in handy when you are dealing with the logarithms of exponential values, so make sure that you understand it well before moving forward.


Log Rules: The Zero Rule

Moving on, the next log rule on our list is the zero rule, which states that:

  • logₐ(1) = 0


Figure 06: Log Rules: The Zero Rule


Simply put, the zero rule of logs states that the log of 1 will always equal zero as long as the base value is positive and not equal to one.

For example, we could use the zero rule to rewrite log₂(1) as follows:

  • log₂(1) = 0

This simple rule can be very useful whenever you are trying to simplify a complex logarithmic expression or equation. The ability to zero out or cancel out a term can make things much simpler and easier to work with.


Log Rules: The Identity Rule

The fifth log rule on our list is called the identity rule, which states that:

  • logₐ(a) = 1


Figure 07: Natural Log Rules: The Identity Rule


The identity rule says that whenever you take the logarithm of a value that is equal to its base value, then the result will always equal 1 provided that the base value is greater than zero and not equal to one.

For example, we could use the identity rule to rewrite log₈(8) as follows:

  • log₈(8) = 1

Similarly, we could also use the identity rule to rewrite logₓ(x) as follows:

  • logₓ(x) = 1

Just like the zero rule, the identity rule is useful as it can sometimes help you with simplifying complex log expressions and equations.


Log Rules: The Inverse Property of Logs

The next log rule that we will cover in this guide is called the inverse property of logarithms rule, which states that:

  • logₐ(aˣ) = x


Figure 08: The inverse property of logs rule.


The inverse property of logs rule states that the log of a number raised to an exponent with a base value that is equal to the base value of the logarithm is equal to the value of the exponent.

For example, we could use the inverse property of logs rule to rewrite log₃(3ᵏ) as follows:

  • log₃(3ᵏ) = k

Again, this is another useful tool that you can use to simplify complicated log expressions and equations.


Log Rules: The Inverse Property of Exponents

The seventh log rule that we will cover is the inverse property of exponents rule, which states that:

  • a^(logₐ(x)) = x


Figure 09: Log Rule #7: The Inverse Property of Exponents


The inverse property of exponents log rule states whenever a base number with an exponent that is a logarithm equal to that base number, the result will equal the number in parenthesis.

For example, we could use the inverse property of exponents log rule to rewrite x^(logₓ(y²)) as follows:

  • x^(logₓ(y²)) = y²


Log Rules: The Change of Base Formula

The eighth and final log rule is the change of base formula, which states that:

  • logₐ(x) = (log꜀(x)) / (log꜀(a))


Figure 10: Log Rule: The Change of Base Formula


Conclusion: Natural Log Rules

In algebra, you will eventually have to learn how to simplify, expand, and generally work with logarithmic expressions and equations. The logarithm function is the inverse of the exponential function, and the corresponding log rules are similar to the exponent rules (i.e. they are a collection of laws that will help you to make complex log expressions and equations easier to work with). By studying and learning how to the natural log rules, you will be better able to understand logarithms and to solve difficult math problems involving logarithms. Feel free to bookmark this guide and return whenever you need a review of the rules of logs.

Keep Learning:

Comment

Exponent Rules Explained! (Free Chart)

4 Comments

Exponent Rules Explained! (Free Chart)

Everything you need to know about the exponent rules!

Exponent Rules Explained

In algebra, exponent rules (also known as the laws of exponents), are a set of laws that you can use to simplify mathematical expressions that have exponents. In other words, exponent rules can be used to make complicated math expressions containing exponents much easier to work with.

Once you learn the rules of exponents, you will be able to use them to quickly and easily perform operations (adding, subtracting, multiplying, dividing, etc.) on expressions that have exponents.

The following free guide to Exponent Rules will describe and explain the rules of exponents are, what they look like, and examples of how you can use them to simplify expressions and solve math problems involving exponents.

You can use the quick links below to jump to any section of this guide, or you can follow along step-by-step.

By the time that you reach the conclusion of this free guide on the rules of exponents, you will have a deep understanding of how to apply the exponent rules to simplify and solve math problems.

Are you ready to get started?

Before we start learning about the exponent rules, let’s do a quick review of exponents and cover some key vocabulary terms that you will need to be familiar with in order to make the most out of this guide.


Figure 01: The number 5 raised to a power of 3.


Quick Review: Exponents

In math, an exponent is a number or a variable at the top right of a base number or expression. The value of the exponent tells you what power the base number will be raised to.

For example, the expression 5³ has a base number of 5 and an exponent of 3. This expression means that the base number, 5, is being raised to a power of 3, meaning:

  • 5³ = 5 x 5 x 5 = 125

In short, an exponent tells you how many times to multiply the base number by itself.

Now that you understand the basic definition of an exponent, it’s time to move onto learning about the Exponent Rules.


What are the Exponent Rules?

The rules of exponents are a collection of specific ways to simplify math expressions involving exponents.

The chart in Figure 02 below shows all of the exponent rules. You can click the link below the chart to download a PDF copy which you can print out and use as a reference whenever you need to.

Below the chart, you will find a section that explains each individual exponent rule along with examples.


Figure 02: The Exponent Rules


Exponent Rules: Zero Exponent Rule

The first exponent rule described in this guide will be the zero exponent rule:

  • a⁰=1


Figure 03: The zero exponent rule.


The zero exponent rule states that any number, variable, or expression raised to the zero power is equal to 1.

For example:

  • 8⁰=1

  • x⁰=1

  • (a+b)⁰=1

Pretty simple, right?

To understand the zero exponent rule, you only have to remember that anything raised to the zero power is equal to one.


Exponent Rules: Product Rule

The next exponent rule that we will cover is called the product rule:

  • a^b x a^c = a^(b+c)


Figure 04: The product exponent rule.


The product rule of exponents applies whenever you have to multiply two or more expressions that have the same base.

The rule goes as follows: whenever you have to multiply two expressions with the same base value, you can simplify the expression by adding the exponents together and keeping the base value the same.

For example:

  • 4³ x 4² = 4⁵

  • m² x m² = m⁴

  • (a+b)⁵ x (a+b)³ = (a+b)⁸

Are you wondering where the product exponent rule comes from, let’s take a closer look at the example:

  • 4³ x 4² = 4⁵

We can rewrite each individual expression as follows:

  • 4³ = 4 x 4 x 4

  • 4² = 4 x 4

Therefore,

  • 4³ x 4² = 4 x 4 x 4 x 4 x 4 = 4⁵

The product rule allows you to simplify the expression 4³ x 4² as 4⁵. They both mean the same thing!

Before we move onto the next rule of exponents, note that the product rule only applies when the expressions have the same base value!


Exponent Rules: Quotient Rule

Our next stop on our chart of the rules of exponents is called the quotient rule.

The exponent rule comes into play when you have to divide two expressions with exponents that have the same base value.

The quotient rule of exponents goes as follows:

  • a^b a^c = a^(b-c); or

  • (a^b)/(a^c) = a^(b-c)


Figure 05(a): The quotient exponent rule with a division symbol.

Figure 05(b): The quotient exponent rule with a fraction.


Whether two expressions with the same base are being divided using a division sign (as shown in Figure 05(a)) or with a fraction (as shown in Figure 05(b)), you can simplify the expression by subtracting the second exponent from the first exponent and keeping the base value the same.

For example:

  • 8⁸ ➗ 8² = 8⁶

  • 8⁵ / 8² = 8³

  • n¹⁰ / n⁸ = n²

  • (a+b)⁹ ➗ (a+b)² = (a+b)⁷

Remember that the quotient exponent rule only applies if both expressions have the same base value.


Exponent Rules: Power of a Power Rule

What happens when you take an expression with an exponent and raise it to another power?

In case like this, you can use the power of a power exponent rule, which states that, whenever you have a base number, variable, or expression with an exponent raised to another exponent, the expression can be simplified by multiplying the two exponents together and keeping the base value the same.

  • (a^b)^c = a^(bc)


Figure 06: The power of a power exponent rule.


Whenever you have a single base with two exponents in a row, you can simplify the expression by multiplying the two exponents together, for example:

  • (9³)⁴ = 9¹²

  • (y²)² = y⁴

  • (x⁷)³ = x²¹

The power of a power exponent rule is a useful law of exponents that you can use to simplify complicated expressions involving multiple exponents.


Exponent Rules: Power of a Product Rule

What happens when you take an entire product and raise the entire thing to a power?

In cases like this, whenever you are raising a product of two numbers inside of a set of parentheses by an exponent, you can distribute the exponent and apply it to each term of the product as follows:

  • (ab)^c = a^b x a^c


Figure 07: The power of a product exponent rule.


In cases when your base is a product raised to an exponent, you can distribute the exponent to each term, for example:

  • (ab)³ = a³b³

  • (xy²)³ = x³y⁶

  • (m²n³)⁴ = m⁸n¹²

The power of a product exponent rule is one of the most important and use exponent rules on our list! Make sure that you feel comfortable with how to use it before moving onto the next law of exponents.


Exponent Rules: Negative Exponent Rule

The final exponent rule that we will cover in this guide is the negative exponent rule, which states that:

  • a^-b = 1/(a^b)


Figure 08: The negative exponent rule.


The negative exponent rule states that any number, variable, or expression raised to a negative power can be rewritten as a fraction with one in the numerator and the same original expression in the denominator, but with the negative sign removed from the exponent.

For example:

  • 8^-2 = 1/(8^2)

  • x^-7 = 1/(x^7)

  • (a+b)^-4 = 1/((a+b)^4)

That’s all that there is to it! If you ever have to solve a problem that requires you to give an answer that includes only positive exponents, the negative exponent rule will come in handy.


Conclusion: Exponent Rules

In math, you will need to be able to work with expressions that have exponents, and being able to simplify them quickly and correctly is an important skill. By learning and understanding the rules of exponents, you can easily simplify exponents in a variety of situations. Whenever you need to review the exponent rules, we encourage you to revisit this guide for a quick refresher.

Need More Help?

Check out our animated video lessons on the power to a power rule and the product to a power rule.

Keep Learning:

4 Comments

How to Factor a Trinomial in 3 Easy Steps

7 Comments

How to Factor a Trinomial in 3 Easy Steps

FactoringTris copy.jpg

How to Factor a Trinomial in 3 Easy Steps

 Learning how to factor a trinomial is an extremely important and useful algebra skill, but factoring trinomials can also be very tricky.

This free How to Factor a Trinomial step-by-step guide will teach you how to factor a trinomial when a=1 and when a does not equal one (more on what a refers to later) using a simple three-step process.

Before you learn how to factor a trinomial, let’s do a quick review of some very important vocabulary and definitions related to trinomials.

Trinomial Definition

A trinomial is a polynomial that has three terms. The first time is an x^2 term, the second term is an x term, and the third term is a constant (just a number).

Snip20210210_6.png

Furthermore, when discussing trinomials, you will see references to vales for a, b, and c., where:

a = the x^2 term coefficient

b = the x term coefficient

c= the constant value

For example:

Snip20210210_8.png
 

For this trinomial: a=1, b=5, and c=6.

Note that, when a=1, the coefficient will not be written in front of the x^2 term.

Snip20210210_9.png
 

Factoring Trinomials: a = 1

For the first few examples, let’s learn how to factor a trinomial when a, the leading coefficient is 1.

How to Factor a Trinomial Example #1

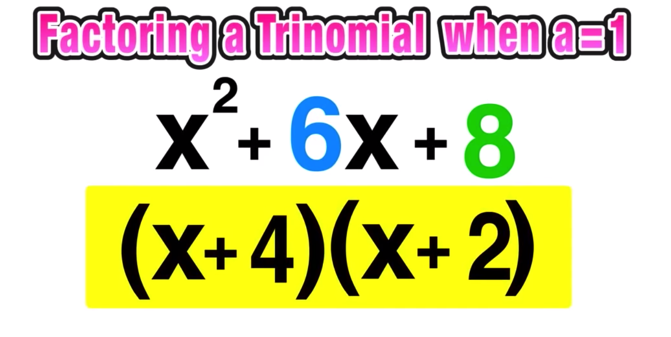
For the first example, let’s factor the trinomial: x^2 + 6x + 8

Snip20210210_10.png
 

Again, note that a=1 in this example.

Now let’s factor the trinomial:

Step 1: Identify the values for b and c.

In this example, b=6 and c=8.

Step 2: Find two numbers that ADD to b and MULTIPLY to c.

This step can take a little bit of trial-and-error.

For instance, you could pick 5 and 1 because 5+1=6. But 5 x 1 does not equal 8, so these numbers would not work.

However, if you chose 4 and 2, you could easily confirm that:

4 + 2 =6 (the value of b); and

4 x 2 = 8 (the value of c)

Step 3: Use the numbers you picked to write out the factors and check

For this example, the factors would be (x+2) and (x+4)

Snip20210210_12.png
 

Final Answer: (x+4)(x+2)

You can check your answer by multiplying the two factors (binomials) together to see if the result is the original trinomial as follows:

Notice that 2x and 4x are like terms that can be combined.

Notice that 2x and 4x are like terms that can be combined.

Multiplying the factors results in the original trinomial.

Multiplying the factors results in the original trinomial.


How to Factor a Trinomial Example #2

Let’s get more practice factoring trinomials when a is 1.

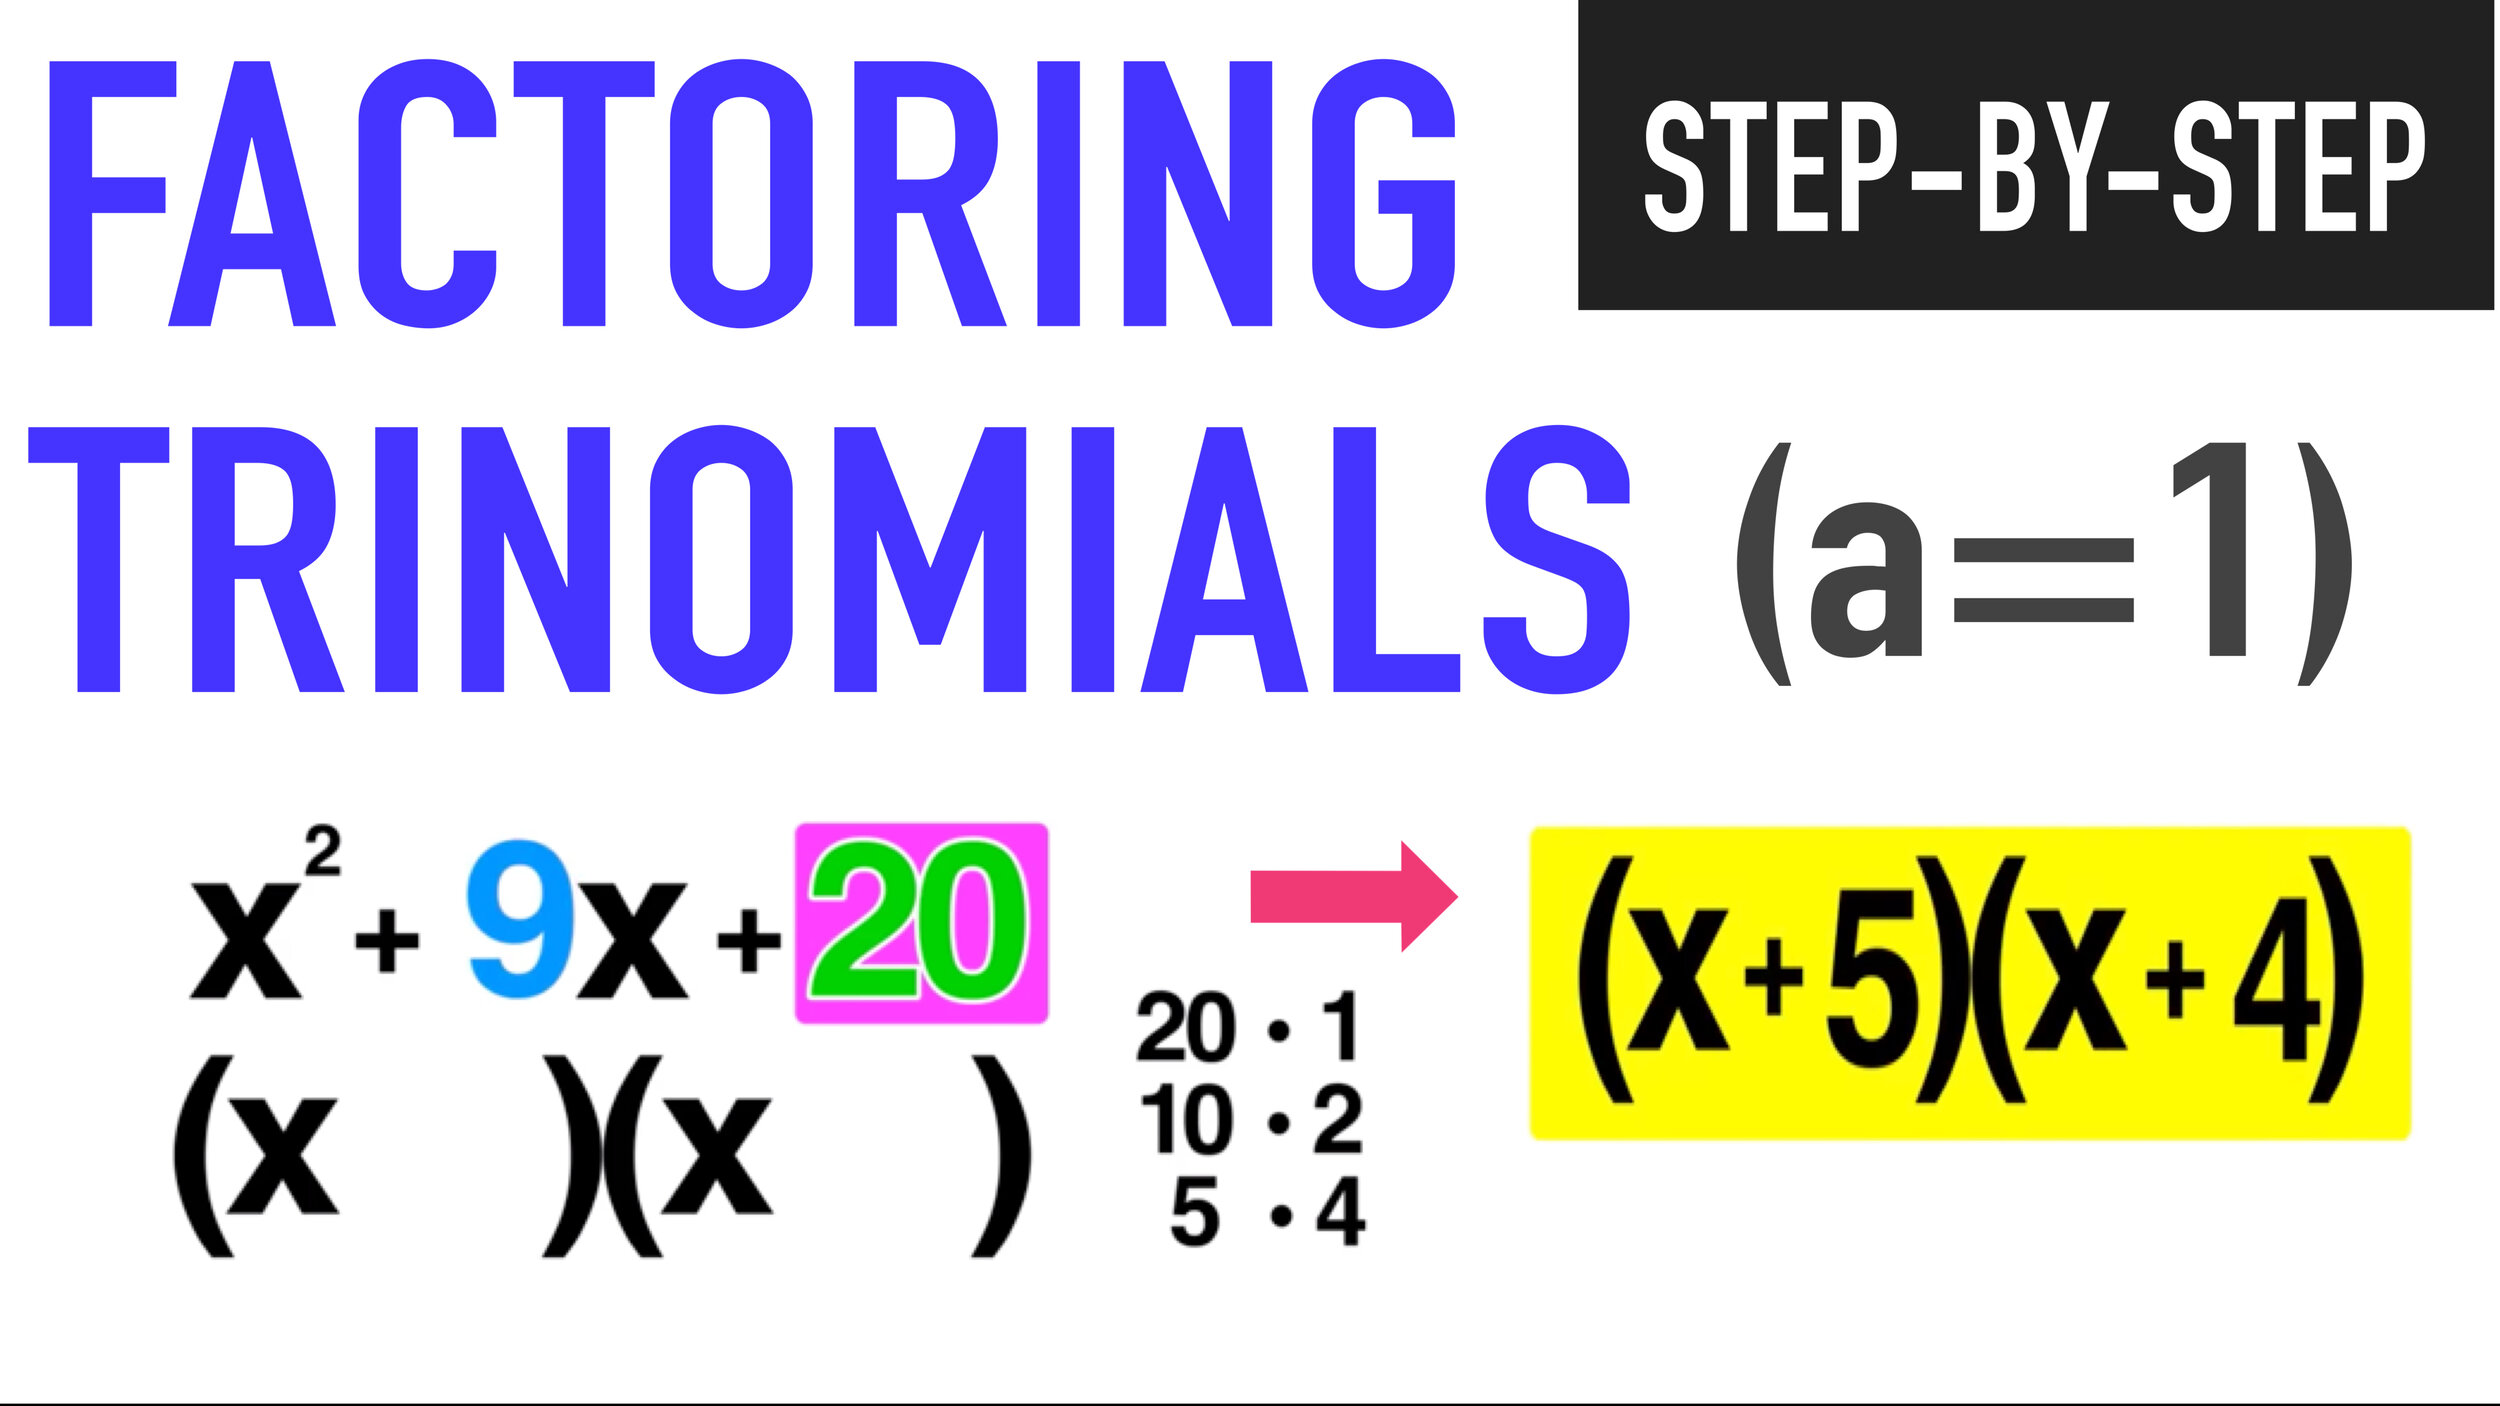
Factor: x^2 + 9x + 20

Snip20210210_15.png
 

Step 1: Identify the values for b and c.

In this example, b=9 and c=20.

Step 2: Find two numbers that ADD to b and MULTIPLY to c.

Finding the right numbers won’t always be as easy as it was in example 1.

To make factoring trinomials easier, write down all of the factors of c that you can think of.

In this case, c=20, so:

20 x 1 = 20

10 x 2 = 20

5 x 4 = 20

Remember that the two numbers have to multiply to c AND add to b.

The only factors of 20 that meet both of these requirements are 4 and 5.

Snip20210210_17.png
 

Step 3: Use the numbers you picked to write out the factors and check

The last step is to write out the factors: (x+5)(x+4)

Snip20210210_18.png
 

How to Factor a Trinomial Example #3

Factor: x^2 - 5x -24

Snip20210210_19.png
 

Notice that this example includes subtraction signs, but the process of factoring is still the same.

Step 1: Identify the values for b and c.

In this example, b= -5 and c= -24.

Step 2: Find two numbers that ADD to b and MULTIPLY to c.

Again, you have to find two values to ADD to -5 and MULTIPLY to -24.

This step can get tricky when you’re dealing with negative numbers. Remember that a negative times a negative is positive, so only one of the values can be negative if the product has to be -24.

After writing out all of the possible factors, you can conclude that:

-8 x 3 = -24

and

-8 + 3 = -5

Snip20210210_20.png
 

Step 3: Use the numbers you picked to write out the factors and check

The last step is to write out the factors: (x-8)(x+3)

Snip20210210_21.png
 

How to Factor a Trinomial when A does not equal 1

How can you factor a trinomial when the leading coefficient does not equal one? This free video tutorial will show you how:

How to Factor a Trinomial Using the Completing the Square Formula

CTS.jpg

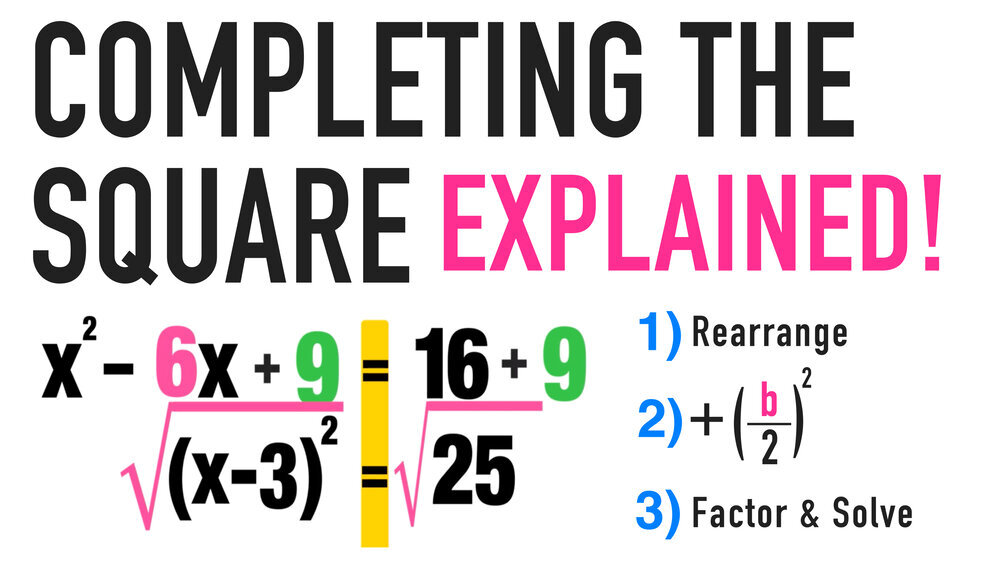
Finally, there is an alternate method to factoring a trinomial that is called completing the square. This method applies to factoring quadratic equations (when a trinomial equals a value, namely zero).

You can learn more about factoring using the completing the square formula by checking our free step-by-step guide.

This Complete Guide to the Completing the Square includes several examples, a step-by-step tutorial, an animated video mini-lesson, and a free worksheet and answer key.

Click here to access a free Completing the Square step-by-step guide.

Conclusion: How to Factor a Trinomial

You can factor a trinomial of the form ax^2 + bx + c, when a=1, by using the following 3-step method:

Step 1: Identify the values for b and c.

Step 2: Find two numbers that ADD to b and MULTIPLY to c.

Step 3: Use the numbers you picked to write out the factors and check

Please review the above examples, watch our video on how to factor a trinomial when the leading coefficient, a, is not 1, and check out our free guide to factoring by completing the square.

Keep Learning:

NewPin12.jpg

7 Comments

Calculating Percent Change in 3 Easy Steps

Comment

Calculating Percent Change in 3 Easy Steps

Calculating Percent Change in 3 Easy Steps

Learning how to calculate percent change is an immensely handy and essential mathematical skill that has various applications inside of your classroom and in the real world as well.

(Looking for a Percent Change Calculator to make a super fast calculation: Click here to access our free Percent Change Calculator)

The ability to calculate, comprehend, and analyze percentages does not only come in handy on class assignments, assessments, quizzes, exams, the SAT, etc., but also in practical matters associated with every day life and several careers as well. In fact, percentages is one of the most useful math skills outside of the classroom, so understanding them is should not be discounted or overlooked.

While it is common for students to think that calculating percent change can be a confusing and demanding task with many steps, the reality is that correctly solving any percent change problem is actually extremely simple and painless.

Are you ready to learn how to easily solve any percent change problem? This post shares a free Calculating Percent Change step-by-step lesson guide that will painlessly teach you how to calculate percent change using an uncomplicated three-step process. If you can learn how to follow the three-step process demonstrated in this guide, you will gain the ability to swiftly and flawlessly solve any math problems or exercises that require you to find percent change.

Now that we are just about ready to learn the three-step process for calculating percent change, lets quickly review a handful of essential vocabulary words, concepts, and definitions related to percentages and percent change.

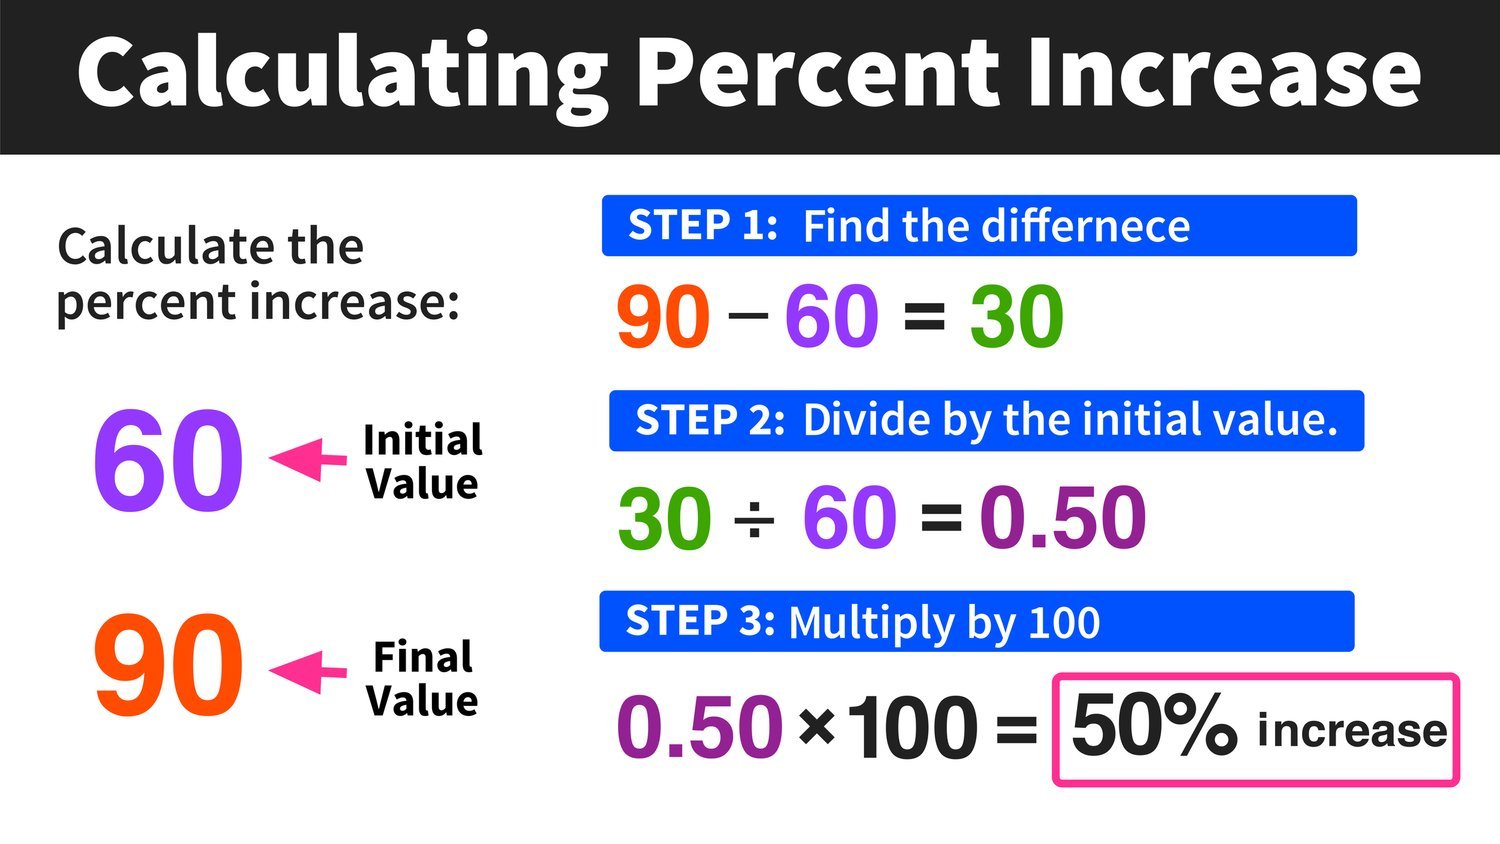
Looking to learn how to calculate percent increase or percent decrease? Use the links below to download our free step-by-step guides:

Percent Definition

In terms of numeracy and mathematics, the word percent relates to parts per one hundred and the numerical symbol used to express percentages is %.

A simple example of a percent would be the value 60%. In this case, 60% represents 60 per 100.

Take a look at the diagram below. You should notice that the green shaded region makes up 60% of the whole.

Another way to express percent is to say that it is defined as a ratio of a value out of one hundred.

For another simple example, consider 30%. In this case, 30% is defined as 30 out of every 100. When viewing percentages as ratios of values out of one hundred, you can conclude that if 30% of 500 total people ride the train to work, then 150 total people ride the train—since 30 out of every 100 means that for every group of 100, we have to consider 30 people. So, 30 x 5 = 150 and 30% of 500 is 150.

Absolute Value Definition

To correctly calculate percent change, you will have to use absolute values. So, let’s do a quick review before we move on.

In math, the absolute value of a real number x, denoted using the vertical brackets |x|, is the positive (or non-negative) value of x.

The key thing to understand is that absolute values are always positive.

For example, the absolute value of 25 is equal to positive 25 AND the absolute value of -25 is equal to positive 25.

  • |25| = 25

  • |-25| = 25

This fact also applies to expressions inside of absolute value bars, for example:

  • | 5 - 7 | = | -2 | = 2

  • | 88 - 10 | = | 78 | = 78

  • | 0 - 33 | = | -33 | = 33

Again, notice how the result is always positive.

Percent Change Definition

Now you are ready to consider the question: what is percent change?

In math, the percent change between two values—a starting value and a final value—is simply the difference between those two values expressed as a percentage.

Note that percent change can also be referred to in terms of percent increase or percent decrease. These terms are more specific than percent change.

  • Percent Increase means that the final value is larger than the starting value. Final Value > Starting Value

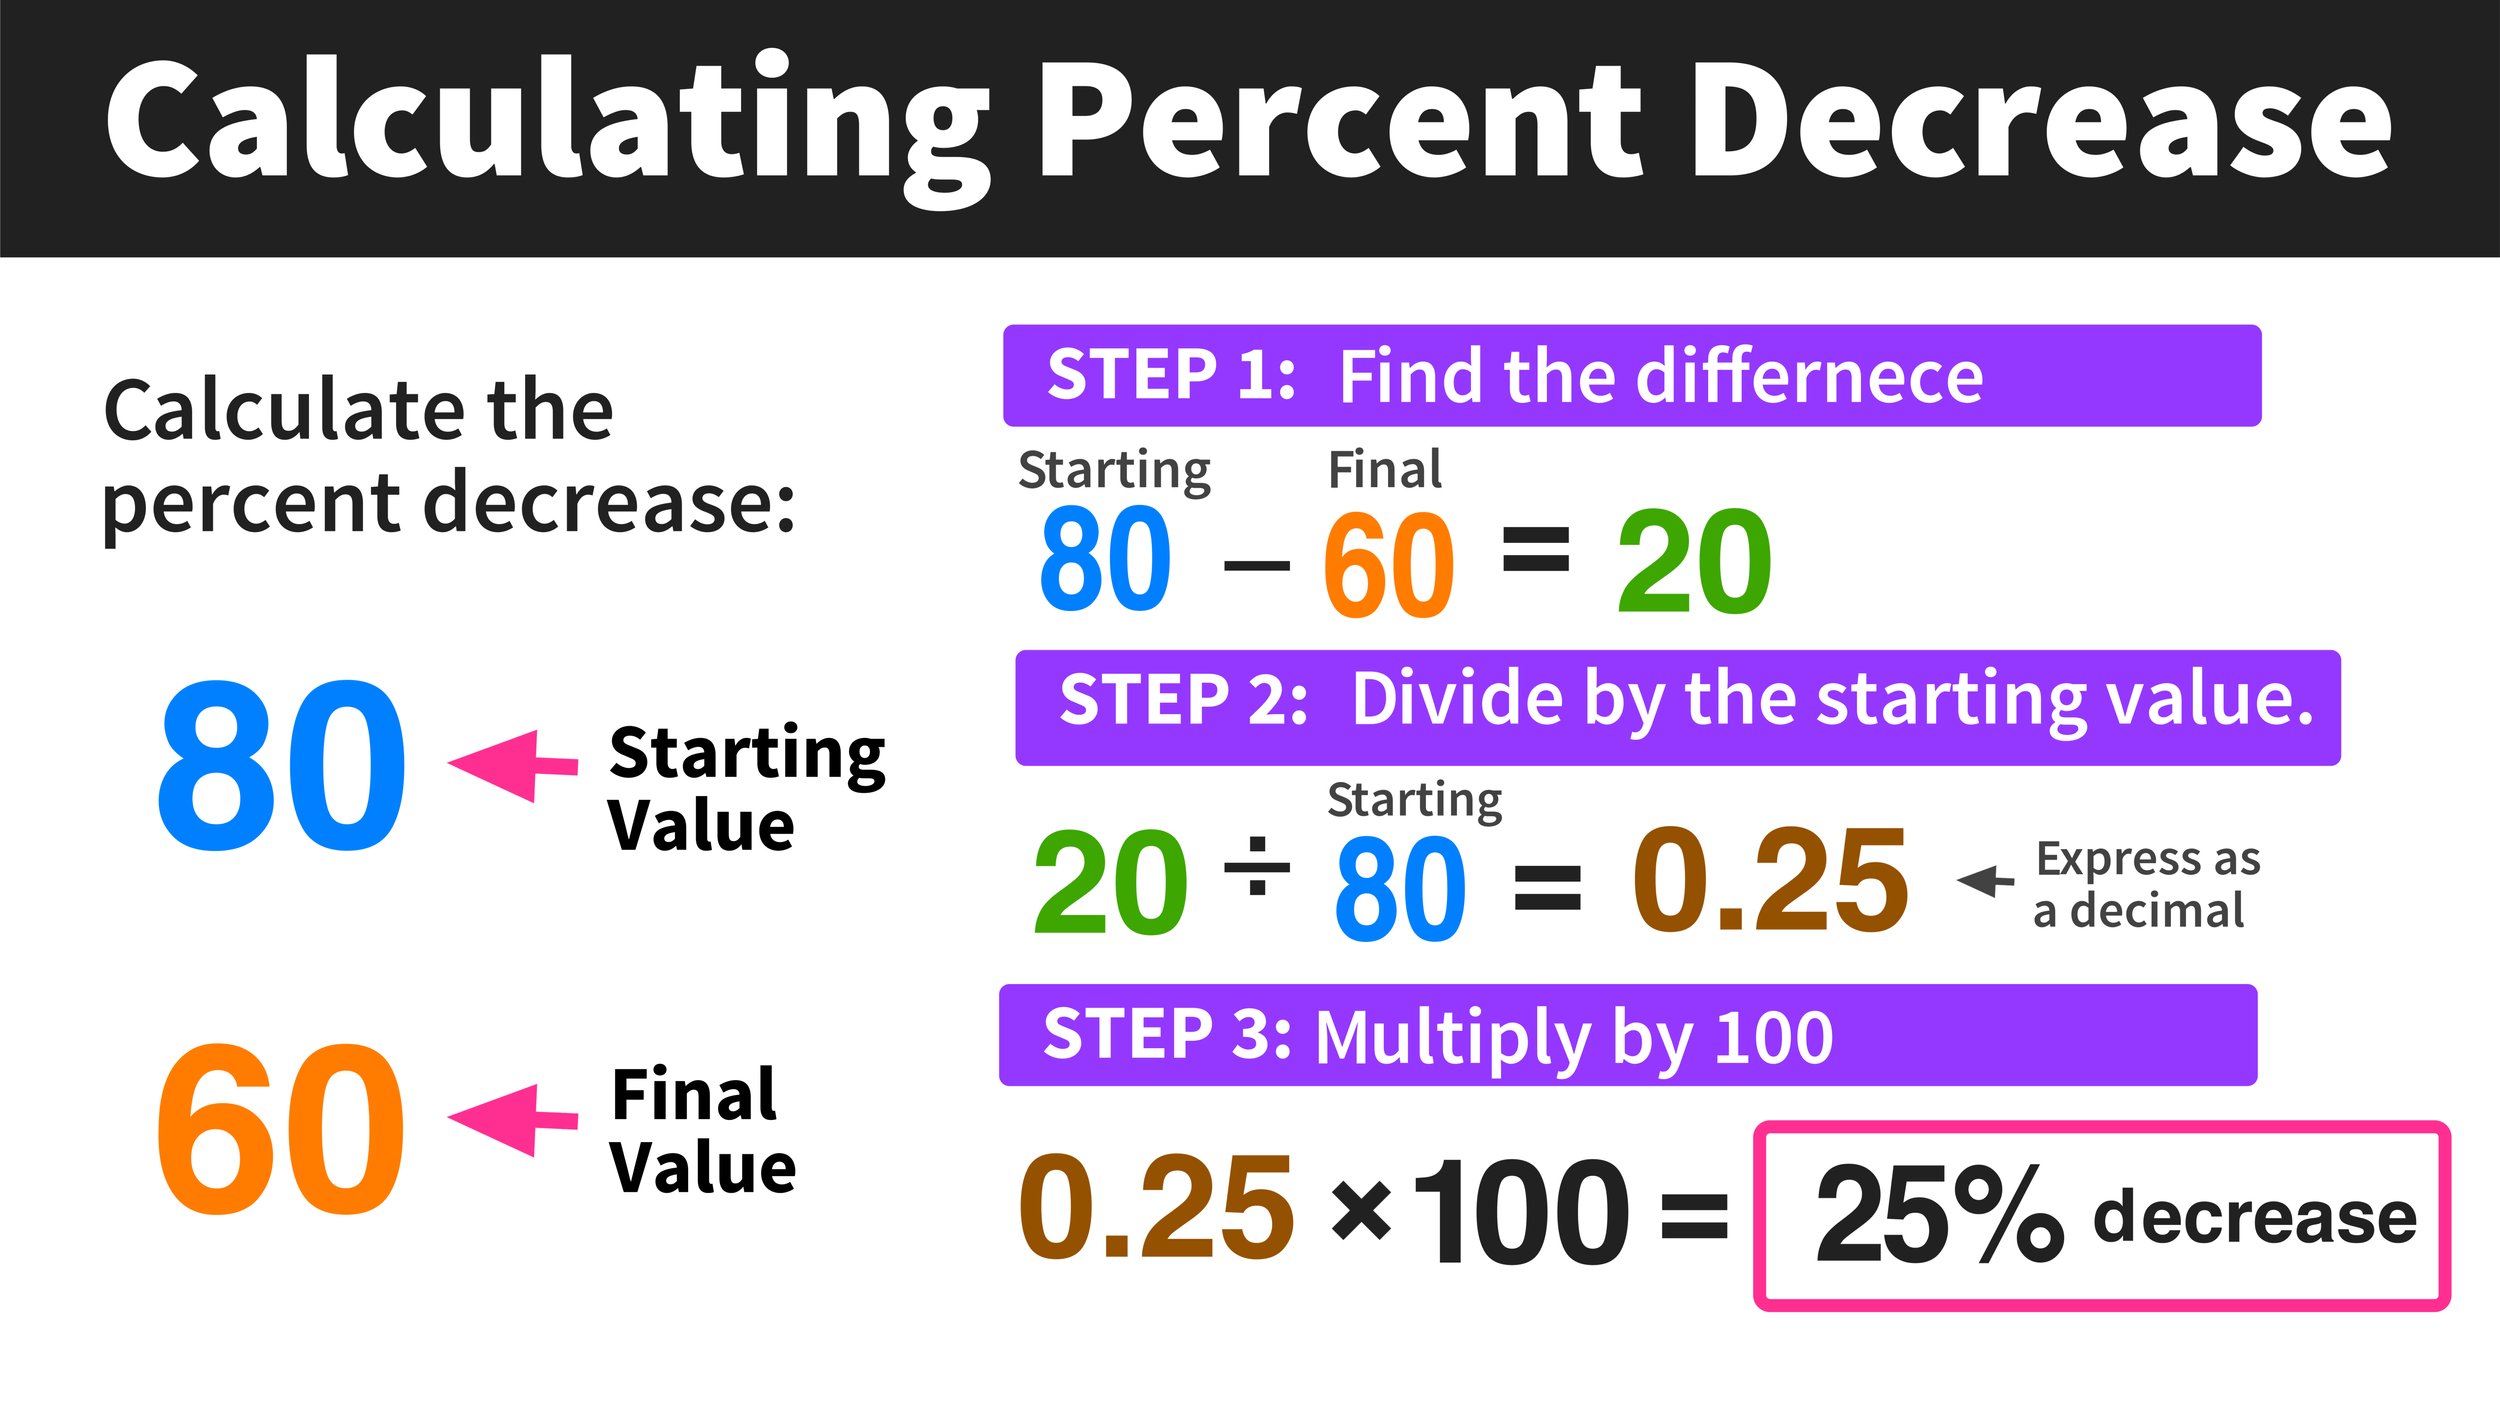
  • Percent Decrease means that the final value is smaller than the starting value. Final Value < Starting Value

Note that percent change will be expressed as a number with a percentage (%) symbol attached to it.

As for identifying the starting value and the final value, simply look for the first value that is given and the second value that is given (percent change problems will always involve two values).

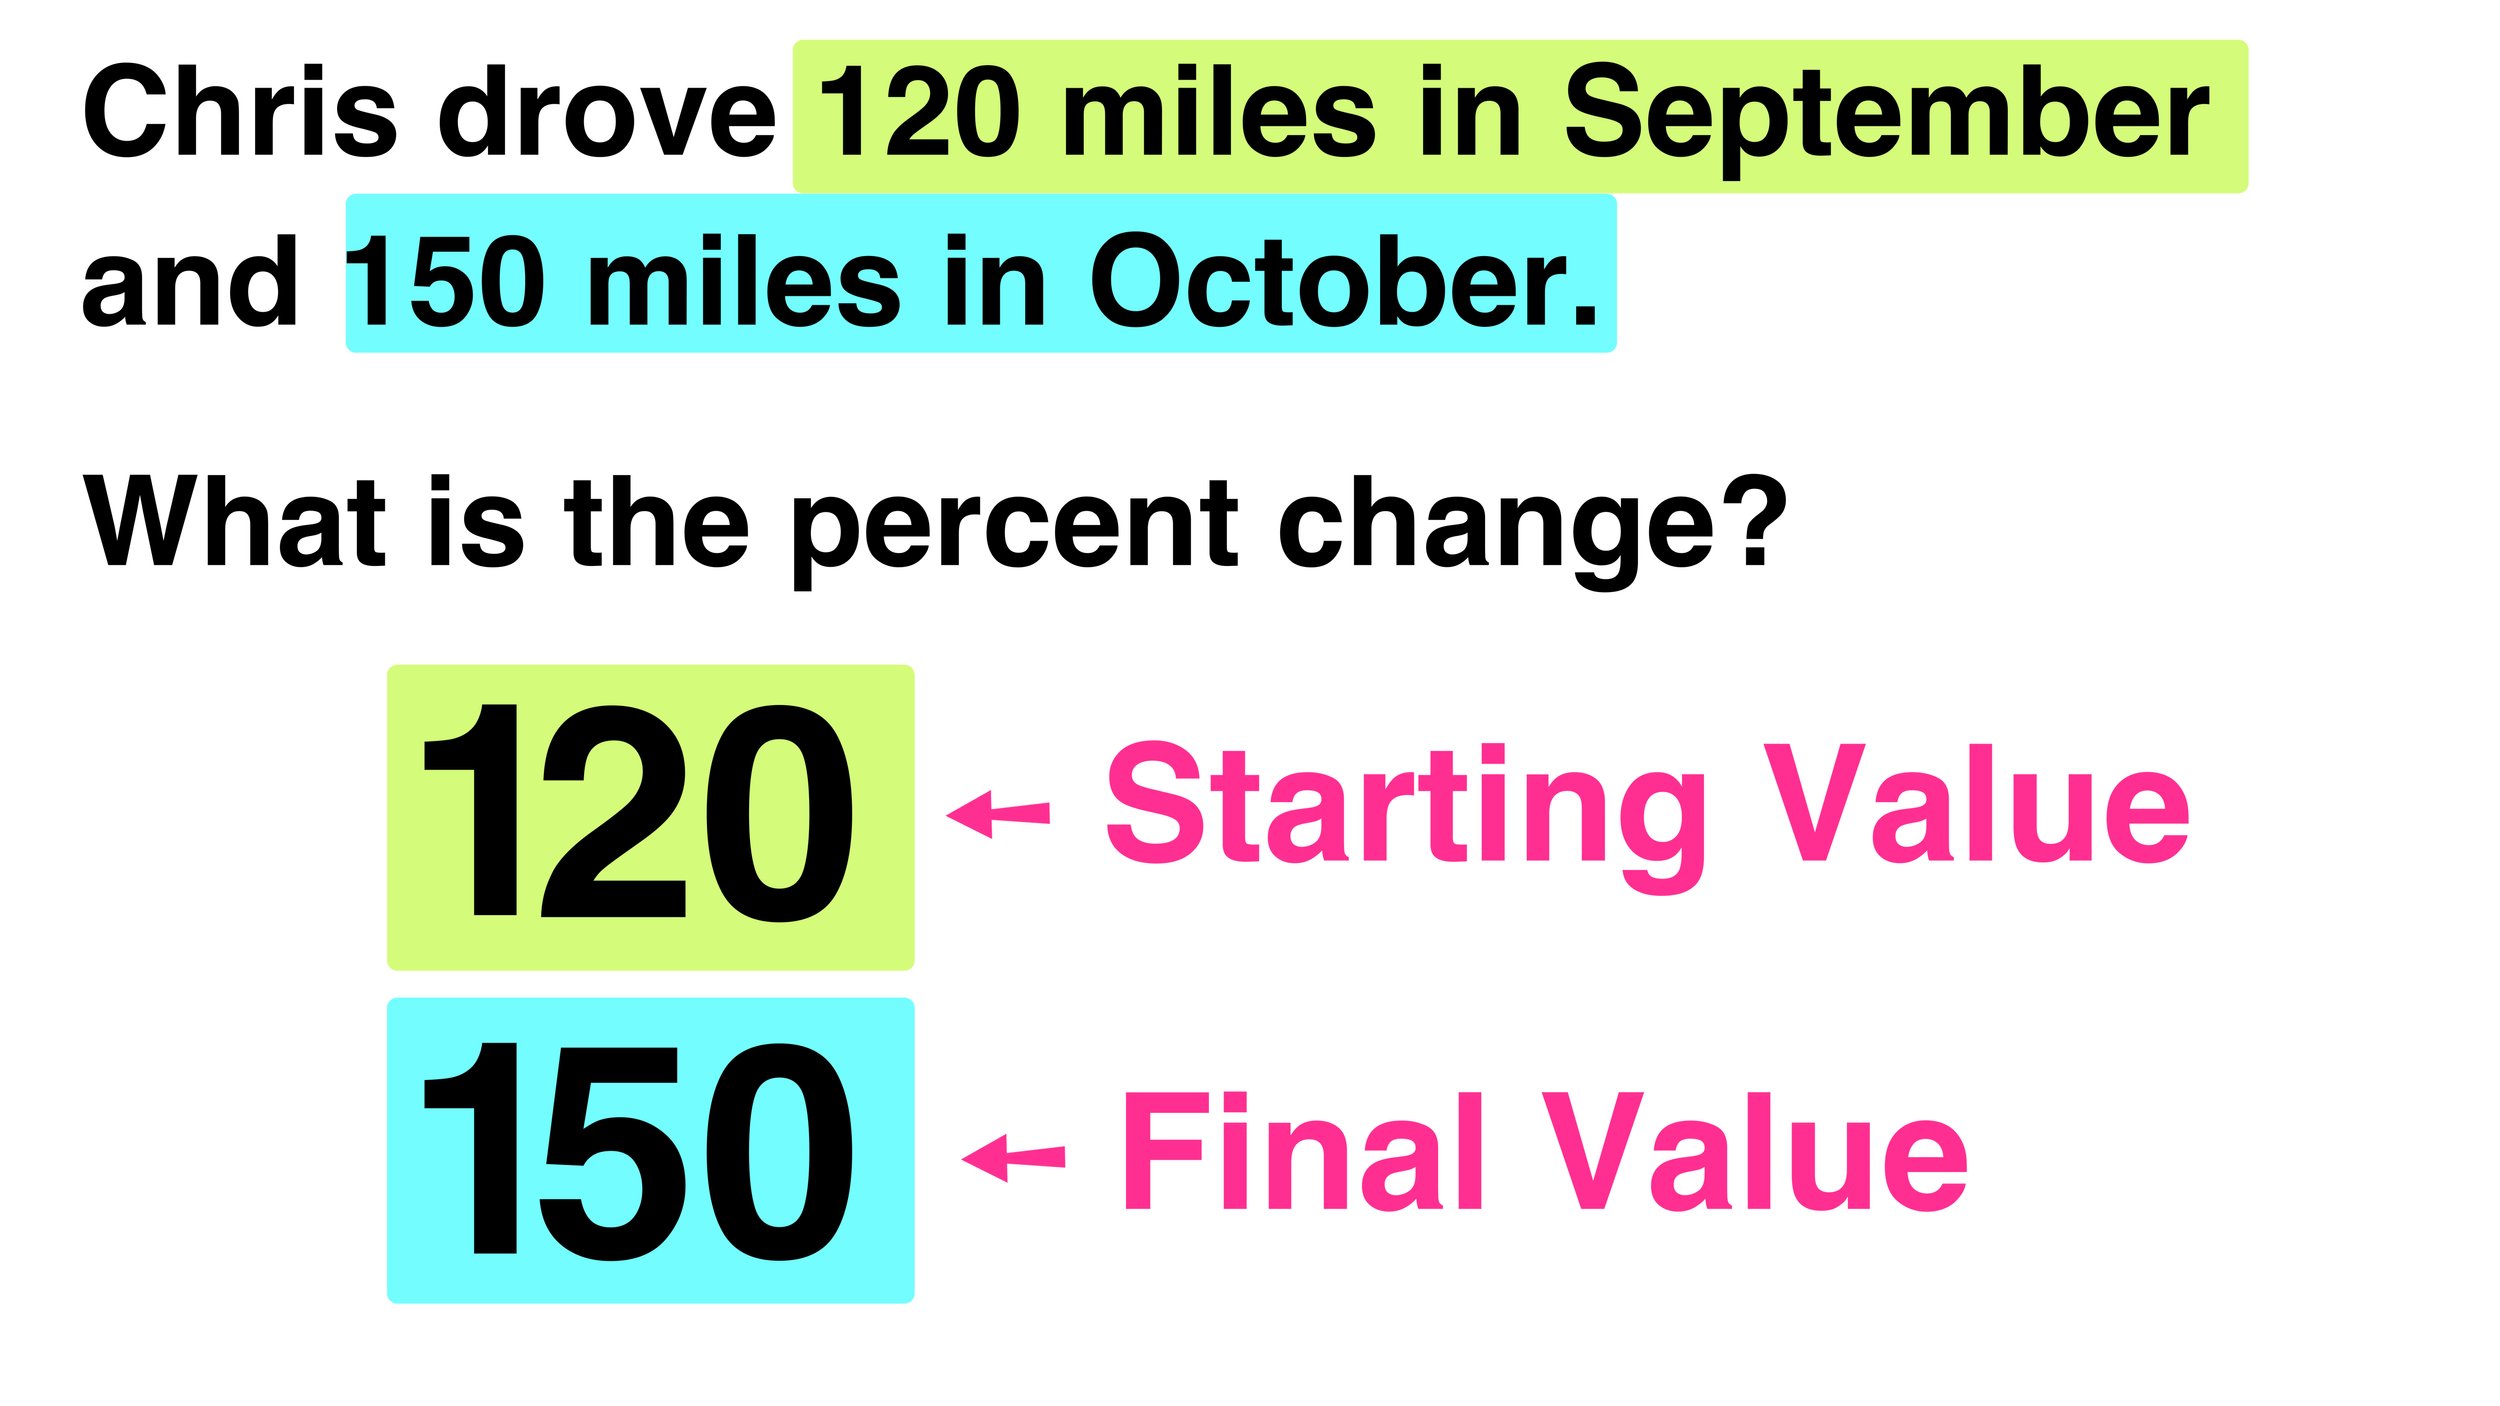
For example, if Chris drove 120 miles in September and 150 miles in October, and you wanted to calculate the percent change in miles driven between the two months, you would start by identifying that the starting value is 120 and the final value is 150.


Simple enough? If not, please review the previous section again as being able to correctly identify the starting value and the final value is critical for finding the solution to percent change math problems.

Calculating Percent Change

Are you ready to learn how to calculate percent change by apply our easy three-step process?

For our first example, we will continue with the scenario involving Chris and his monthly driving mileage totals.

Calculating Percent Change Example #1

In our first example, we will calculate the percent change for the following situation:

Chris drove 120 miles in September and 150 miles in October. What is the percent change in miles driven between the two months?

Remember that you already figured out that the starting value is 120 and the final value is 150.

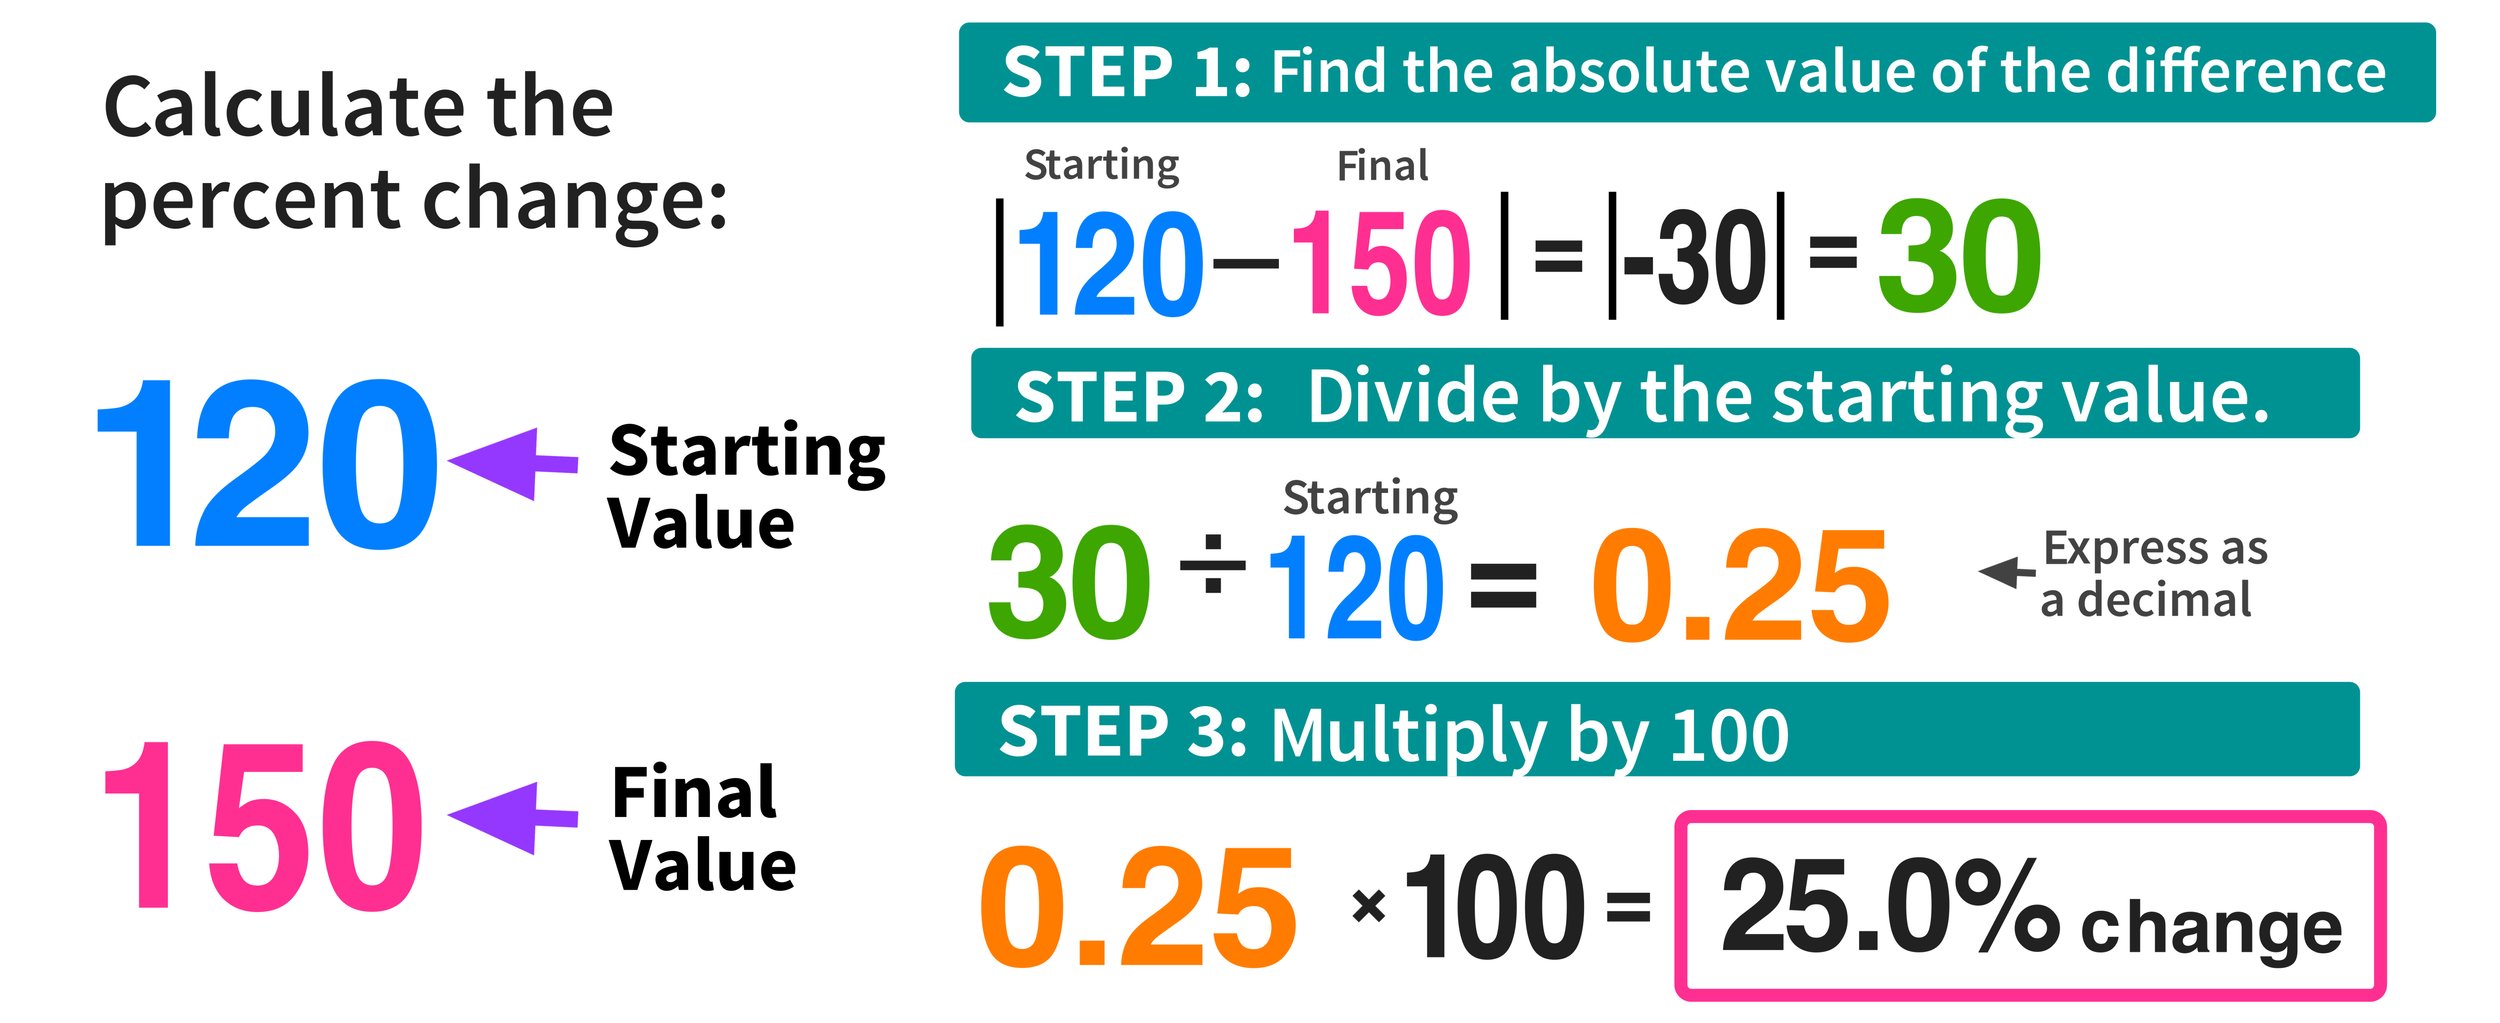
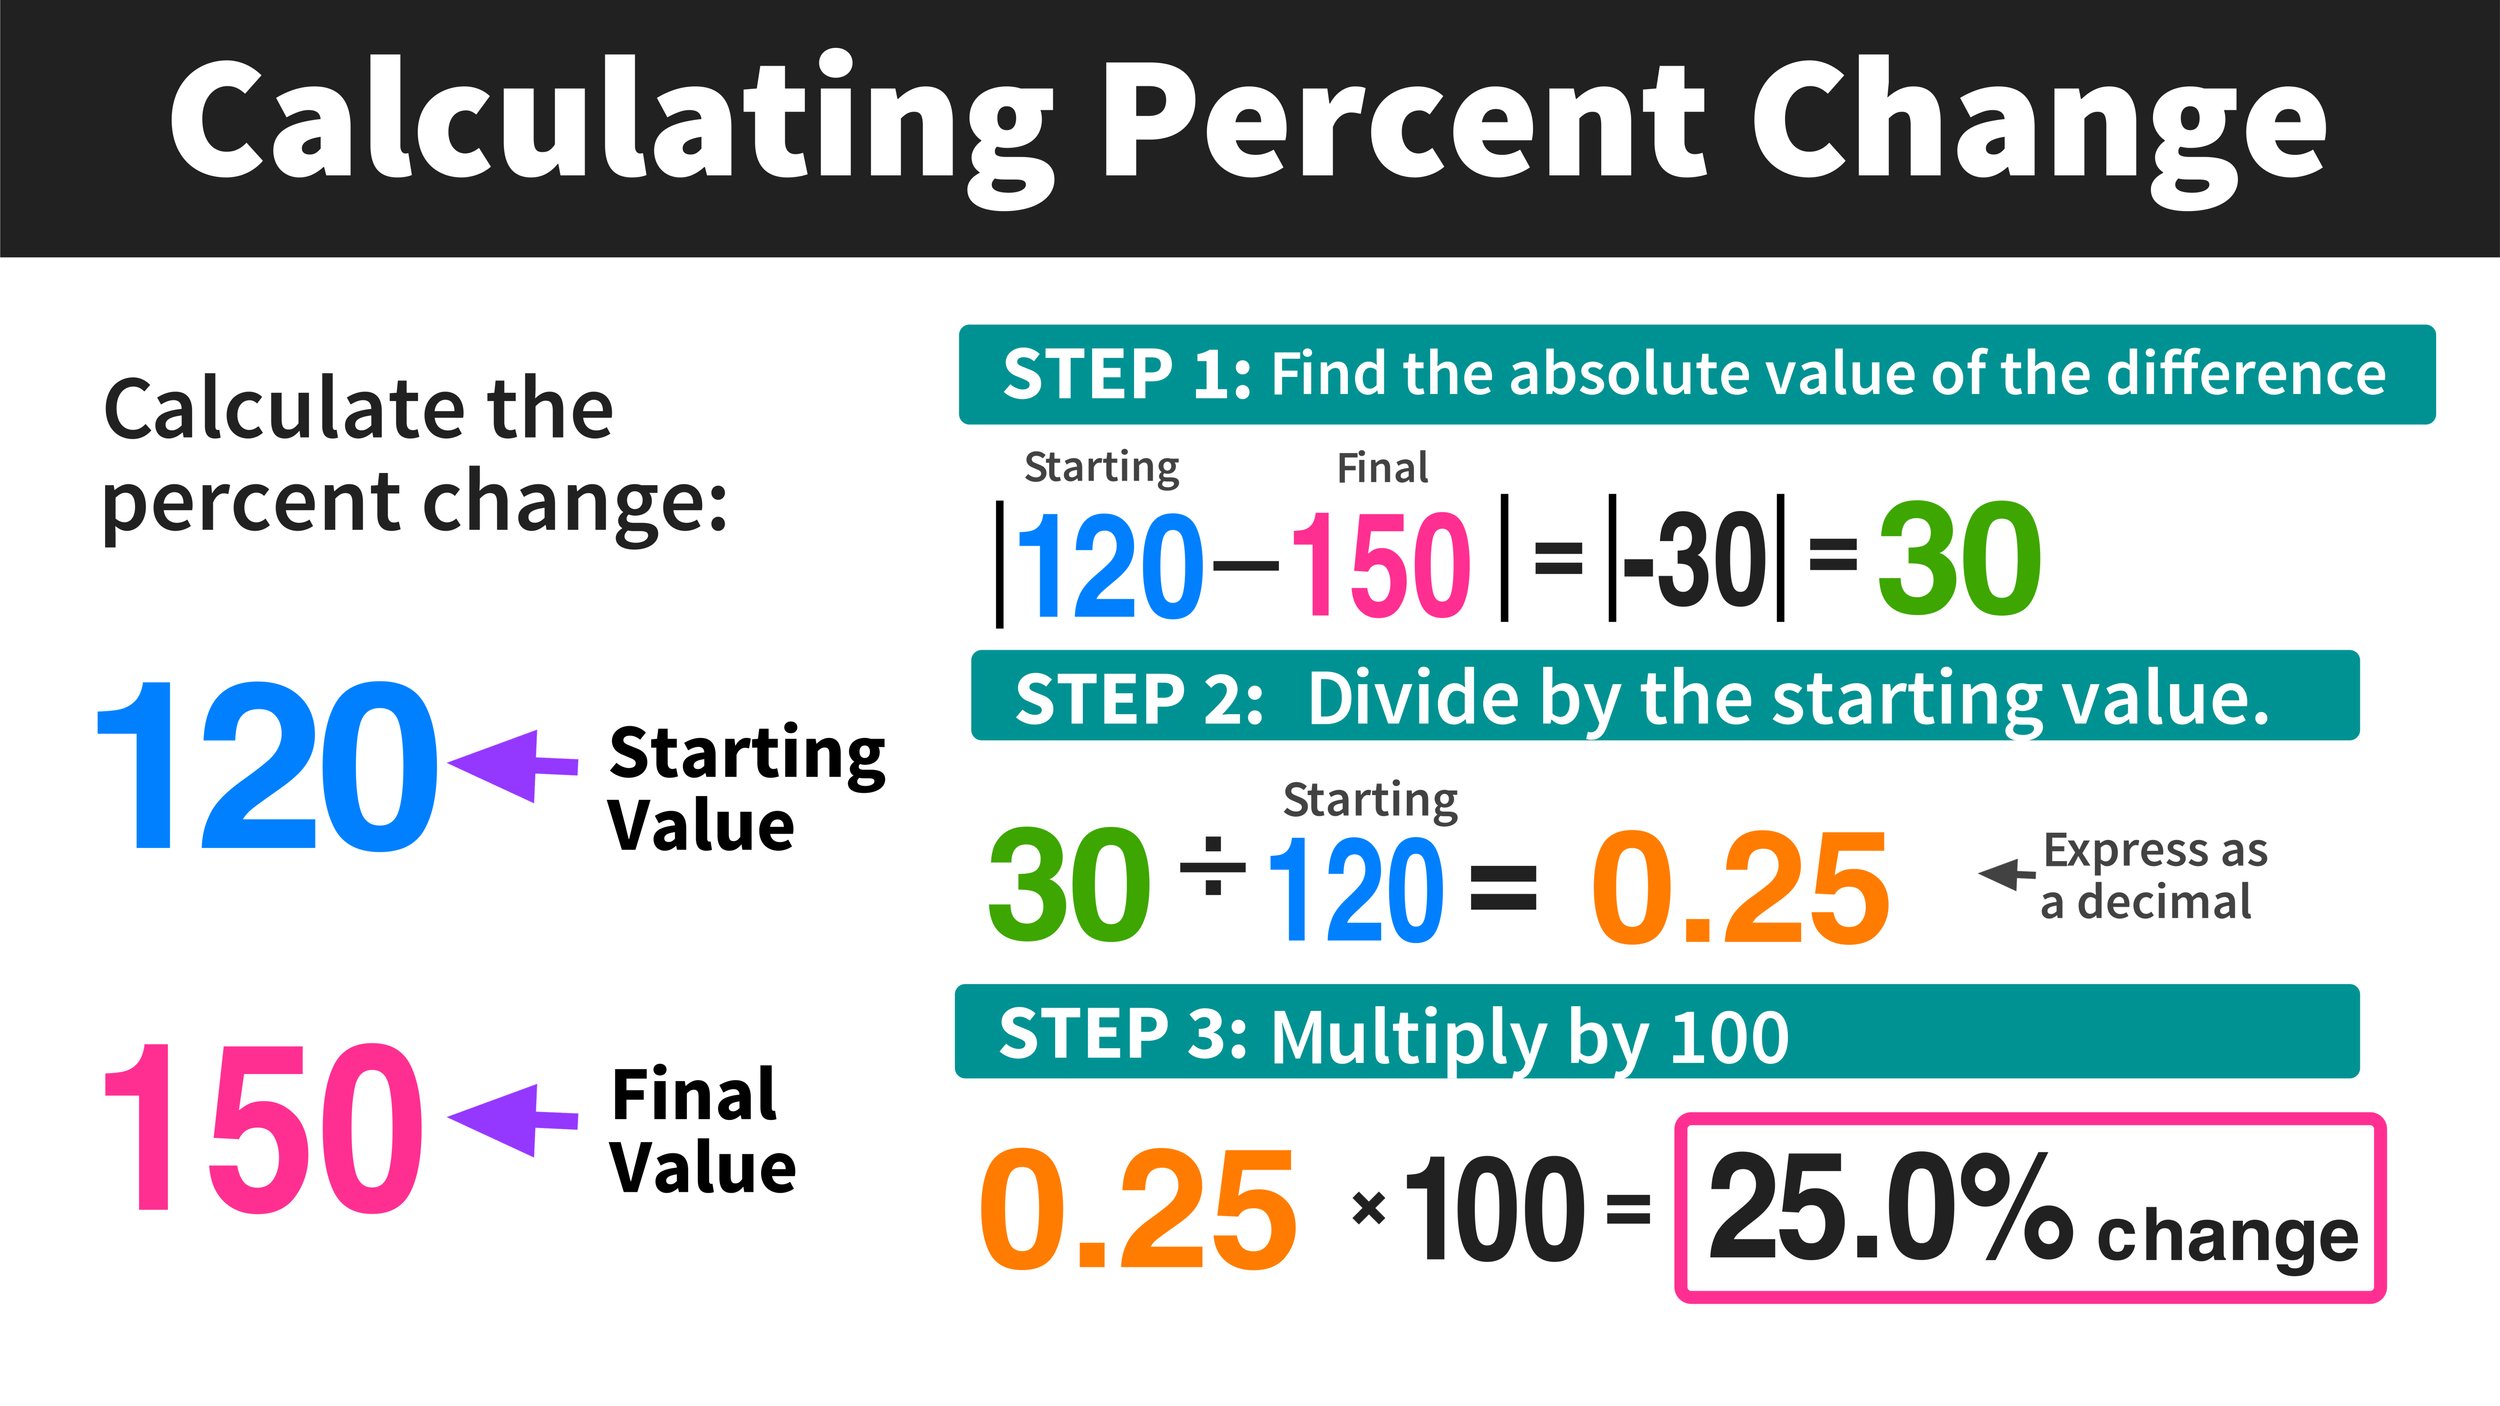
Now, you are ready to apply the three-step process to calculating percent change. Here is a preview of how it will work:


Step 1: Find the absolute value of the difference.

To perform step one, simply take the absolute value of the difference of the starting value and the final value.

  • | Starting Value - Final Value | = ?

In this example:

  • | 120 - 150 | = | -30 | = 30

Again, since absolute value is involved, the end result of step 1 will always be a positive number.

Step 2: Divide the difference by the starting value.

The second step is to take your result from step 1 (30 in this example) and divide it by the starting value (120 in this example) as follows:

  • 30/120 = 0.25

For the second step, you will always express your result as decimal (never as a fraction). Otherwise, you will not be able to perform the third and final step.

Step 3: Multiply by 100

The last step is easy and straightforward: take your decimal result from step 2 and multiply it by 100, then express your final result using a % symbol as follows:

  • 0.25 x 100 = 25.0%

Final Answer: 25% Change (or 25% Increase)

Note that this final answer can also be considered a percent increase since the final value was larger than the starting value (the number of miles driven increased over time).

That’s all there is to it! Applying the three-step process allows you to conclude that there was a 25% change in miles driven between September and October.

Now, let's take a look at another calculating percent change example problem where you will gain more practice applying the three-step process.


Looking for a free Percent Change Calculator?

If you need a faster way to calculate the percent change between two numbers, check out our free Percent Change Calculator tool, which lets you input the starting and final values to get an instant answer!

Click here to access our free Percent Change Calculator for students


Calculating Percent Increase Example #2

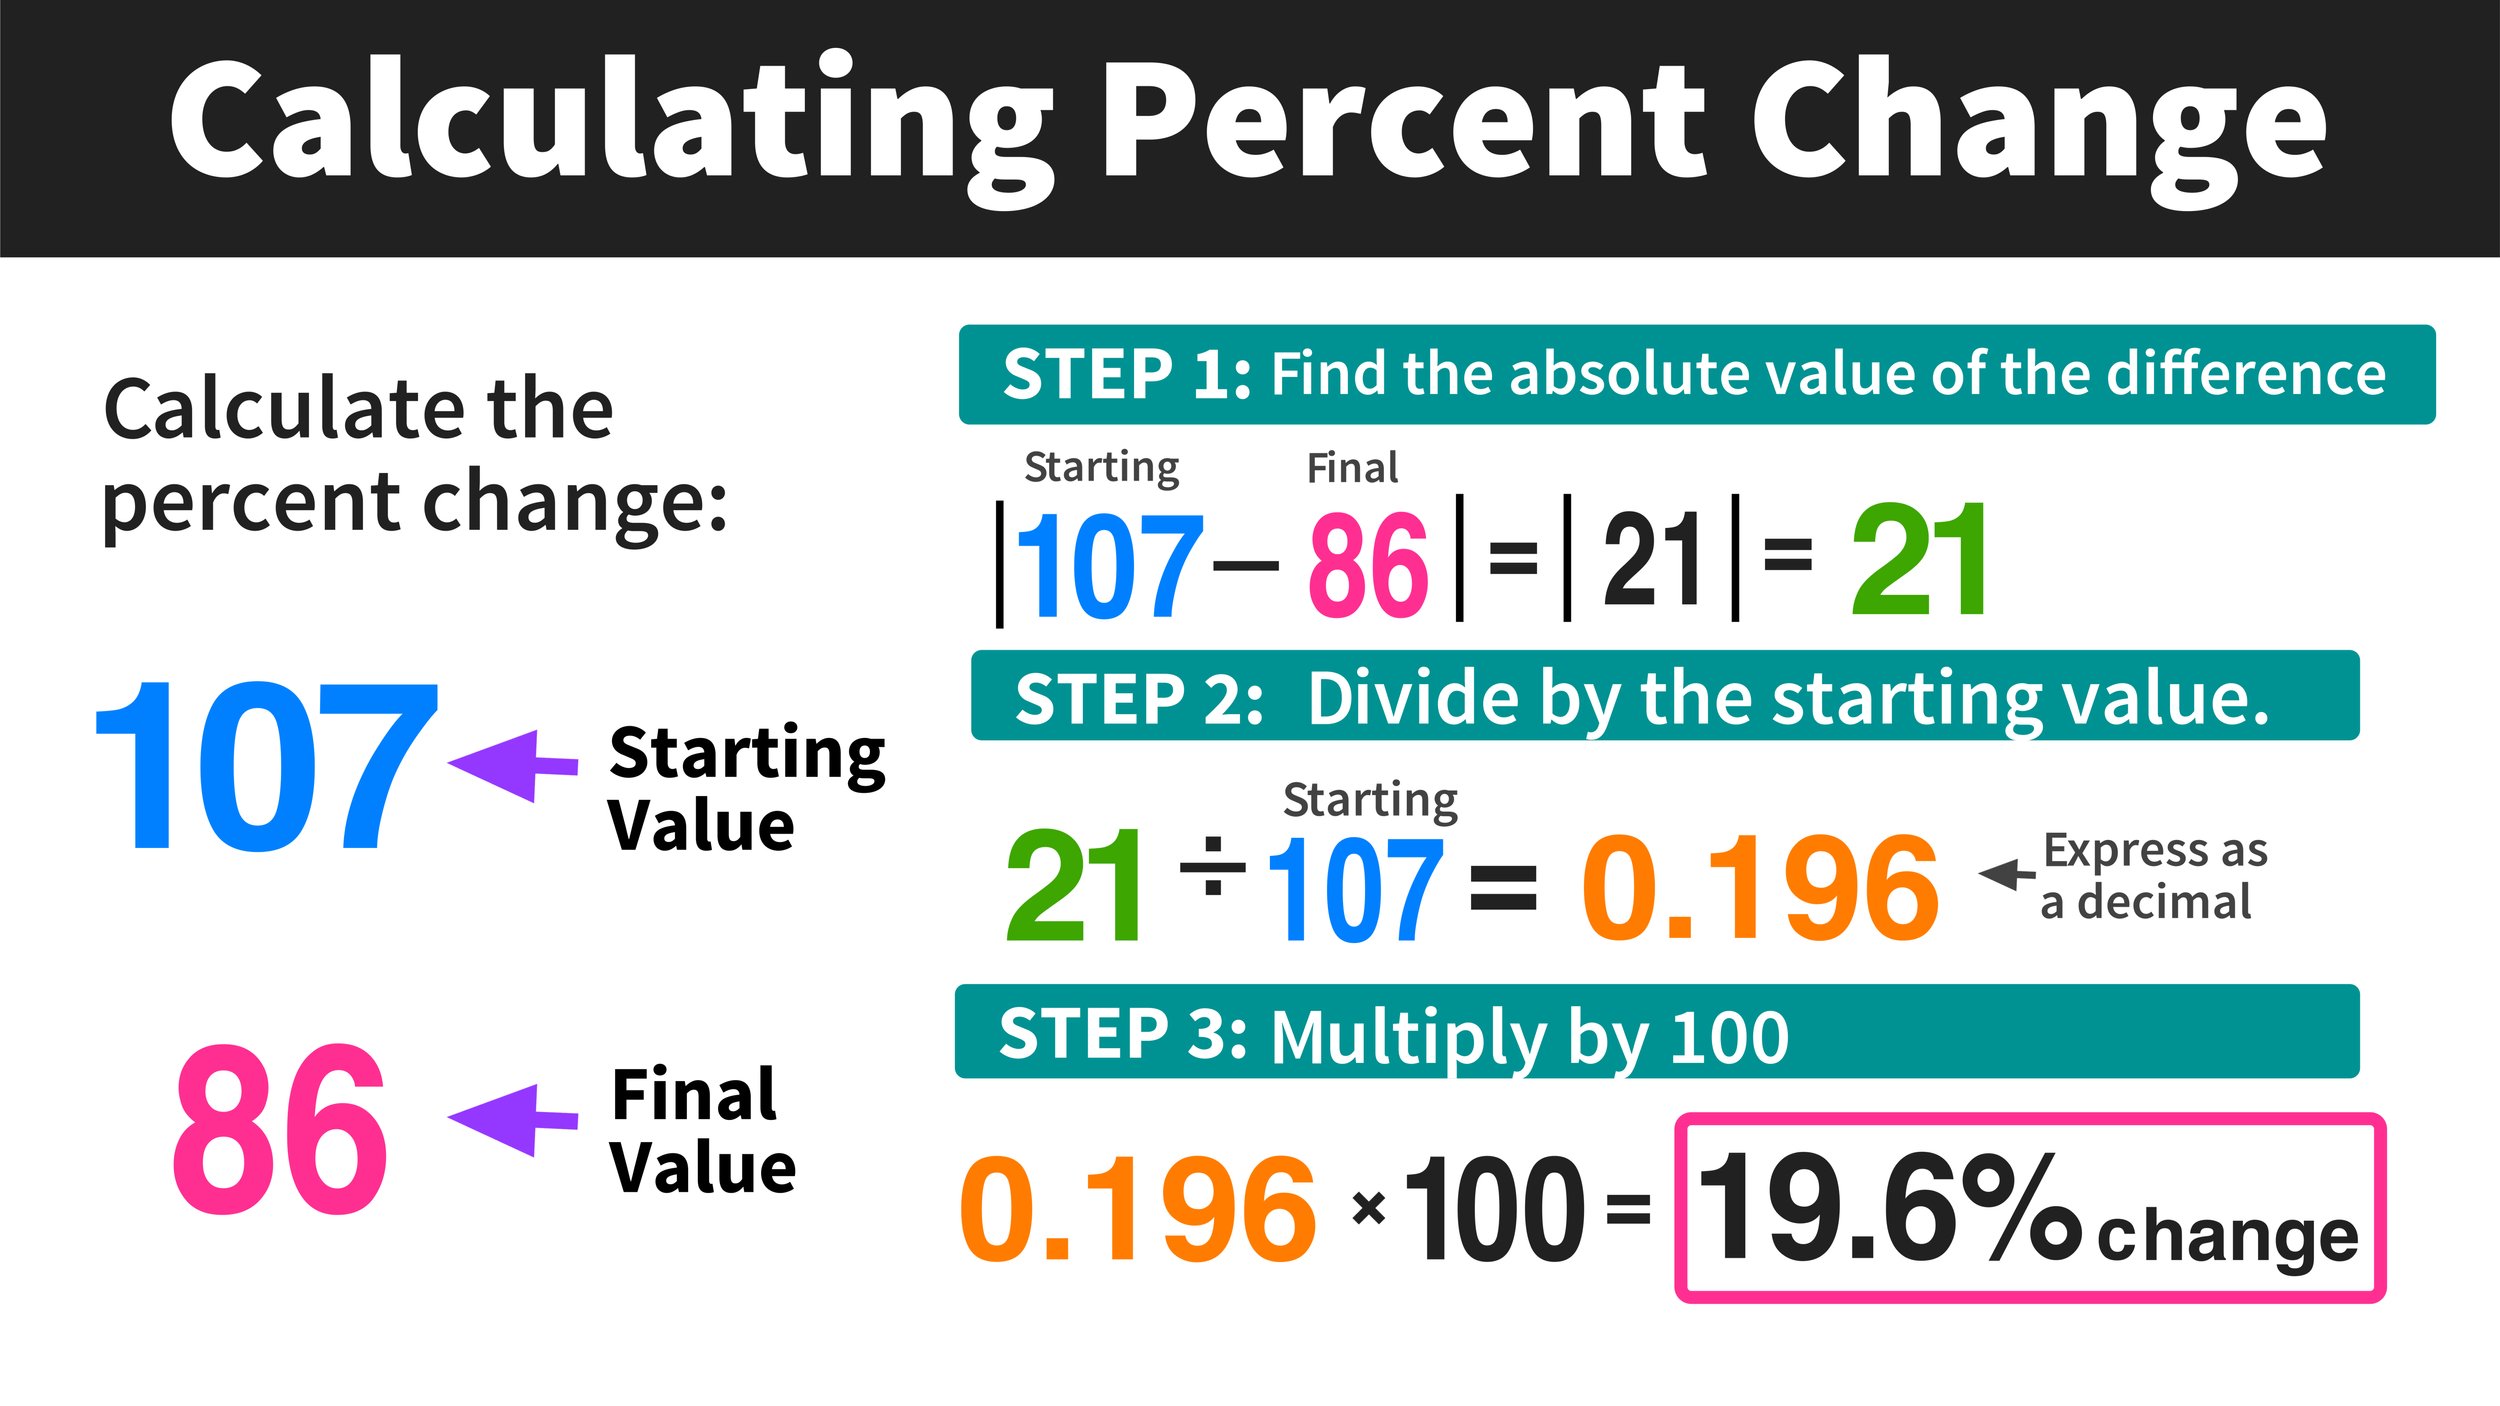
Last semester, Ariana spent a total of 107 hours studying for exams. This semester, she spent a total of 86 hours studying for exams. What was the percent change in the total number of hours she spent studying between last semester and this semester?

Let’s start by identifying the starting value and the final value:

  • Starting Value: 107

  • Final Value: 86

Step 1: Find the absolute value of the difference.

Just like Example #1, start by finding the absolute value of the difference of the starting value and the final value.

  • | 107 - 86 | = | 21 | = 21

Step 2: Divide the difference by the starting value.

The next step is to take your result from step 1 (21 in this example) and divide it by the starting value (107 in this example) as follows:

  • 21/107 = 0.1962616822… ≈ 0.196

Remember to express your result as decimal!

Step 3: Multiply by 100

Finally, take your decimal result from step 2 and multiply it by 100, then express your final result using a % symbol as follows:

  • 0.196 x 100 = 19.6%

Final Answer: 19.6% Change (or 19.6% Decrease)

Note that this final answer can also be considered a percent decrease since the final value was smaller than the starting value (the number of hours spent studying decreased over time).

All done! You have concluded that there was a 19.6% change in the total hours Ariana spent studying between last semester and this semester.


Now, let’s gain some more experience using the three-step process for calculating percent change by working through one final example.


Calculating Percent Decrease Example #3

In 2023, 395 students attended the Loha High School Dance. In 2024, 861 students attended the Loha High School Dance. What was the percent change in the number of students who attended the Loha High School Dance between 2023 and 2024?

We will start example #3 the same as the previous two examples, by identifying the starting value and the final value:

  • Starting Value: 395

  • Final Value: 861

 Just like the last two examples, you can solve this problem by following the three-step process:

Step 1: Find the absolute value of the difference.

Start by finding the absolute value of the difference of the starting value and the final value.

  • | 395 - 861 | = | -466 | = 466

Step 2: Divide the difference by the starting value.

The next step is to take your result from step 1 (466 in this example) and divide it by the starting value (395 in this example) as follows:

  • 466/395 = 1.179746835… ≈ 1.18

Step 3: Multiply by 100

Finally, take your decimal result from step 2 and multiply it by 100, then express your final result using a % symbol as follows:

  • 1.18 x 100 = 118.0%

Final Answer: 118% Change (or 118% Increase)

Note that this final answer can also be considered a percent increase since the final value was larger than the starting value (the number students in attendance increased over time).

Also note that it is totally fine to have an end result that is greater than 100%. In this case, a 118% increase means that the number of students in attendance more than doubled!


After working through three percent change examples, you should be feeling more confident in your ability to solve percent change problems using the three-step process. However, I highly recommend working through the examples again to further solidify your understanding so that you are successful on problems.

Conclusion: Calculating Percent Change

You can calculate percent change using a given starting value and final value by applying the following 3-step process:

Step 1: Find the absolute value of the difference between the starting value and the final value.

Step 2: Divide the result from Step 1 by the starting value and always express the result in decimal form.

Step 3: Multiply the result from Step 2 by 100 and express your final answer as a percentage (%).


What about Calculating Percent Increase and Percent Decrease?

Learn how to calculate a percent increase or a percent decrease between two numbers using our free step-by-step guides. Click the links below to get started.


Don’t forget about our Free Percent Change Calculator

Click here to get started using our free Percent Change Calculator


Keep Learning:

Comment