Step-by-Step Guide: How to Convert Percent to Fraction in 3 Easy Steps
Free Step-by-Step Guide: Percent to Fraction in 3 Steps
Are you ready to learn how to turn a percent into a fraction? If so, this free guide on how to convert percent to fraction will teach you everything you need to know about this important math skill. Understanding how to turn a percent into a fraction will help you with solving a variety of math problems related to topics including conversions, discounts, unit rates, and more.
Beyond the classroom, knowing how to make percent to fraction conversions will help you with real-world scenarios including sales tax, data and statistics, and shopping. So, whether you are a math student or just someone who wants to strength their overall number sense, this guide will teach you and important and useful skill.
You can use the quick links below to jump to any section of this guide, or you can work through each section in order (recommended). Let’s get started!
Figure 01: What is the percent to fraction relationship?
Review: Percent to Fraction Key Concepts
Before we learn how to turn a percent into a fraction, let’s complete a short view of some key concepts and vocabulary terms related to percents and fractions.
For starters, percents and fractions share a relationship in that they are two different ways of expressing the same thing: a part related to a whole.
In terms of parts and wholes, a fraction, like 1/2, includes a numerator (top number that represents the part) and a denominator (bottom number that represents the whole.). So, 1/2 means that a whole is divided into two equal parts, and you have one of those parts.
On the other hand, a percent, like 50%, means represents a fraction where the denominator, or whole, is always equal to 100.
A fraction and a percent are two different ways of expressing the same thing.
So, 1/2 is equivalent to 50% (as shown in Figure 01 above).
But what if we are given a percent and had to turn it into a fraction?
Below, you will learn a simple 3-step strategy for how to turn a percent into a fraction that you can use to convert any percent to a fraction quickly and accurately.
Figure 02: Percent to Fraction: Why does 25% equal 1/4?
How to Turn a Percent into a Fraction in 3 Easy Steps
Now that you understand the relationship between percents and fractions, you are ready to learn how to turn a percent into a fraction in 3 simple steps:
How to Turn Percent to Fraction
Step One: Rewrite the given percent as a number without the % sign
Step Two: Rewrite the result as a fraction with a denominator of 100.
Step Three: Simplify the fraction (if possible).
Let’s say that we wanted to convert 25% to a fraction, we could use these three steps to solve the problem as follows:
Step One: Rewrite the number without a % sign:
25% → 25
Step Two: Rewrite the result as a fraction with a denominator of 100:
25 → 25/100
Step Three: Simplify (if possible):
You can simplify a fraction by seeing if you can find a common factor shared by both the numerator and the denominator. If they share more than one common factor, you must choose the greatest common factor.
Since 25 and 100 are both divisible by 25, we can simplify 25/100 as follows:
25/100 → (25÷25) / (100÷25) = 1/4
Final Answer: 25% = 1/4
So, 25% is equivalent to the fraction 1/4.
The entire step-by-step process for showing that 25% equals 1/4 is shown in Figure 03 below.
Figure 03: How to convert percent to fraction in 3 steps.
Percent to Fraction: Example #1
Problem: Convert 75% to a fraction.
Now we are ready to use the 3-step method for converting percent to fraction to solve a few practice problems.
Step One: Rewrite without the percent sign:
75% → 75
Step Two: Rewrite the result from Step One as a fraction with a denominator of 100:
75 → 75/100
Step Three: Simplify (if possible):
To complete this final step, we have to see if 75/100 can be simplified (i.e. reduced). Since 75 and 100 are both divisible by 25, we can simplify the fraction as follows:
75/100 → (75÷25) / (100÷25) = 3/4
Final Answer: 75% = 3/4
Figure 04 below shows how we solved this first example of how to turn a percent into a fraction.
Figure 04: How to convert percent to fraction.
Percent to Fraction: Example #2
Problem: Convert 12% to a fraction.
For our next example, we can again use our 3-step strategy to convert it to fraction as follows:
Step One: Rewrite without the %:
12% → 12
Step Two: Rewrite the result from as a fraction over 100
12 → 12/100
Step Three: Simplify (if possible):
After completing the second step, we are left with the fraction 12/100. Since both 12 and 100 are divisible by 4, we can simplify the fraction as follows:
12/100 → (12÷4) / (100÷4) = 3/25
Final Answer: 12% = 3/25
Figure 05 below illustrates how we showed that 12% equals 3/25 in 3 steps.
Figure 05: How to turn a percent into a fraction example #2 solved.
Fraction to Percent: Example #3
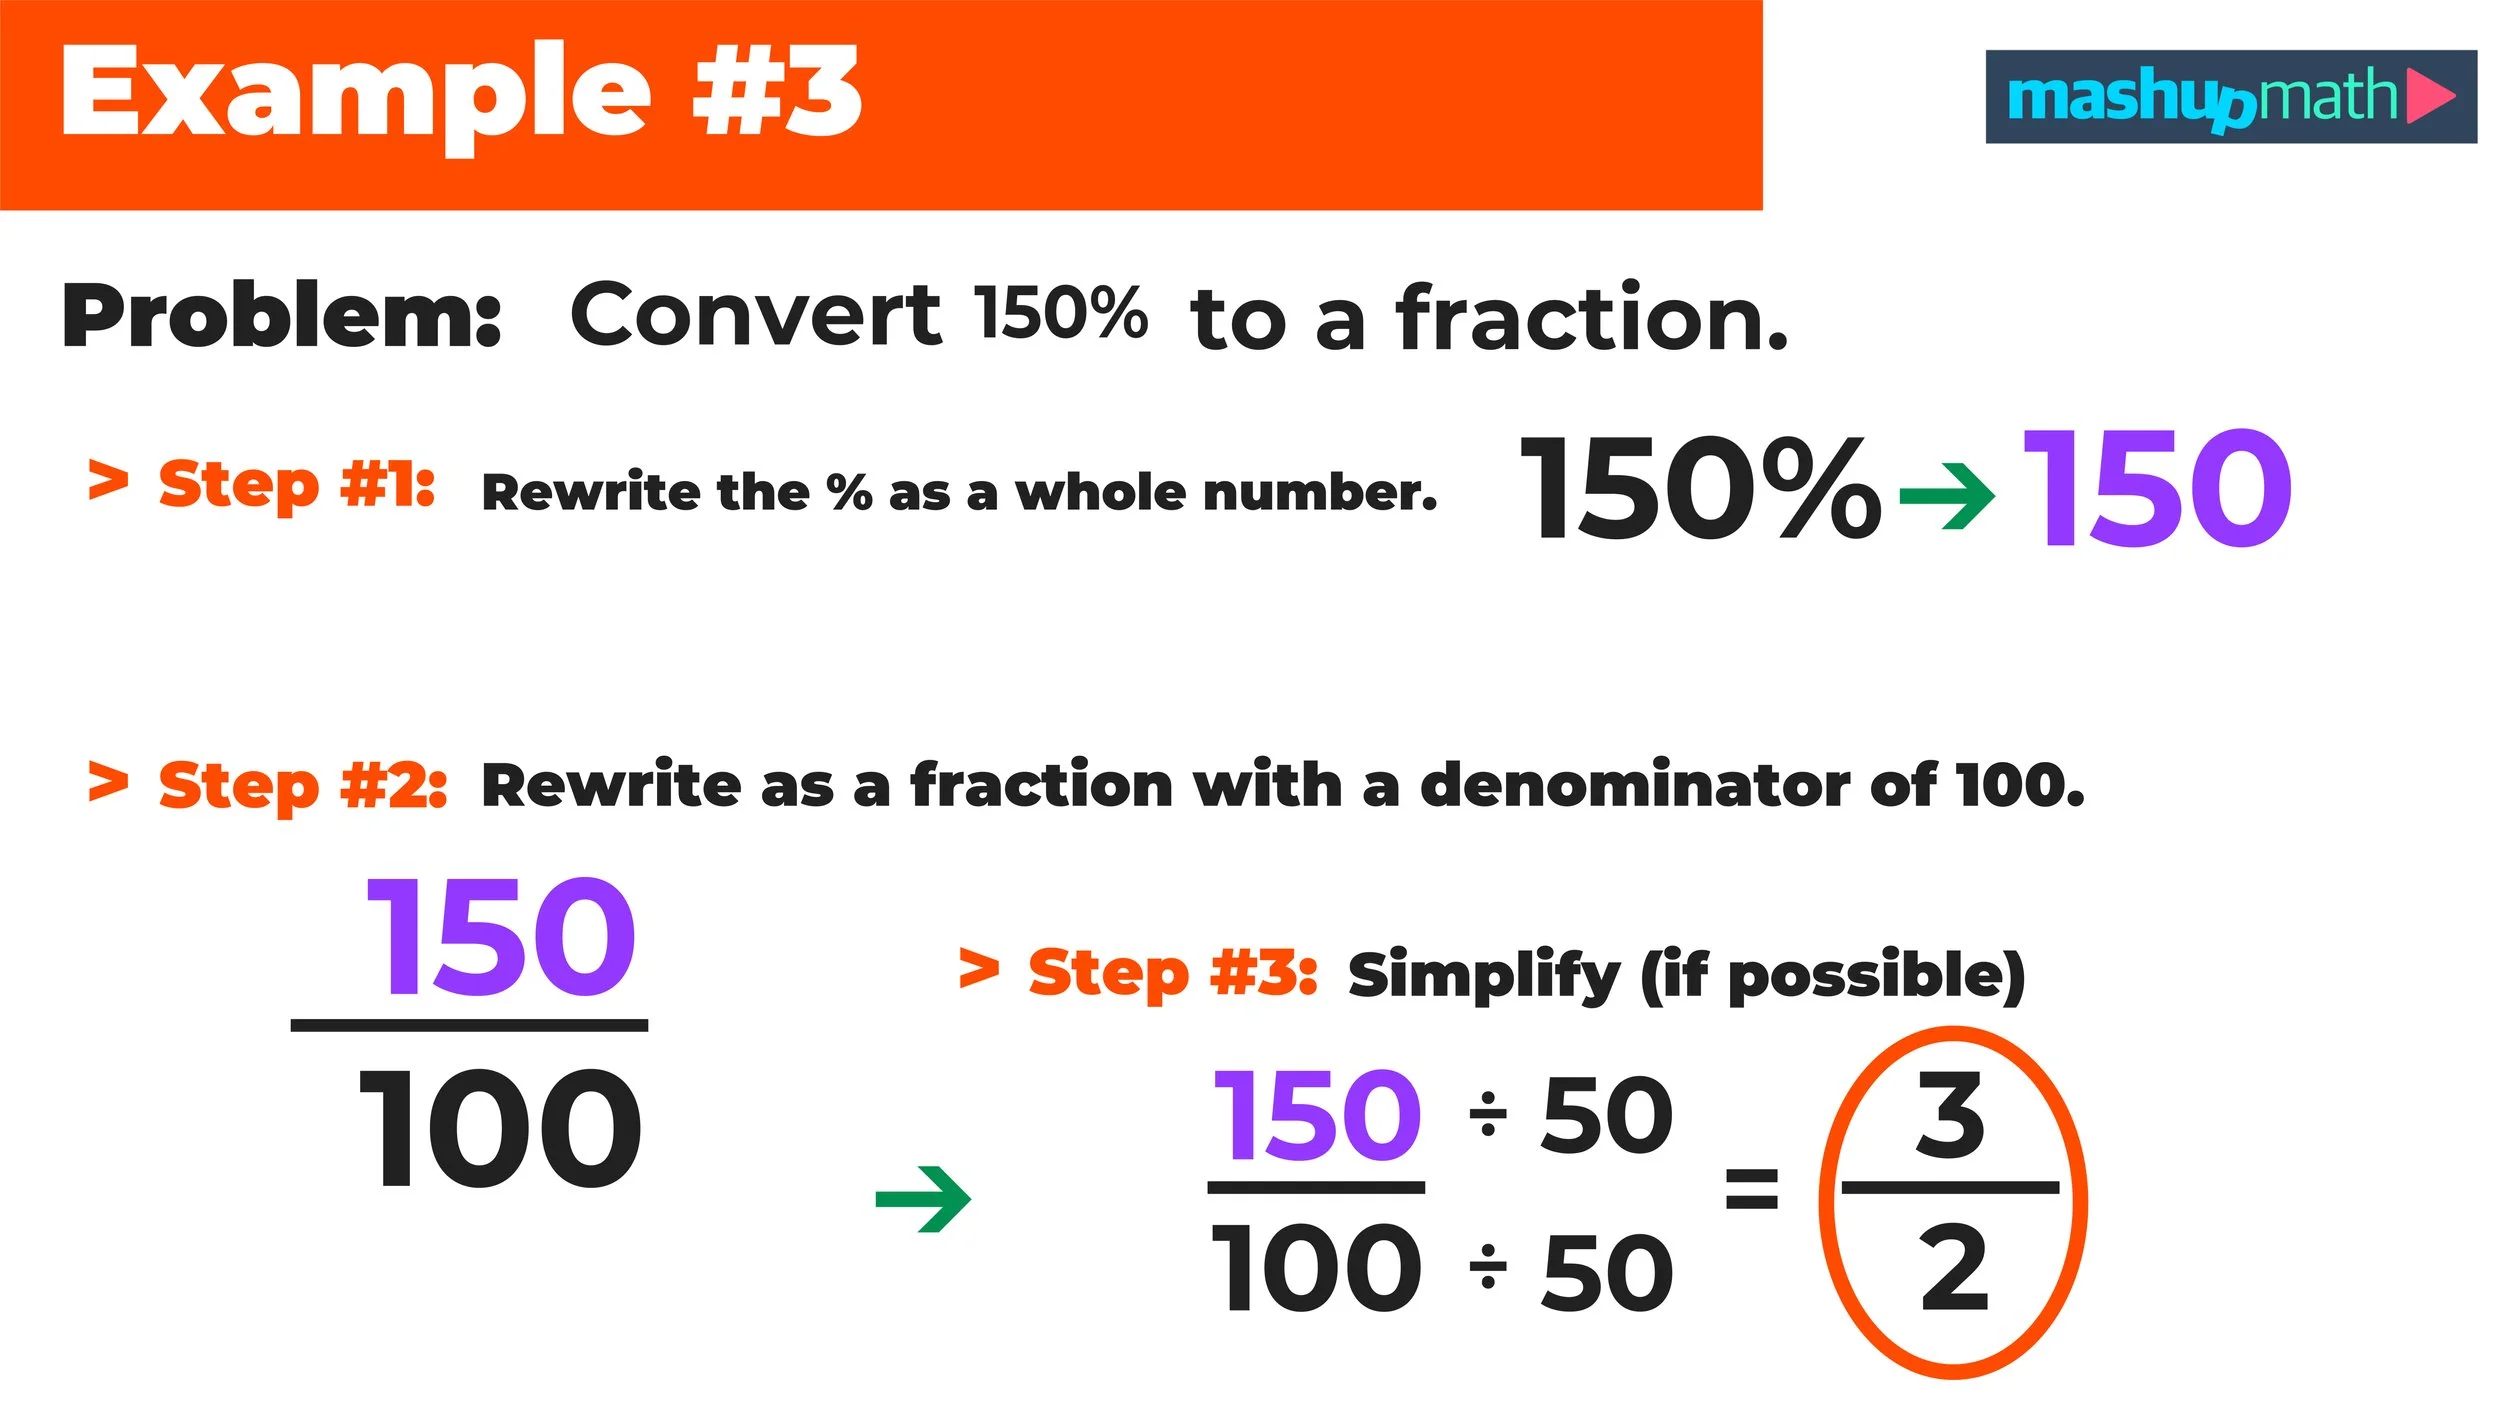
Problem: Convert 150% to a fraction.
For this third and final example, we have a percentage (150%) that is greater than 100. However, we can still convert this percent to a fraction by using our 3-step strategy as follows:
Step One: Rewrite 150% the percent sign:
150% → 150
Step Two: Rewrite 150 as a fraction with a denominator of 100
150 → 150/100
Step Three: Simplify (if possible):
Can we simplify the fraction 150/100? Since both 150 and 100 share a greatest common factor of 50, we can simplify this fraction as follows:
150/100 → (150÷50) / (100÷50) = 3/2
Final Answer: 150% = 3/2
So, 150% is equivalent to the improper fraction 3/2 (as shown in Figure 06 below).
Figure 06: How to convert percent to fraction in 3 steps.
Step-by-Step Guide: How to Convert Fraction to Percent in 2 Easy Steps
Free Step-by-Step Guide: Fraction to Percent in 2 Easy Steps
Knowing how to turn a fraction into a percent is a simple math skill that can help you solve problems in the classroom as well as in the real-world. When you understand how to turn fraction to percent, you can quickly and easily solve problems and make conversions, which is an incredibly useful skill that everyone should learn at some point.
This free guide on turning fraction to percent will teach you how to turn a fraction into a percent by following a simple 2-step method that you can use to solve a variety of math problems involving fractions and percents. To help you to learn this skill, we will work through three example problems of how to make a fraction into a percent, which will give you a great amount of practice and experience with this skill.
While we recommend that you work through each section of our fraction to percent guide, you can use the Table of Contents links below to jump to any section that you choose:
Let’s start off with a quick review of the fraction to percent relationship along with some important math vocabulary related to this topic.
What is the relationship between a fraction and a percent?
In math, fractions and percents are two different ways of expressing the same concept: a part and a whole.
A fraction, like 4/5, means that there is a whole divided into 5 equal parts, and you have 4 of those parts. The part is the numerator (the value above the fraction line), and the whole is the denominator (the value below the fraction line).
A percent, like 80%, means that there is a whole represented by 100%, and you have 80 equal parts of that whole. In other words, a percent is a fraction where the denominator is always 100 (i.e. a percent is the same thing as a fraction, but it is always out of 100). So, the fraction 4/5 can be expressed as a percent by multiplying it by 100 as follows:
4/5 x 100 = 400/5 = 80%
Therefore, we can say that the fraction 4/5 expressed as a percent is 80% (as shown in Figure 01 above).
Understanding the relationship between fractions and percents is key to learning how to turn a fraction into a percent will help you to make fast and accurate conversions between measurements, make comparisons involving data, and solve properties related to topics including sales, taxes, discounts, statistics, and even exam scores.
Figure 02: How to make a fraction into a percent in two steps.
How to Turn a Fraction into a Percent in 2 Easy Steps
Now that we have reviewed the relationship between fractions and percents, let’s learn a simple two-step method for how to make a fraction into a percent:
How to Turn a Fraction into a Percent
Step One: Divide the numerator by the denominator to convert the fraction into a decimal.
Step Two: Multiply the result by 100 and express as a percent using a % sign.
For example, let’s turn the fraction 1/2 into a percent by using this two-step method:
Step One: Start by dividing the numerator by the denominator and express the result as a decimal:
1/2 = 1 ÷ 2 = 0.5
Step Two: Multiply by 100 and express as a percent:
0.5 x 100 = 50 → 50%
So, the fraction 1/2 is equivalent to 50% (as shown in Figure 02 above).
Figure 03: How to convert fraction to percent in two steps.
Fraction to Percent: Example #1
Problem: Convert 3/4 to a percent.
Let’s gain some experience with using our two-step method for how to turn a fraction into a percent by applying it to the fraction 3/4 as follows:
Step One: First, we have to divide the numerator by the denominator to express the fraction in decimal form:
3/4 = 3 ÷ 4 = 0.75
Step Two: Now, multiply the result from the first step by 100 and solve:
0.75 x 100 = 75 → 75%
Final Answer: The fraction 3/4 is equivalent to 75%.
The step-by-step process for solving this first example is shown in Figure 03 above.
Now, let’s go ahead and try another practice problem on how to make a fraction into a percent.
Figure 04: How to turn a fraction into a percent example #2 solved.
Fraction to Percent: Example #2
Problem: Convert 2/5 to a percent.
We can solve this next example using the same two-step method that we used to solve Example #1 as follows:
Step One: Convert the fraction to a decimal by dividing the numerator by the denominator:
2/5 = 2 ÷ 5 = 0.4
Step Two: Multiply the result by 100 and express the answer as a percent (%):
0.4 x 100 = 40 → 40%
Final Answer: 2/5 = 40%
Figure 04 above illustrates how we turned this fraction into a percent in two easy steps.
Are you starting to get the hang of it? Now, let’s work through one more fraction to percent practice problem.
Figure 05: The fraction 7/8 is equal to 87.5%
Fraction to Percent: Example #3
Problem: Convert 7/8 to a percent.
For this third and final example of how to make a fraction into a percent, we want to convert the fraction 7/8 into a percent, and we can use our two-step method to do that.
Step One: Divide the numerator by the denominator and express the answer as a decimal:
7/8 = 7 ÷ 8 = 0.875
Step Two: Multiply the decimal from Step One by 100 and express the answer as a percent (%):
0.875 x 100 = 87.5 → 87.5%
Final Answer: 7/8 = 87.5%
Figure 05 above shows how we used our two-step method to solve Example #3.
Step-by-Step Guide: How to Convert CM to Inches in 3 Easy Steps
Free Step-by-Step Guide: How to Convert CM to Inches.
Learning how to convert cm to inches is an important math skill that everyone will benefit from, no matter what their age is. Knowing how to convert cm to inches will allow you to quickly and accurately make conversions between different systems of measurement. This free step-by-step guide will teach you how to convert cm to inches using an easy three step method. Together, we will learn how to us a cm to inches conversion formula, and we will work through a few practice problems of how to convert cm to inches.
To gain a deep understanding of this topic, we recommend that you work through each section of this guide in order. However, you can also use the table of contents below to jump to any section of this guide:
Before we learn how to convert cm to inches, let’s review some key vocabulary related to this topic.
What are centimeters (cm) and inches (in.)?
A centimeter is a metric unit of length that is equivalent to one hundredth of a meter. The abbreviation for centimeters is cm.
An inch is an imperial unit of length that is equivalent to one twelfth of a foot. The abbreviation for inches is in.
Note that most of the world uses the metric system of measurement, while the imperial system in most commonly used in the United States.
When we compare the metric system and the imperial system in terms of inches and centimeters, the cm to inches unit conversion is as follows:
1 inch equals 2.54 centimeters.
This relationship between inches and centimeters is shown in Figure 01 above.
CM to Inches Formula
Now that we understand the relationship between centimeters and inches, we are ready to learn the formula for how to convert cm to inches.
CM to Inches Conversion Formula:
Inches = Centimeters ÷ 2.54
So, whenever to have a length expressed in cm that you want to convert to inches, simple divide that length, in cm, by 2.54 (since one inch equals 2.54 centimeters), and then express your result in terms of inches.
Figure 02: How to convert cm to inches in 3 easy steps.
How to Convert CM to Inches in 3 Steps
You can use the conversion formula to solve any problem where you have to convert centimeters to inches by following these three easy steps:
Step 1: Identify the given length (in cm).
Step 2: Input that length into the conversion formula (inches = cm ÷ 2.54)
Step 3: Round your answer (if necessary) and express it in terms of inches.
For example, let’s convert 10 centimeter to inches using these three steps:
Step 1: Identify the given length (in cm).
The given length is 10 cm.
Step 2: Using the formula:
inches = cm ÷ 2.54
inches = 10 ÷ 2.54
inches = 3.937007874…
Step 3: Round your answer.
In most cases, you can make an accurate and correct conversion by rounding your answer to the nearest tenths decimal place.
Final Answer: 10 cm equals 3.94 inches.
Figure 02 above illustrates how we used the conversion formula to determine that 10 centimeters equals approximately 3.94 inches.
Now, let’s gain some more experience with converting cm to inches by working through some more practice problems.
CM to Inches Conversion Formula: inches = cm ÷ 2.54
CM to Inches: Example #1
Example #1: Convert 15 cm to inches
We can use our 3-step method to solve this problem as follows:
Step 1: Identify the given length (in cm).
For this example, the given length is 15 cm.
Step 2: Using the cm to inches conversion formula:
inches = cm ÷ 2.54
inches = 15 ÷ 2.54
inches = 5.9055118…
Step 3: Round your answer.
Finally, we can round our answer to the nearest tenths decimal place and conclude that:
Final Answer: 15 cm equals 5.90 inches.
Example #1 Solved: 15 cm equals 5.90 inches.
CM to Inches: Example #2
Example #2": Convert 19.5 cm to inches
We can solve this next example exactly the same way that we did Example #1
Step 1: For Example #2, the given length is 19.5 cm.
Step 2: Next, input 19.5 cm into the conversion formula as follows:
inches = cm ÷ 2.54
inches = 19.5 ÷ 2.54
inches = 7.677165…
Step 3: After rounding our result to 7.68, we can say that…
Final Answer: 19.5 cm equals 7.68 inches.
Example #2 Solved: 19.5 cm equals 7.68 inches
CM to Inches: Example #3
Example #3: A picture frame is 41 cm wide and 51 cm tall. What are the dimensions of the picture frame in inches? Round your answer to the nearest inch.
For our final example, we have to make to cm to inches conversions:
Convert 41 cm to inches; and
Convert 51 cm to inches
We can make the first conversion by using the cm to inches conversion formula as follows:
41 cm to inches
inches = cm ÷ 2.54
inches = 41 ÷ 2.54
inches = 16.1417…
41 cm equals approximately 16 inches
And, we can use the same approach to make the second conversion:
51 cm to inches
inches = cm ÷ 2.54
inches = 51 ÷ 2.54
inches = 20.07874
51 cm equals approximately 20 inches
Now that we have made both conversions, we can conclude that:
Final Answer: The approximate dimensions of the frame are 16 inches by 20 inches.
Example #3 Solved: The dimensions of the frame are 16 inches by 20 inches.
CM to Inches Chart
Now that you know how to easily convert cm to inches, it can be extremely handy to have access to a conversion chart so that you can quickly reference common conversions between centimeters and inches.
cm
inches
conversion
1
0.39
1 ÷ 2.54 = 0.39 in
2
0.79
2 ÷ 2.54 = 0.79 in
3
1.18
3 ÷ 2.54 = 1.18 in
4
1.57
4 ÷ 2.54 = 1.57 in
5
1.97
5 ÷ 2.54 = 1.97 in
6
2.36
6 ÷ 2.54 = 2.36 in
7.5
2.95
7.5 ÷ 2.54 = 2.95 in
9
3.54
9 ÷ 2.54 = 3.54 in
10
3.94
10 ÷ 2.54 = 3.94 in
11
4.33
11 ÷ 2.54 = 4.33 in
12
4.72
12 ÷ 2.54 = 4.72 in
13
5.12
13 ÷ 2.54 = 5.12 in
14
5.51
14 ÷ 2.54 = 5.51 in
15
5.91
15 ÷ 2.54 = 5.91 in
16
6.30
16 ÷ 2.54 = 6.30 in
17
6.69
17 ÷ 2.54 = 6.69 in
18
7.09
18 ÷ 2.54 = 7.09 in
19
7.48
19 ÷ 2.54 = 7.48 in
20
7.87
20 ÷ 2.54 = 7.87 in
21
8.27
21 ÷ 2.54 = 8.27 in
22
8.66
22 ÷ 2.54 = 8.66 in
23
9.06
23 ÷ 2.54 = 9.06 in
24
9.45
24 ÷ 2.54 = 9.45 in
25
9.84
25 ÷ 2.54 = 9.84 in
26
10.24
26 ÷ 2.54 = 10.24 in
If you want to have this chart on hand to make quick and accurate conversions anywhere you go, then click the link below to download your printable CM to Inches Conversion Chart PDF!
What is the There’s a Woman in a Boat Riddle answer?
There’s a Woman in a Boat Riddle
If you are looking for a simple yet challenging brain teaser, then the There’s a Woman in a Boat riddle will surely give you a fun mental workout. This riddle has become really popular on social media recently because of it simple structure and ability to absolutely stump most people who attempt to determine the riddle’s answer.
The riddle, shown in full below, is just two simple sentences. While the given information seems limited, everything you need to find the answer is included in the wording of the riddle. The challenge lays in decoding the given information to determine the woman’s name.
If you are ready to attempt to answer the ‘There’s a Woman in a Boat’ riddle on your own, then carefully read the riddle and give yourself as much time as you would like to attempt to solve it. You can even go for a long walk where you can "take the riddle with you” and play with it in your mind until you find an answer.
And, whenever you are read to see the There’s a Woman in a Boat Riddle Answer, scroll down to the bottom section of this page to see the solution along with an in-depth explanation.
There’s a Woman in a Boat Riddle
There’s a woman in a boat on a lake wearing a coat, if you want to know her name it’s in the riddle I just wrote. What is the woman’s name?
Most people who attempt to solve this riddle give up after a while, saying that there is simply not enough given information to figure out the woman’s name. If you find yourself feeling this way, we encourage you to go back and try again. This time, read the riddle very carefully and think about how the woman’s name could be hidden within the text.
If you are still stumped, but not ready to see the answer, here are a few suggestions for different ways to think about this problem:
How could the text be rewritten if you did know the woman’s name? For example, if you knew that the woman’s name was Jennifer (it’s not), how would you rewrite the text?
Many riddles have elements of misdirection. Is there any information that is included to misdirect you rather than help you to find the answer?
Now is your final chance to find the answer on your own. If you want more time, stop now and do not continue scrolling. The next section will reveal the There’s a Woman in a Boat Riddle Answer along with a detailed explanation.
Now it’s time to reveal the answer to the There’s a Woman in a Boat riddle:
Answer:The woman's name is There.
Did you solve this one correctly? The fun of this short riddle lies in how it misdirects the reader by using a name that is also a common pronoun (There).
The woman’s name, which is There (which could possibly be short for Theresa) is hidden in plain sight, which is why the reader doesn’t actually need any additional information in order to find the answer. When the riddle says that her name “is in the riddle I just wrote,” it is not a metaphor. The riddle is actually telling the reader the woman’s name is one of the actual words included in the riddle itself.
If you were unable to solve the There’s a Woman in a Boat Riddle, it is likely because you were overthinking how to find the answer. Many people who fail to solve this riddle get caught up in the details of the short story, such as the fact that she is on a lake or that she is wearing a coat. However, the details of the story do not actually help the reader at all.
The woman’s name is There, which is the very first word of the riddle!
The There’s a Woman in a Boat riddle is a fun example of how the English language can be played with in a clever and literal way. This simple riddle uses double-meanings, misdirection, and reader tendencies to display an extremely simple scenario into something that seems complex and difficult to decode.
The riddle tricks the reader by using her tendency to look for explicit information against her, and making the answer so extremely obvious that it often gets completely overlooked, which is why so many people fail to find the There’s a Woman in a Boat riddle answer.
Now that we have solved the riddle, let’s remember that we all use mental biases and underlying assumptions whenever we are solving problems. While these tendencies often help us and save us time, they can sometimes force us into rigid ways of thinking that prevent us from seeing things that are very clear or obvious.
So, trying to solve riddles like There’s a Woman in a Boat is an awesome way to teach yourself to be an open-minded problem solver and to not get overly reliant on rigid and uncreative ways of thinking.
Ready for Another Riddle?
I met a man on London Bridge. He tipped his hat and Drew his name and cheated at the guessing game. What was the man’s name?
Math Skills: Perform a reflection over x axis, Perform a reflection over y axis, Reflections on the coordinate plane
Understanding how to perform a reflection over x axis or a reflection over y axis is an important algebra skill that students can easily master with some study and practice.
In real life, a reflection is a concept that everyone is familiar with, as many of us look a mirror at least once every day.
Similarly, in math, a reflection is a type of transformation where the mirror image of a point, line, or figure is displayed on the coordinate plane.
This free student guide on How to Perform Reflection Over X Axis and How to Perform Reflection Over Y Axis will teach you how to perform reflections on the coordinate plane in a simple step-by-step way.
Reflections in Real-Life (Photo by Tim Stief via Unsplash)
Reflections in Math: Reflection over the x axis example.
What is a Reflection Over the X-Axis?
In math, a reflection over x axis of a point, a line, or a figure involves reflecting the image over the x axis to create a mirror image.
In the case of a reflection over the x axis, the horizontal line on the coordinate plane that passes through the origin (the x-axis) would be called the axis of reflection.
In other words, whenever something is reflected over the x axis, it is essentially “flipped” across the axis on the coordinate plane.
Rule: Whenever a point is reflected over the x-axis, the following rule applies:
x-coordinates stay the same
y-coordinates change signs (positive becomes negative and vice versa)
Rule: (x,y) → (x,-y)
For example, if we reflected the coordinate points A (2,6) and B (7, 3) over the x-axis, the new reflected points, A’ and B’, would become:
A (2,6) → A’ (2,-6)
B (7,3) → B’ (7, -3)
Again, notice, after a reflection over x axis, that the x-coordinates did not change, but the signs of the y-coordinates were reversed (positive values became negative)
Figure 01 below shows what it would look like if we took line segment AB (with coordinates A (2,6) and B (7, 3)) and reflected it over the x-axis to create the image of line segment A’B’.
Figure 01: The reflection over x axis rule states that (x,y) → (x,-y).
What is a Reflection Over the Y-Axis?
Similarly, a reflection over y axis of a point also involves reflecting the image over the y axis to create a mirror image.
Whenever you have to reflect a point over the y axis, you are reflecting over the vertical line on the coordinate plane that passes through the origin (i.e. the y-axis is the axis of reflection).
Rule: Whenever a point is reflected over the y-axis, the following rule applies:
x-coordinates change signs (positive becomes negative and vice versa)
y-coordinates stay the same
Rule: (x,y) → (-x,y)
For example, if we took line segment AB, with coordinate points A (2,6) and B (7, 3), from the previous example and reflected over y axis, the new coordinate points, A’ and B’, would be:
A (2,6) → A’ (-2,6)
B (7,3) → B’ (-7, 3)
In the case of reflection over y axis, notice that the signs of the x-coordinate values were reversed (positive became negative) and that the y-coordinate values were unchanged.
Figure 02 below illustrates this rule and what the image of AB would look like after it was reflected over the y axis.
Figure 02: The reflection over y axis rule states that (x,y) → (-x, y).
The chart below displays the difference between reflecting line segment AB over the x-axis versus reflecting over the y-axis.
Original Point
Reflected over X-Axis
Reflected over Y-Axis
A (2, 6)
A′ (2, -6)
A″ (-2, 6)
B (7, 3)
B′ (7, -3)
B″ (-7, 3)
Now that you have a better understanding of the difference between a reflection over x axis and a reflection over y axis, you are ready to work through a few practice problems.
Before moving onto the next section, make sure that you have a firm grasp of the following key points:
On the coordinate plane, the x-axis is a horizontal line (⟷) that passes through the origin, while the y-axis is a vertical line (↕) that passes through the origin. The difference between the x-axis and the y-axis is illustrated in Figure 03 below.
The rule for a reflection over the x axis is: (x,y) → (x,-y)
The rule for a reflection over the y axis is: (x,y) → (-x, y)
Figure 03: The x-axis is a horizontal line and the y-axis is a vertical line.
Reflection Over X Axis and Y Axis Examples
Reflection Over X Axis Example #1
Problem: Reflect the point P (5,8) over the x-axis.
For our first example, we will take a given point and perform a reflection over x axis.
Quick Tip: Remember that the rule for reflecting a coordinate point over the x-axis is (x,y) → (x,-y), so you only have the change the sign of the y-coordinate.
Step 1: Apply the reflection over the x-axis rule:
Given Point: P (5,8)
Rule: P (5,8) → P’ (5, -8)
Step 2: Plot P’ (5,-8) on the coordinate plane to complete the reflection.
Final Answer: The reflected point is P’ (5,-8)
Example #1: Reflection over x axis of one coordinate point.
Reflection Over X Axis Example #2
Problem: Reflect line segment RS, with endpoints R(-3,-4) and S(2,-5), over the x axis.
For this next example of how to perform reflection over x axis, we have to reflect an entire line segment, and we can do that by applying the rule (x,y) → (x,-y) to both endpoints and then plotting those new points and constructing the line segment R’S’.
Step 1: Apply the rule to each given point.
Given Points: R(-3,-4) and S(2,-5)
Rule: R(-3,-4) → R’(-3,4)
Rule: S(2,-5) → S’(2,5)
Example #2: Reflection over x axis of a line segment.
Step 2: Plot the endpoints R’ and S’ and construct the reflected line segment (i.e. connect R’ and S’ with a straight line).
Final Answer: The reflected line segment R’S’ has endpoints at R’ (-3, 4) and S’ (2, 5).
The chart below shows how the coordinates of points R and S were transformed after a reflection over the x axis.
Point
Coordinates
Reflected Over X-Axis
R
(-3, -4)
R′ = (-3, 4)
S
(2, -5)
S′ = (2, 5)
Reflection Over X Axis Example #3
Now, let’s try a problem where we have to reflect an entire figure over the x-axis.
Problem: Reflect △ABC over the x-axis if the figure has vertices at:
A (2, 8)
B (6, 4)
C (4, -2)
Step 1: Apply the rule (x,y) → (x,-y) to each point:
A (2, 8) → A’ (2, -8)
B (6, 4) → B’ (6, -4)
C (4, -2) → C’ (4, 2)
Example #3: Reflection over x axis of a figure.
Step 2: Plot and label points A’, B’, and C’ on the coordinate plane and construct △A’B’C’ as shown in Figure 04 below. Notice how points A and B are reflected below the x-axis, while point C is reflected above the x-axis, which creates a symmetrical mirror image between △ABC and △A’B’C’.
Figure 04: How to perform a reflection over the x axis of a figure (completed)
Reflection Over Y Axis Example #1
Problem: Reflect the point K (-8,6) over the y-axis.
Let’s start off by reflecting a single coordinate point over the y axis.
Quick Tip: The rule for reflecting a point over the y-axis is (x,y) → (-x,y), so you only have the change the sign of the x-coordinate.
Step 1: Apply the reflection over y-axis rule:
Given Point: K (-8,6)
Rule: K (-8,6) → K (‘-8,6)
Step 2: Plot K’ on the graph.
Final Answer: After K (-8,6) is reflected over the y-axis, the coordinates of K’ are (8,6).
Example #1: Reflection over y axis of a point.
Reflection Over Y Axis Example #2
Our next example of how to perform reflection over y axis involves a line segment.
Problem: Reflect segment CD over the y-axis, where:
C (2,7)
D (9,-5)
Step 1: Apple the rule (x,y) → (-x,y) to each point:
C (2,7) → C’ (-2,7
D (9,-5) → D’ (-9,-5)
Step 2: Plot C’ and D’ and construct the reflected line segment C’D’.
Final Answer: Line segment C’D’ has endpoints at C’ (-2,7) and D’ (-9,-5).
Example #2: Reflection over y axis of a line segment.
The chart below shows how the coordinates of points C and D were transformed after a reflection over the y axis.
Point
Original Coordinates
Reflected Over Y-Axis
C
(2, 7)
C′ = (-2, 7)
D
(9, -5)
D′ = (-9, -5)
Video Tutorial: Reflections on the Coordinate Plane
If you need some extra help with learning how to reflect over the x-axis or over the y-axis, then check out our free Reflections on the Coordinate Plane Video Tutorial, which includes a review of key concepts and vocabulary related to reflections as well step-by-step explanations of how to solve a variety of problems.
If you like the video, please subscribe to our channel, give it a thumbs up, and/or leave a positive comment. Thank you in advance for your support.
Reflection over X Axis and Y Axis Worksheet
Preview: Free Reflection Over X Axis and Y Axis Worksheet.
Now that you have a better understanding of how to reflect a point, line, or figure over the x and y axis, it’s time to try some problems on your own to assess your overall understanding.
The free PDF worksheet below includes several practice problems for performing a reflection over the x-axis and over the y-axis. We recommend trying each problem on your own and then checking your solutions by comparing them to the answer key.
If you solve more than 85% of the problems correctly, then you likely have a strong understanding of how to perform a reflection on the coordinate plane. However, if you are still struggling, you can go back and work through the step-by-step problems in the guide for a second time. The more that you practice this skill, the better you will understand it!