How to Factor Polynomials—Step-by-Step Examples and Tutorial

How to Factor Polynomials—Step-by-Step Examples and Tutorial

How to Factor Polynomials Explained

Factoring polynomials is a process of rewriting a polynomial as the product of one or more simpler expressions—including constants, variables, or factors that can not be further reduced. How to factor a given polynomial will depend on a few different factors, including the number of terms, the value of the coefficients, and the structure of the polynomial.


Free Step-by-Step Guide: How to factor a polynomial with a specific number of terms

 
Anthony Persico

by Anthony Persico

Founder & Head Educator, Mashup Math
With a background in elementary and secondary math education and special education, Anthony has taught thousands of K-12 students across the United States.

Learn more about the author →

Last Updated: May 2025

In algebra, a polynomial is an expression made up of variables and coefficients separated by the operations of addition and/or subtraction.

Polynomials are a fundamental math topic and understanding how to work with them (including factoring) is essential to being successful in algebra and beyond. Learning how to factor polynomials with 2, 3, or 4 terms involves understanding how to break down a given polynomial into simpler factors.

This free Step-by-Step Guide on How to Factor Polynomials will cover the following topics:

Table of Contents

While learning how to factor polynomials can be challenging, it is a learnable skill that can be acquired through practice. The goal of this free guide on how to factor polynomials is to give you plenty of step-by-step practice with factoring polynomials—including polynomials with 4 terms (cubic polynomials)—so that can become more comfortable with factoring all kinds of polynomials.

Before we cover everything you need to know about how to factor a polynomial, let’s quickly recap some key algebra vocabulary terms and phrases that you will need to be familiar with in order to use this guide.


Figure 01: How to Factor Polynomials: What is a Polynomial?


What is a polynomial?

As previously stated, a polynomial is a math expression comprised of variables, coefficients, and/or constants separated by the operations of addition or subtraction.

The terms of polynomials are individual parts, or monomials, separated by addition or subtraction signs.

For example,

  • 3x² is a monomial

  • 3x² + 6x is a polynomial with 2 terms (3x² and 6x)

  • 3x² + 6x - 15 is a polynomial with 3 terms (3x², 6x, and -15)

  • 9x³ + 3x² + 6x - 15 is a polynomial with 4 terms (9x³, 3x², 6x, and -15)

Figure 01 above illustrates the difference between a monomial and a polynomial.

For an expression to be considered a polynomial, it must have at least two terms, but there is no limit on how many terms a polynomial can have.

When it comes to factoring polynomials, you will most commonly be dealing with polynomials that have 2 terms, 3 terms, or 4 terms:

  • A polynomial with 2 terms is called a binomial

  • A polynomial with 3 terms is called a trinomial

  • A polynomial with 4 terms is called a quadrinomial (also known as a cubic polynomial)

Examples of a polynomial with 2 terms, 3 terms, and 4 terms are shown in Figure 02 below.


Figure 02: How to factor polynomials with 4 terms or less.


Now that you understand the key terms and the difference between a polynomial with 2 terms, 3 terms, and 4 terms.

For factoring each type of polynomial, we will look at two methods: GCF, direct factoring, and a combination of the two.

Let’s get started!


How to Factor Polynomials with 2 Terms

We will start by learning how to factor polynomials with 2 terms (binomials).

Whenever you are factoring a polynomial with any number of terms, it is always best to start by looking to see if there is a GCF—or greatest common factor—that all of the terms have in common.

For example, consider the following example:

Example #1: Factor 8x + 4

For this example, you should notice that both terms, 8x and 4 are divisible by 4, hence they share a GCF of 4.

Therefore, you can divide out the GCF of 4 from both terms as follows:

  • 8x + 4 → 4 (2x + 1)

So, the factors of 8x + 4 are: 4 and (2x+1).

What we just did was essentially the reverse of the distributive property, as shown in Figure 03 below.


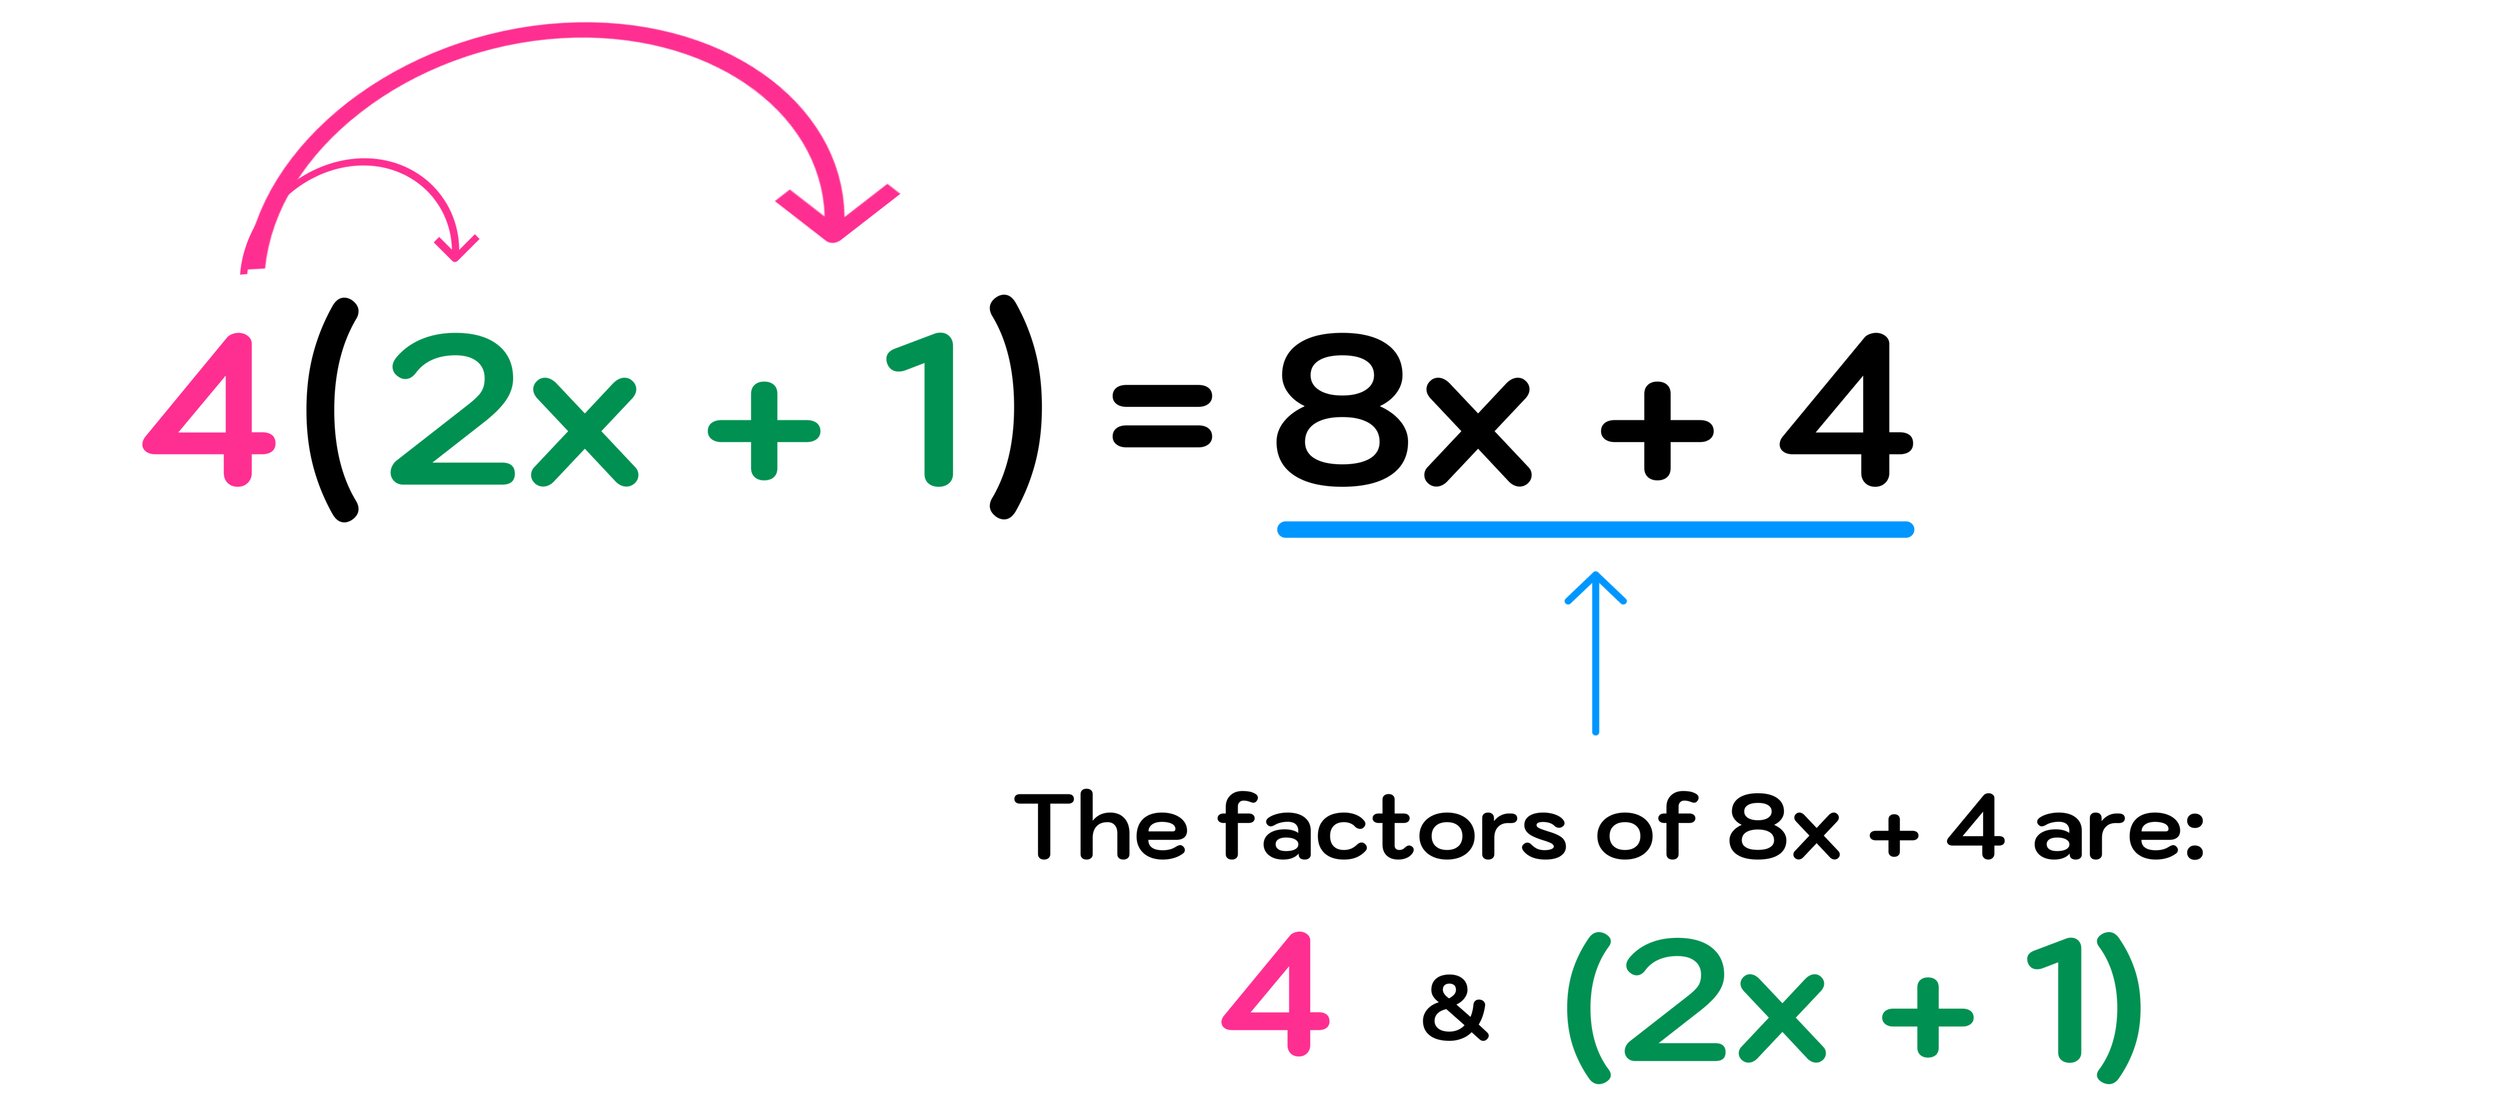
Figure 03: How to factor a polynomial with 2 terms using the GCF method.


Note that many binomials can be factored using the GCF method, so let’s gain a little more practice with one more example (understanding how to simplify and/or factor a polynomial using the GCF method will come in handy when you start factoring 3 and 4 term polynomials later on).

Example #2: Factor 6x² + 12x

Just like the first example, there is a GCF for both terms. But, in this case, the GCF includes a variable. Why? Because both terms have coefficients that are divisible by 6 and both terms have at least one x variable, so the GCF, in this case, is 6x.

Therefore, you can divide out 6x from both terms as follows:

  • 6x² + 12x → 6x(x + 2)

So, the factors of 6x² + 12x are: 6x and (x+2).

Again, this method of factoring is just the reverse of the distributive property and is illustrated in Figure 04 below.


Figure 04: How to factor a polynomial with 2 terms using the GCF method.


Next, we will look at a special case of factoring a binomial—when the binomial is a difference of two squares (this is sometimes referred to as DOTS).

Whenever you have a binomial of the form a²-b², the factors will be of the form (a+b)(a-b).

Example #3: Factor x² - 49

For example, if you wanted to factor the binomial: x² - 49, you would notice that both x² and 49 are squares:

  • x² = (x)(x)

  • 49=(7)(7)

So, another way to write (x²- 49) is (x²- 7²)

Therefore, you can use the DOTS method for factoring binomials. In this case, a = x and b = 7, so:

  • (a²-b²) = (a+b)(a-b) → (x²- 7²) = (x-7)(x+7)

You can now conclude that the factors of x²- 49 are (x-7) and (x+7) using the DOTS method.

This process is illustrated in Figure 05 below:


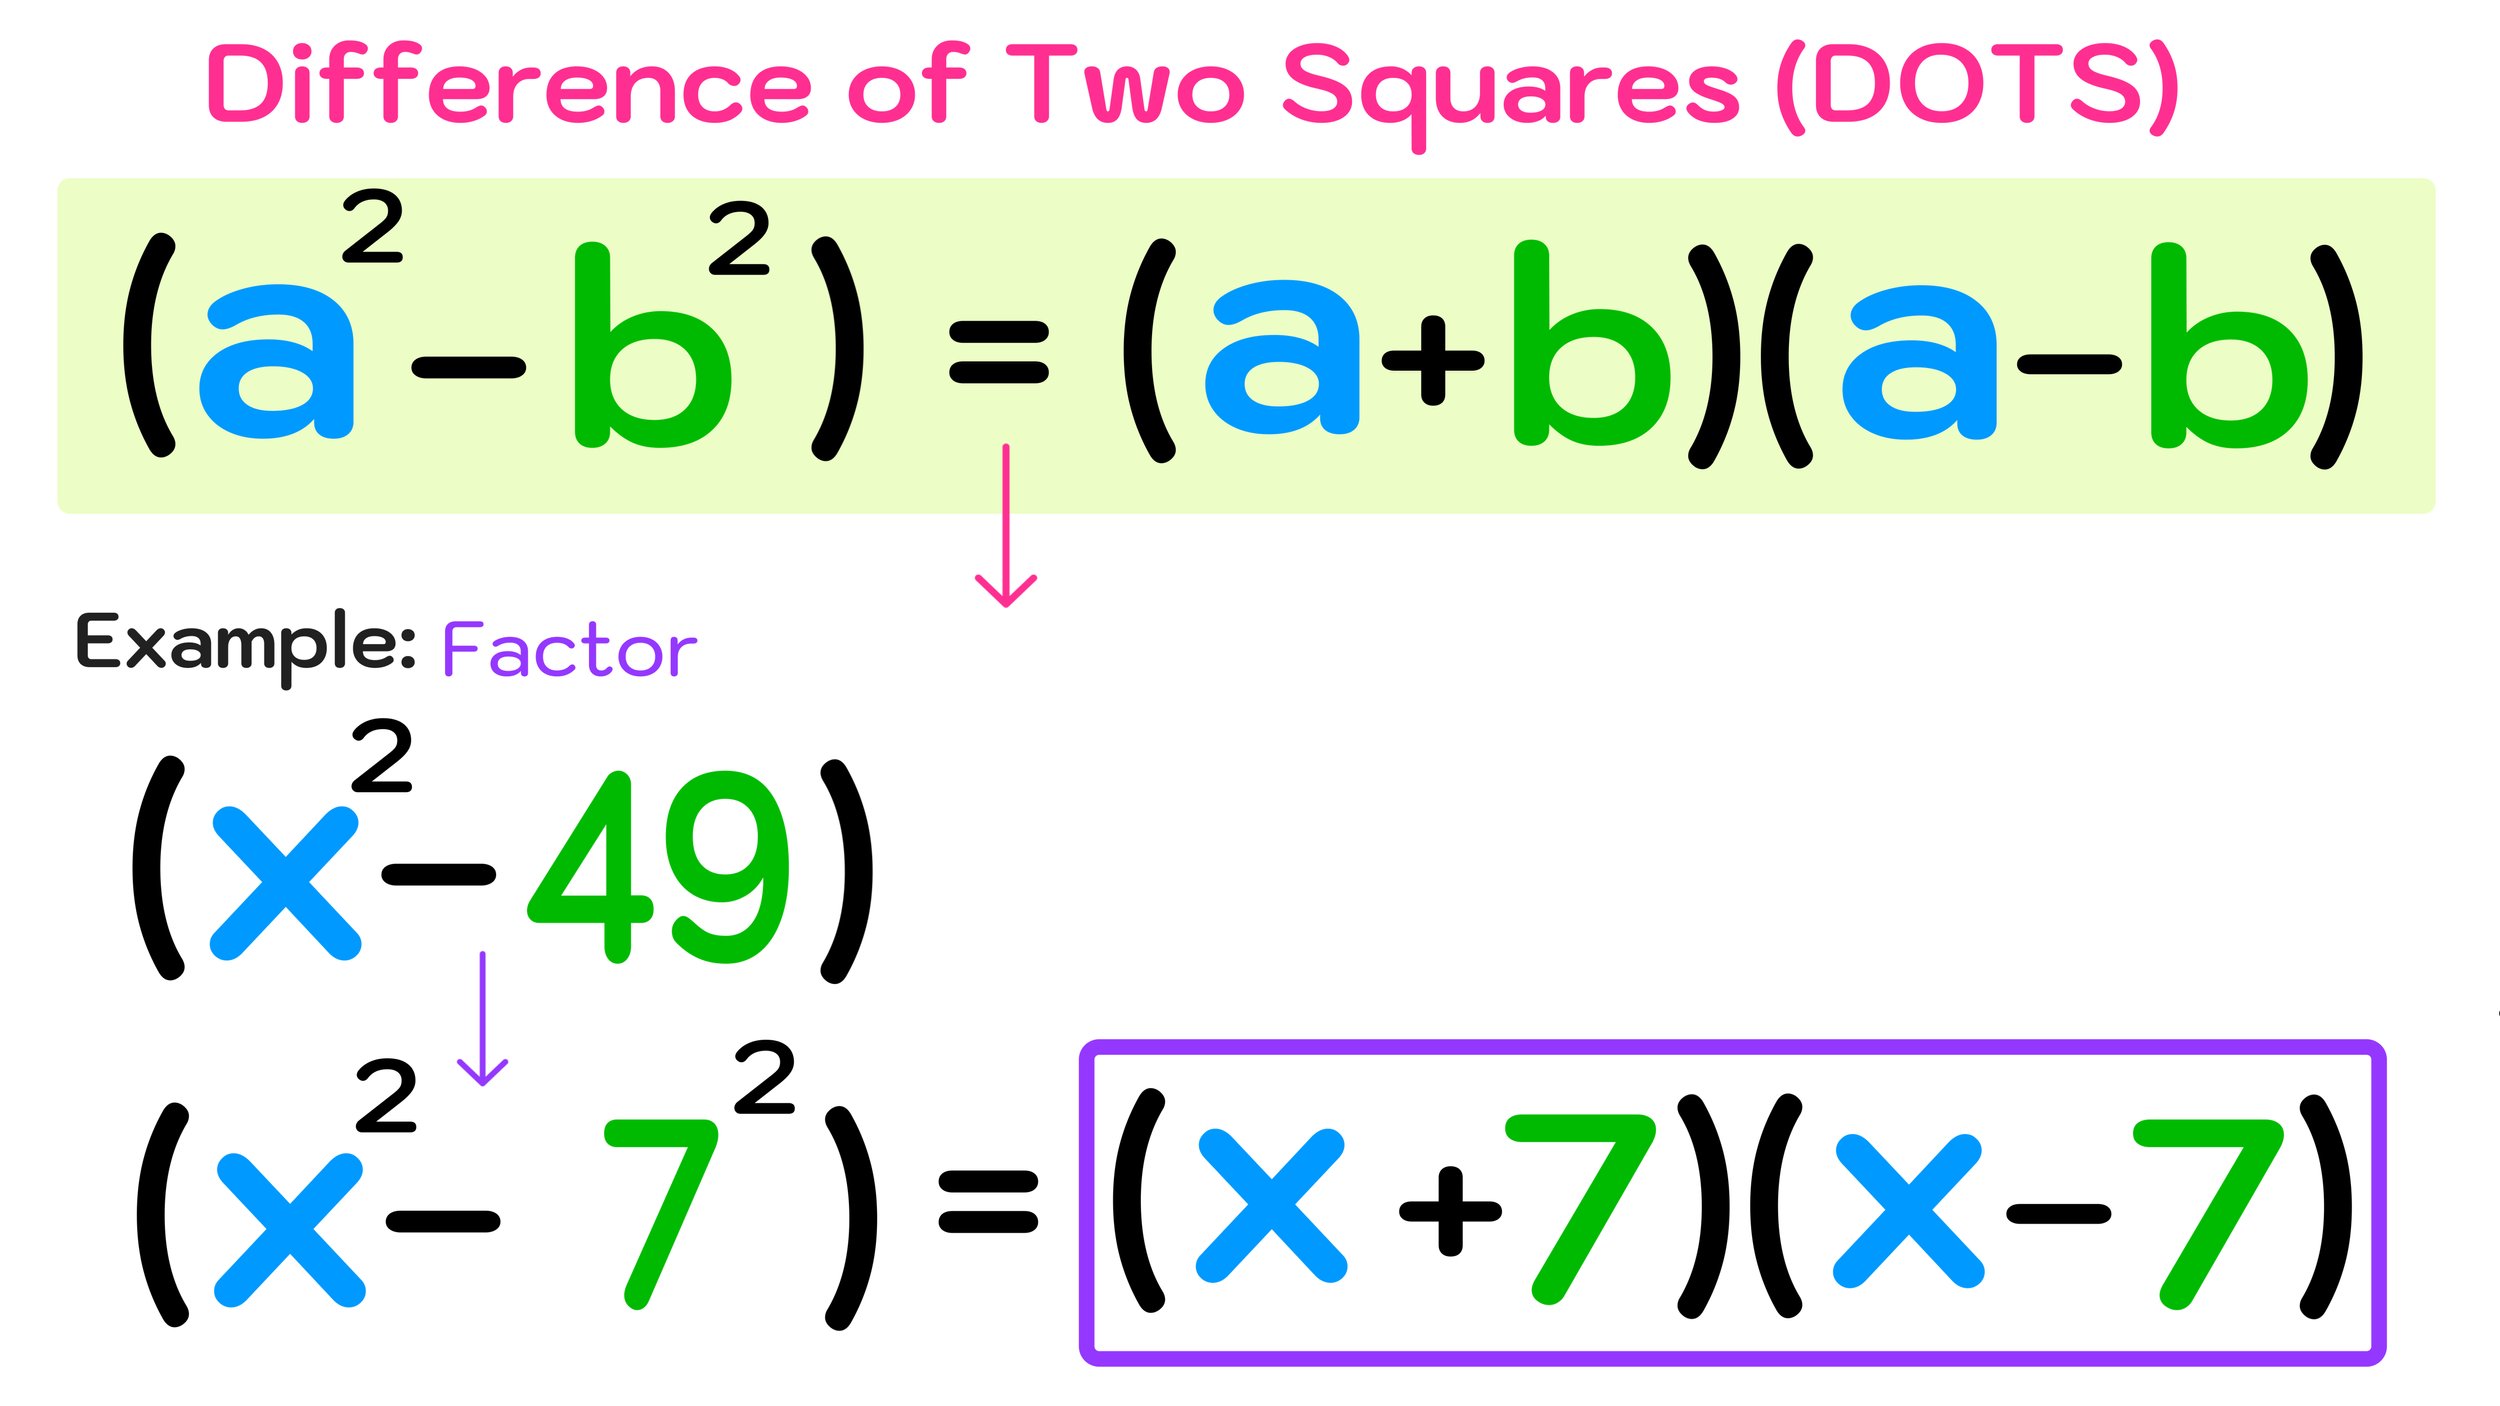
Figure 05: How to factor a polynomial that is the difference of two squares.


If you want to learn more about the DOTS method for factoring polynomials that are the difference of two squares, check out this free video tutorial on YouTube for more practice.

And if you want more practice, check out our free Factoring Polynomials Worksheet Library, where you can download free PDF practice worksheets with answer keys.

Otherwise, let’s continue onto the next section where you will learn how to factor polynomials with 3 terms.


How to Factor Polynomials with 3 Terms

Moving on, we will now look at polynomials with 3 terms, typically referred to as trinomials

Learning how to factor polynomials with 3 terms involves a more involved factoring process that we will explore in this section.

The trinomials that we will cover will be of the form ax² + bx + c (where c is a constant). The strategies that we will use will depend on whether a (the leading coefficient) equals one or not. Therefore, the first two examples in this section will be factoring trinomials when a=1 and the second two examples will be when a≠1.

How to Factor Polynomials with 3 Terms when a=1

Example #1: Factor x² + 6x + 8

For the first example, we have to factor the trinomial: x² + 6x + 8


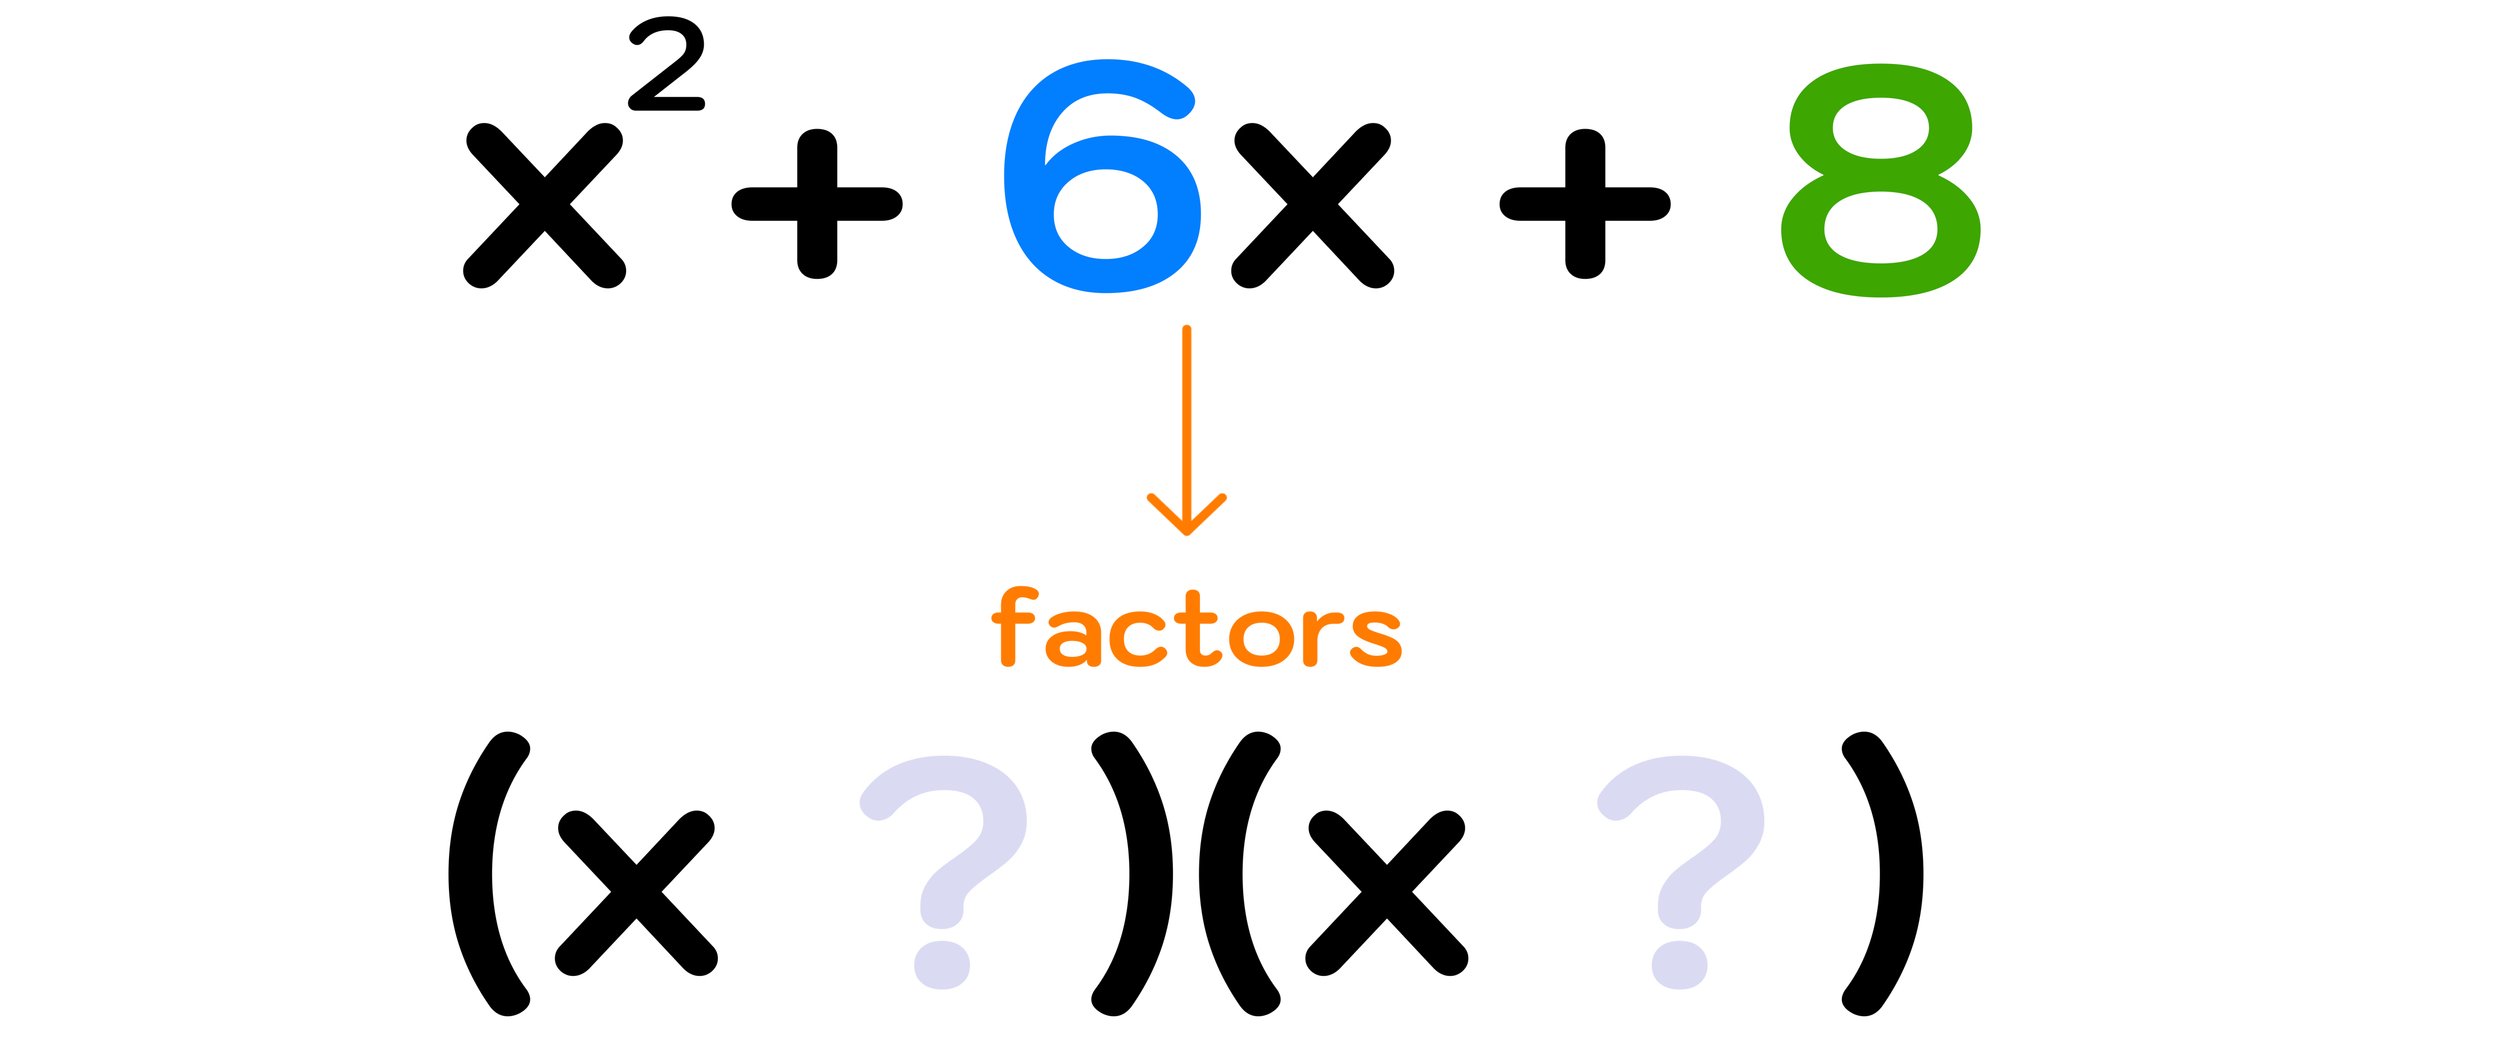
Figure 06: How to factor polynomials with 3 terms (when a=1)


Again, the leading coefficient, a, is equal to 1 in this example. This is important to note because the following method for factoring a trinomial only works when a=1.

Now we are ready to factor this trinomial in 3 easy steps:

Step One: Identify the values of b and c.

In this example, the values of b and c in the trinomial are: b=6 and c=8

Step Two: Figure out two numbers that both ADD to b and MULTIPLY to c.

The second step often involves some of trial-and-error as you pick numbers and see if they meet both conditions (the two numbers have to add together to make b and multiply together to make c).

  • 5 + 1 =6 (the value of b) ✓

  • 5 x 1 ≠ 8 (the value of c) ✘

For example, lets say that you chose the numbers 5 and 1. While 5+1=6 is true (satisfying the first condition), 5x1=5 (not 8), therefore, they do not satisfy the second condition. So, 5 and 1 do not work.

But, if you picked the numbers 2 and 4, you can see that:

  • 2 + 4 =6 (the value of b) ✓

  • 2 x 4 = 8 (the value of c) ✓

Since 2 and 4 satisfy both conditions, you can stop searching and move onto the third step.

Step Three: Use your numbers from step two to write out the factors

In this case, you can conclude that the factors of x² + 6x + 8 are (x+2) and (x+4).


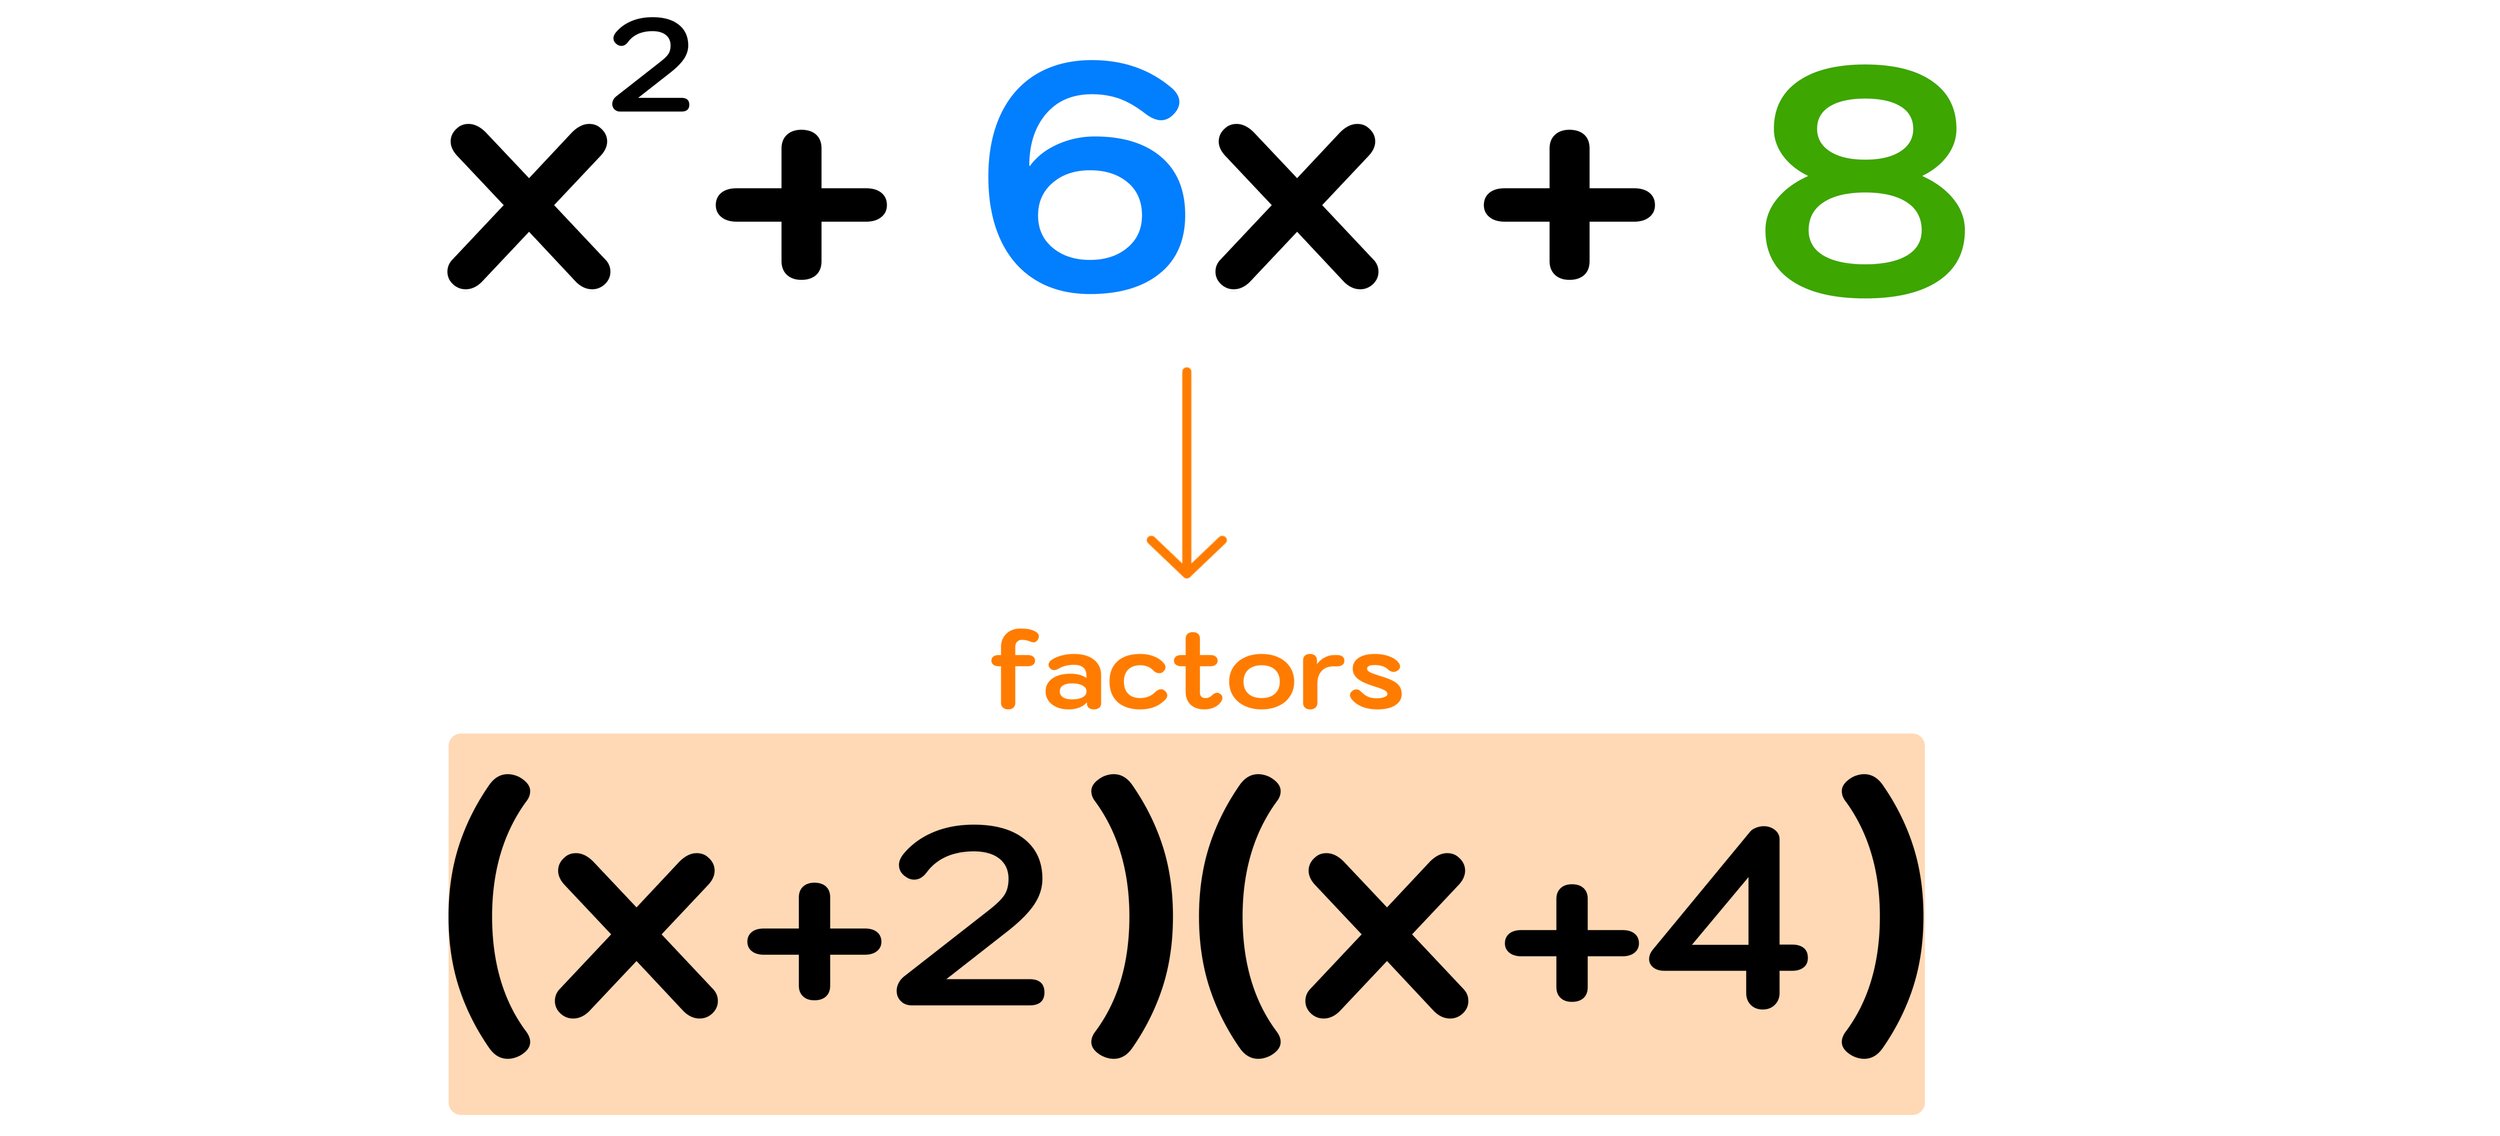
Figure 07: The factors of x² + 6x + 8 are (x+2) and (x+4).


You can verify that these are the correct factors by performing double distribution as follows:

  • (x+2)(x+4) = x² + 2x + 4x + 8 = x² + 6x + 8

Notice that you ended up with the trinomial that you started with! Now, lets work through one more example of how to factor polynomials with 3 terms when a=1.

Example #2: Factor x² - 3x - 40

For this next example, we have to factor the trinomial: x² - 3x - 40


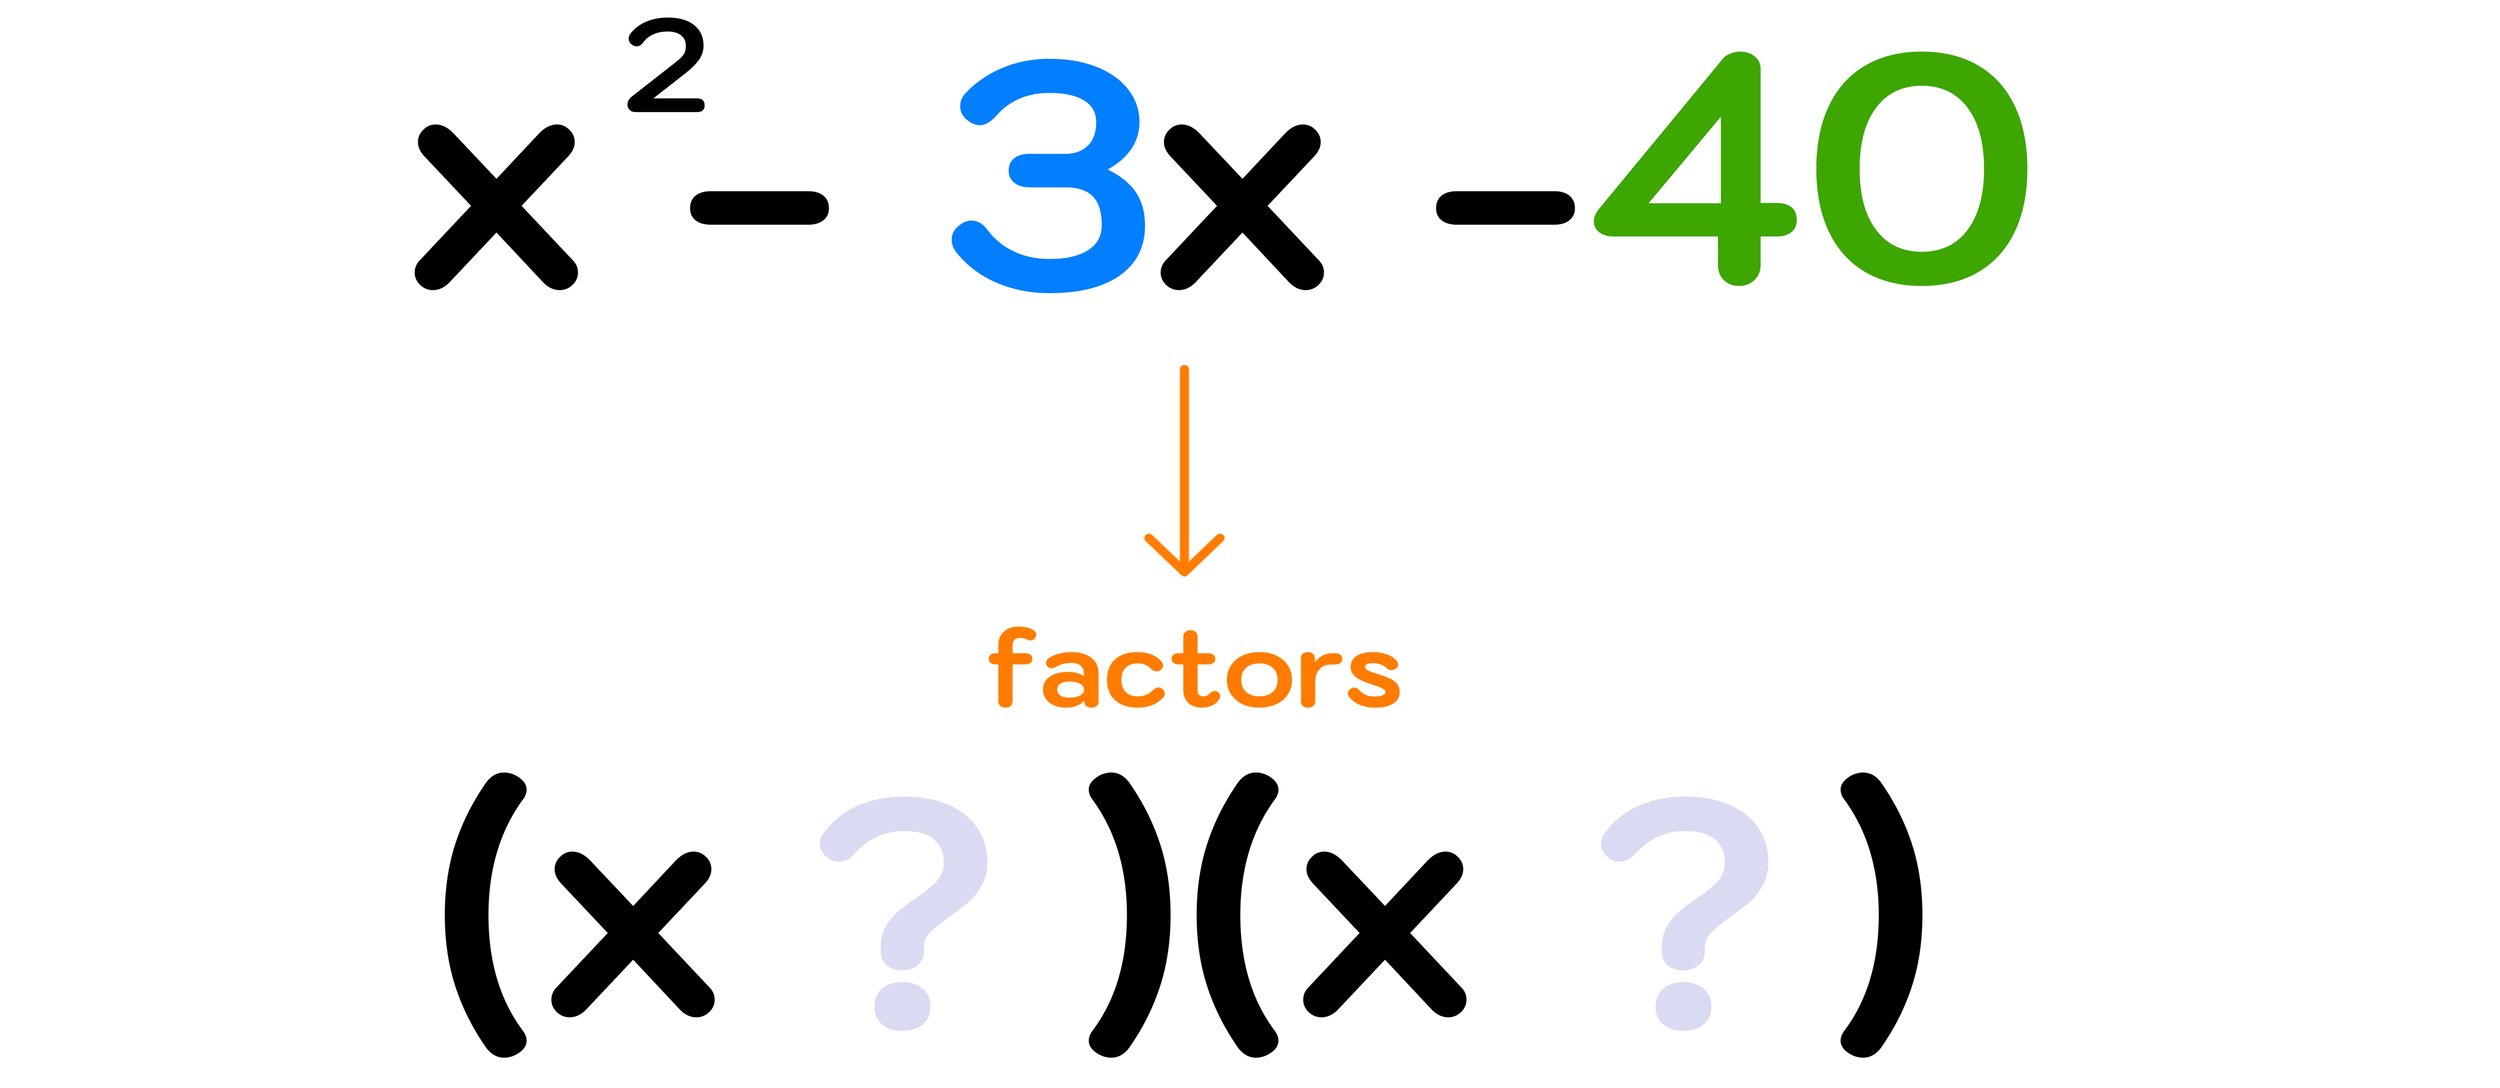
Figure 08: How to factor 3rd degree polynomials


Notice that, in this case, the trinomial includes subtraction signs, which will affect how you perform step two below.

Step One: Identify the values of b and c.

For this trinomial, b= -3 and c= -40

Step Two: Figure out two numbers that both ADD to b and MULTIPLY to c.

Again, you have to find two numbers that add to make -3 and that multiply together to make -40.

This part can be tricky when both of the values for b and c are negative (like in this example). You have to recall that a negative number times another negative number will lead to a positive result, so you can’t have two negatives (since you need to find two numbers that multiply together to make -40).

Eventually, after some trial-and-error, you should find that -8 and +5 satisfy both conditions:

  • -8 + 5 =-3 (the value of b) ✓

  • -8 x 5 = -40 (the value of c) ✓

Step Three: Use your numbers from step two to write out the factors

Finally, you can conclude that the factors of x² - 3x -40 are (x-8) and (x+5).

(You make sure that this answer is correct, you can perform double distribution on (x-8)(x+5) to make sure that the result is equal to the original trinomial).


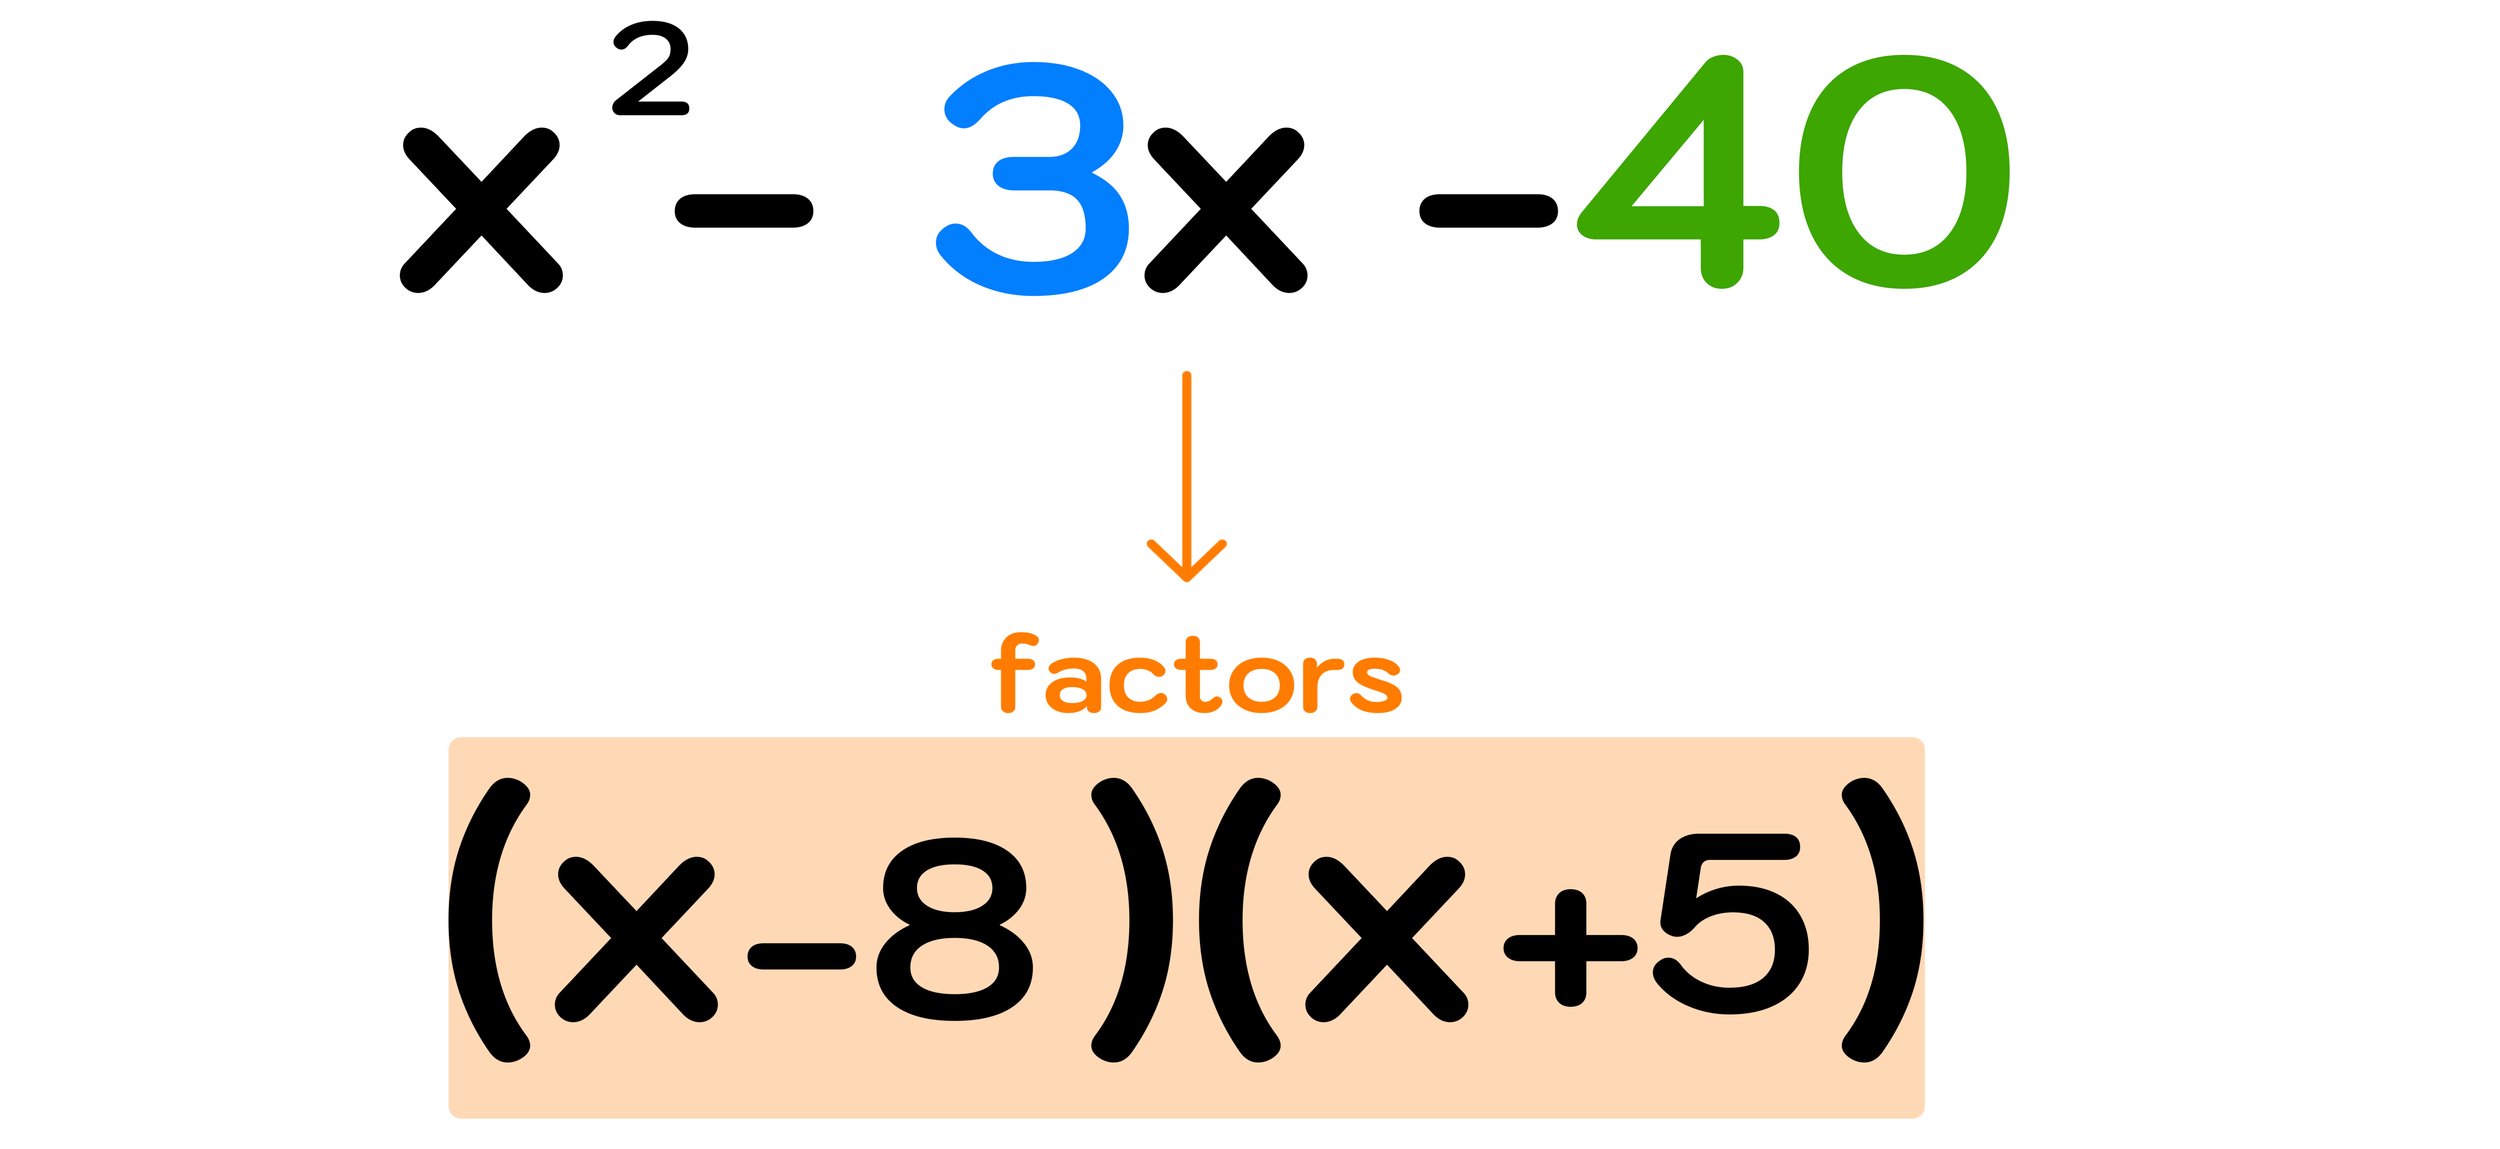
Figure 09: The factors of x² - 3x -40 are (x-8) and (x+5).


If you want more practice factoring trinomials when a=1, check out our free step-by-step guide on how to factor trinomials to gain some more practice.

And if you want more independent practice opportunities, check out our free Factoring Polynomials Worksheet Library, where you can download free PDF practice worksheets with answer keys.

Otherwise, you can continue on to learn how to factor polynomials with 3 terms when a≠1.

How to Factor Polynomials with 3 Terms when a≠1

Example #1: Factor 2x² - x - 6

For the first example, we have to factor the trinomial: 2x² - x - 6


Figure 10: How to factor polynomials with 3 terms when a≠1


For starters, notice that you can not pull out a GCF.

So, to solve trinomials of the form ax² + bx + c when a≠1, you can use the AC method as follows:

Step One: Identify the values of a and c and multiply them together

In this case, a=2 and c=-6, so

  • a x c = 2 x -6 = -12

Step Two: Factor and replace the middle term

The second step requires you to use the result from step one to factor and replace the middle term.

The middle term is currently -1x and note that:

  • -12 = -4 x 3; and

  • -4 + 3 = -1

We chose -4 and 3 as factors because the sum of -4 and 3 equals negative 1, so we can rewrite the original trinomial as 2x² - 4x +3x - 6


Figure 11: Factor and replace the middle term


Step Three: Split the new polynomial down the middle and take the GCF of each side

Note that we are now working with a polynomial that actually has four terms: 2x² - 4x + 3x - 6

In this third step, you have to split the polynomial down the middle to essentially create two separate binomials that you can simplify by dividing GCF’s out of as follows:

  • First Half: 2x² - 4x = 2x(x-2)

  • Second Half: 3x - 6 = 3(x-2)

This third step is illustrated in Figure 12 below:


Figure 12: Split the new polynomial down the middle and take the GCF of each side


Step Four: Identify the Factors

Finally, you are ready to identify the factors.

The result from the previous step was 2x(x - 2) + 3(x -2). Hidden within this expression are your two factors, which you can see by looking at Figure 13 below.


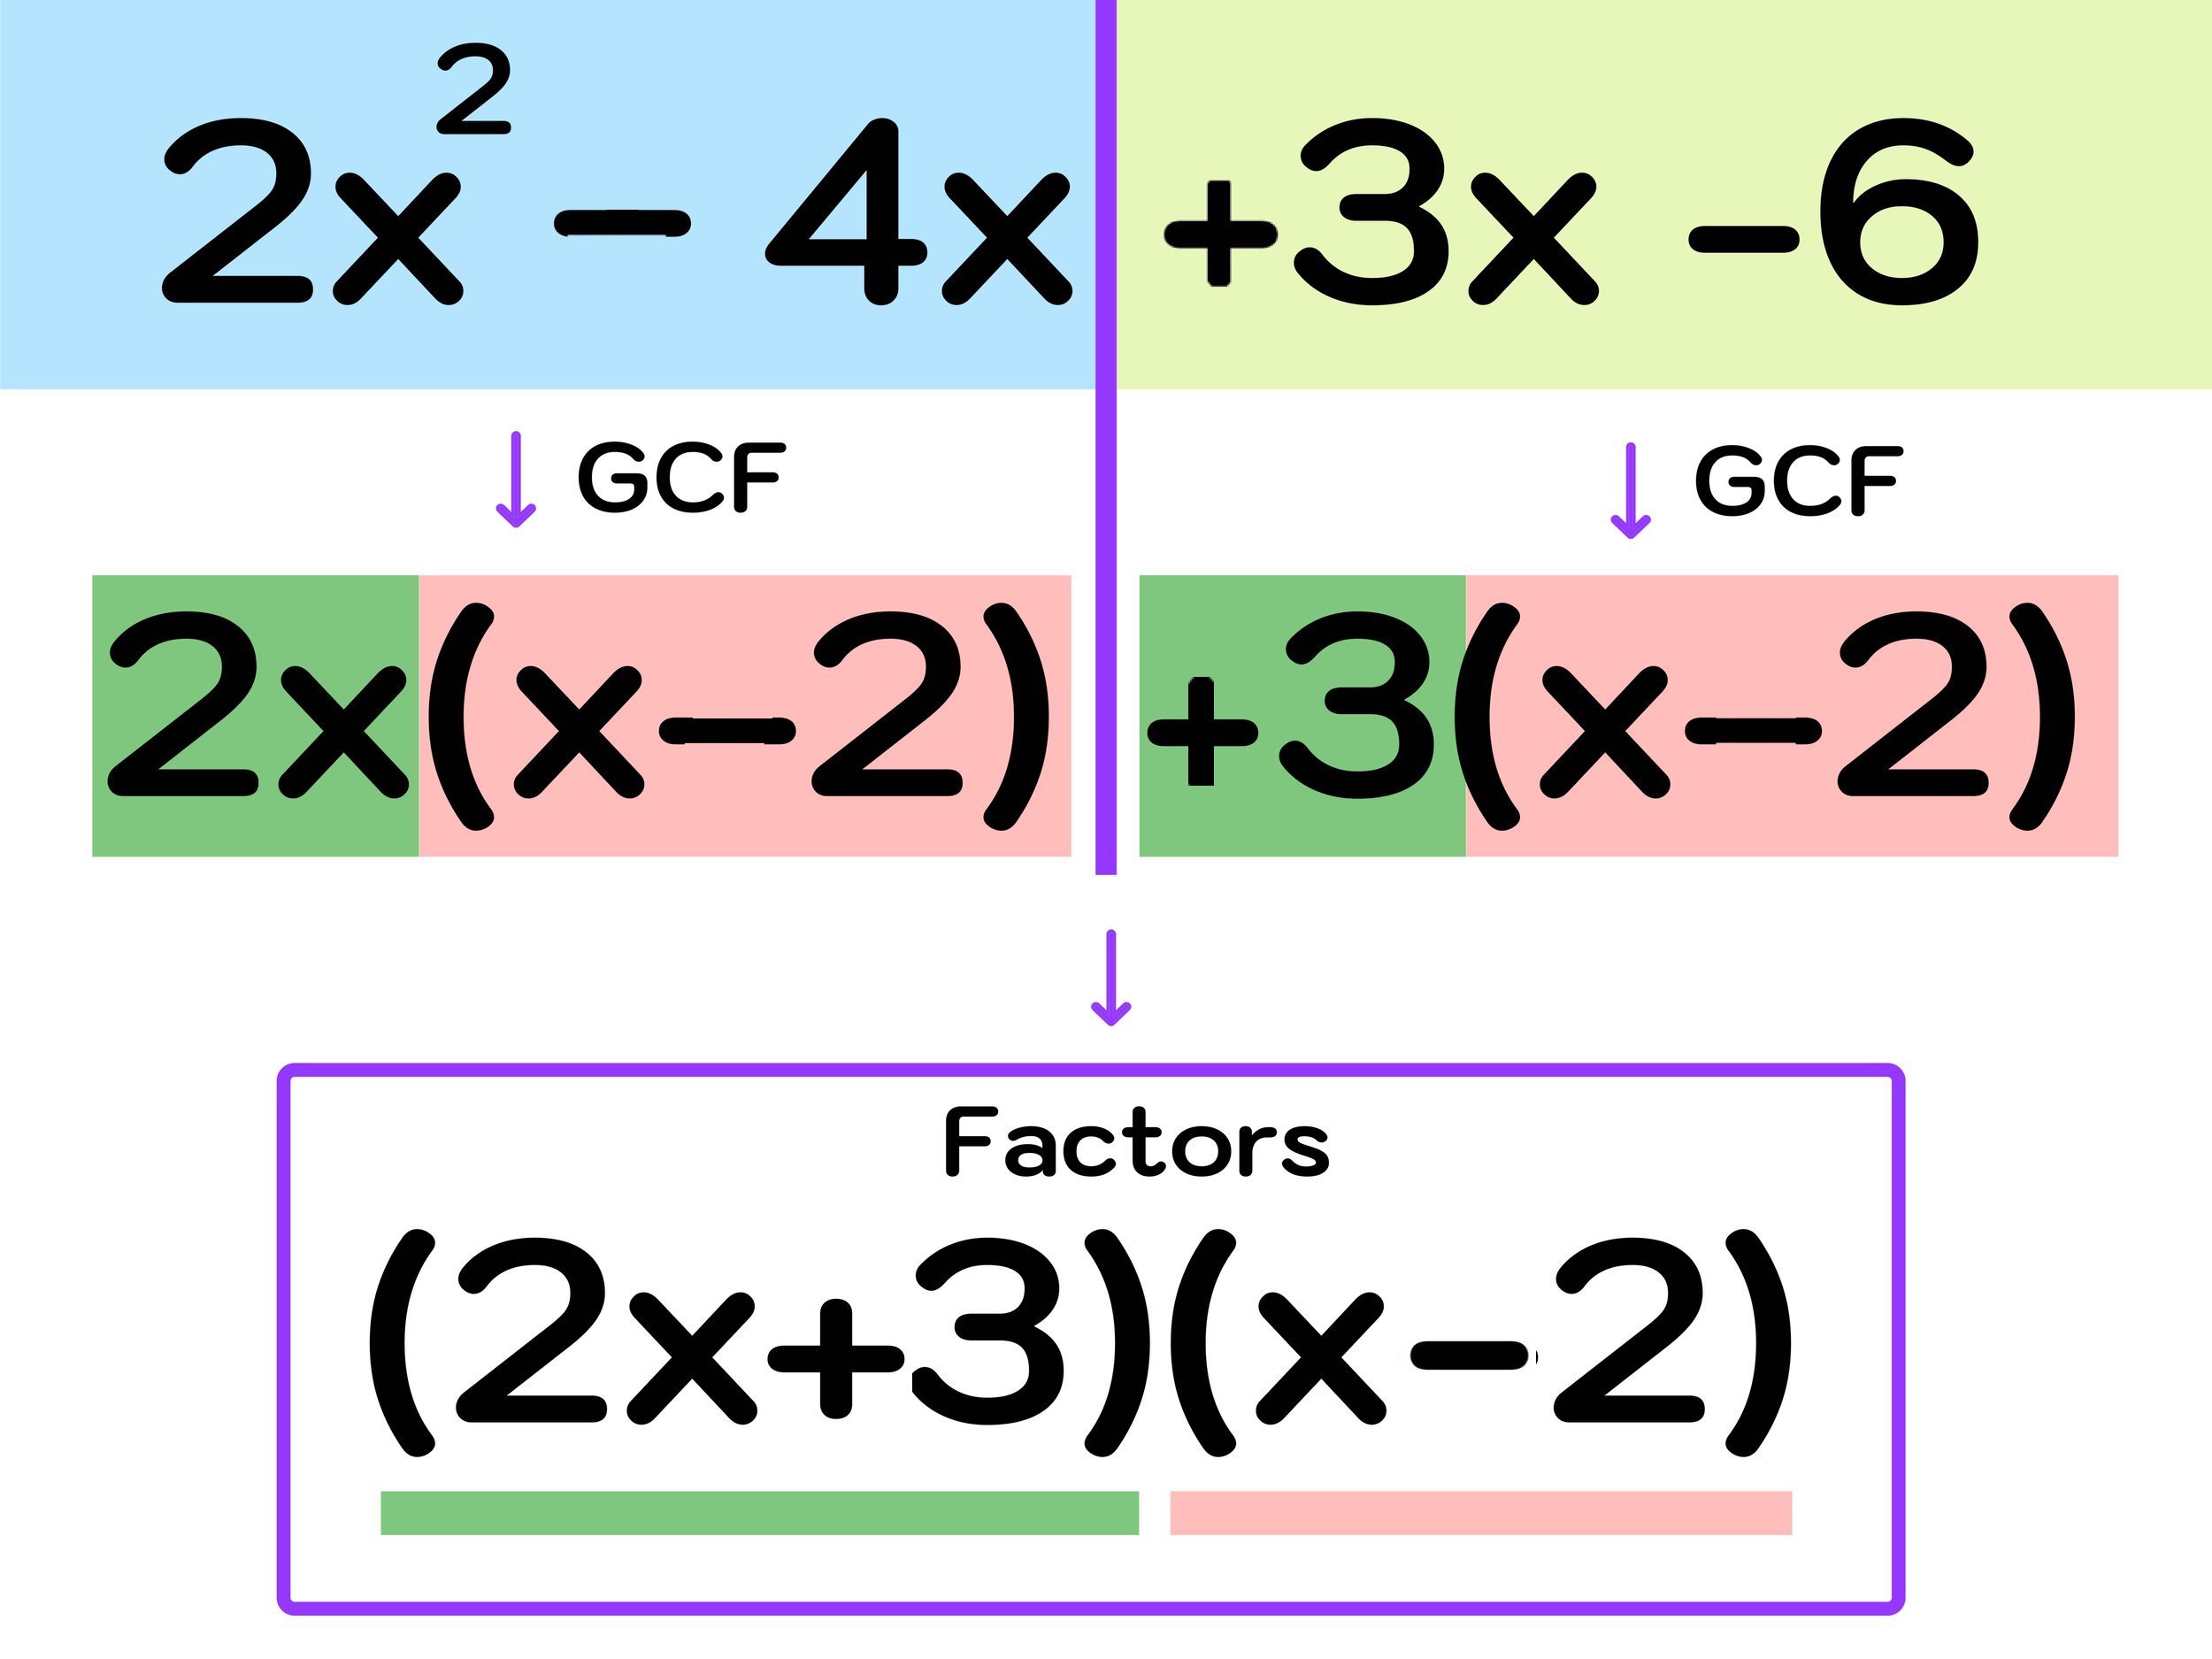
Figure 13: The final step is to identify the factors


Finally, you can conclude that the factors of 2x² - x - 6 are (2x+3) and (x-2).

Clearly, factoring a trinomial when a≠1 can be a tricky and there are several steps along the way, but, the more that you practice this process, the better you will become at factoring polynomials with 3 terms like the one in this past example. To give you a little more practice, lets work through one more example before we move on to learning how to factor cubic polynomials.

Example #2: Factor 4x² - 15x + 9


Figure 14: Factor the trinomial where a=4, b=-15, and c=9


Step One: Identify the values of a and c and multiply them together

In this example, a=4 and c=9, so

  • a x c = 4 x 9 = 36

Step Two: Factor and replace the middle term

For the next step, note that the middle term is -15x, so you will need to find two numbers that multiply to 36 and add to -15:

  • 36 = -12 x -3; and

  • -12 + -3 = -15

Now, we can rewrite the original trinomial as 4x² -12x -3x +9

Step Three: Split the new polynomial down the middle and take the GCF of each side

For step three, you have to split the polynomial into two separate binomials and divide a GCF out of each one as follows:

  • First Half: 4x² -12x = 4x(x-3)

  • Second Half: -3x+9 -3(x-3)

Step Four: Identify the Factors

The last step is to identify the factors as shown in Figure 15 below.


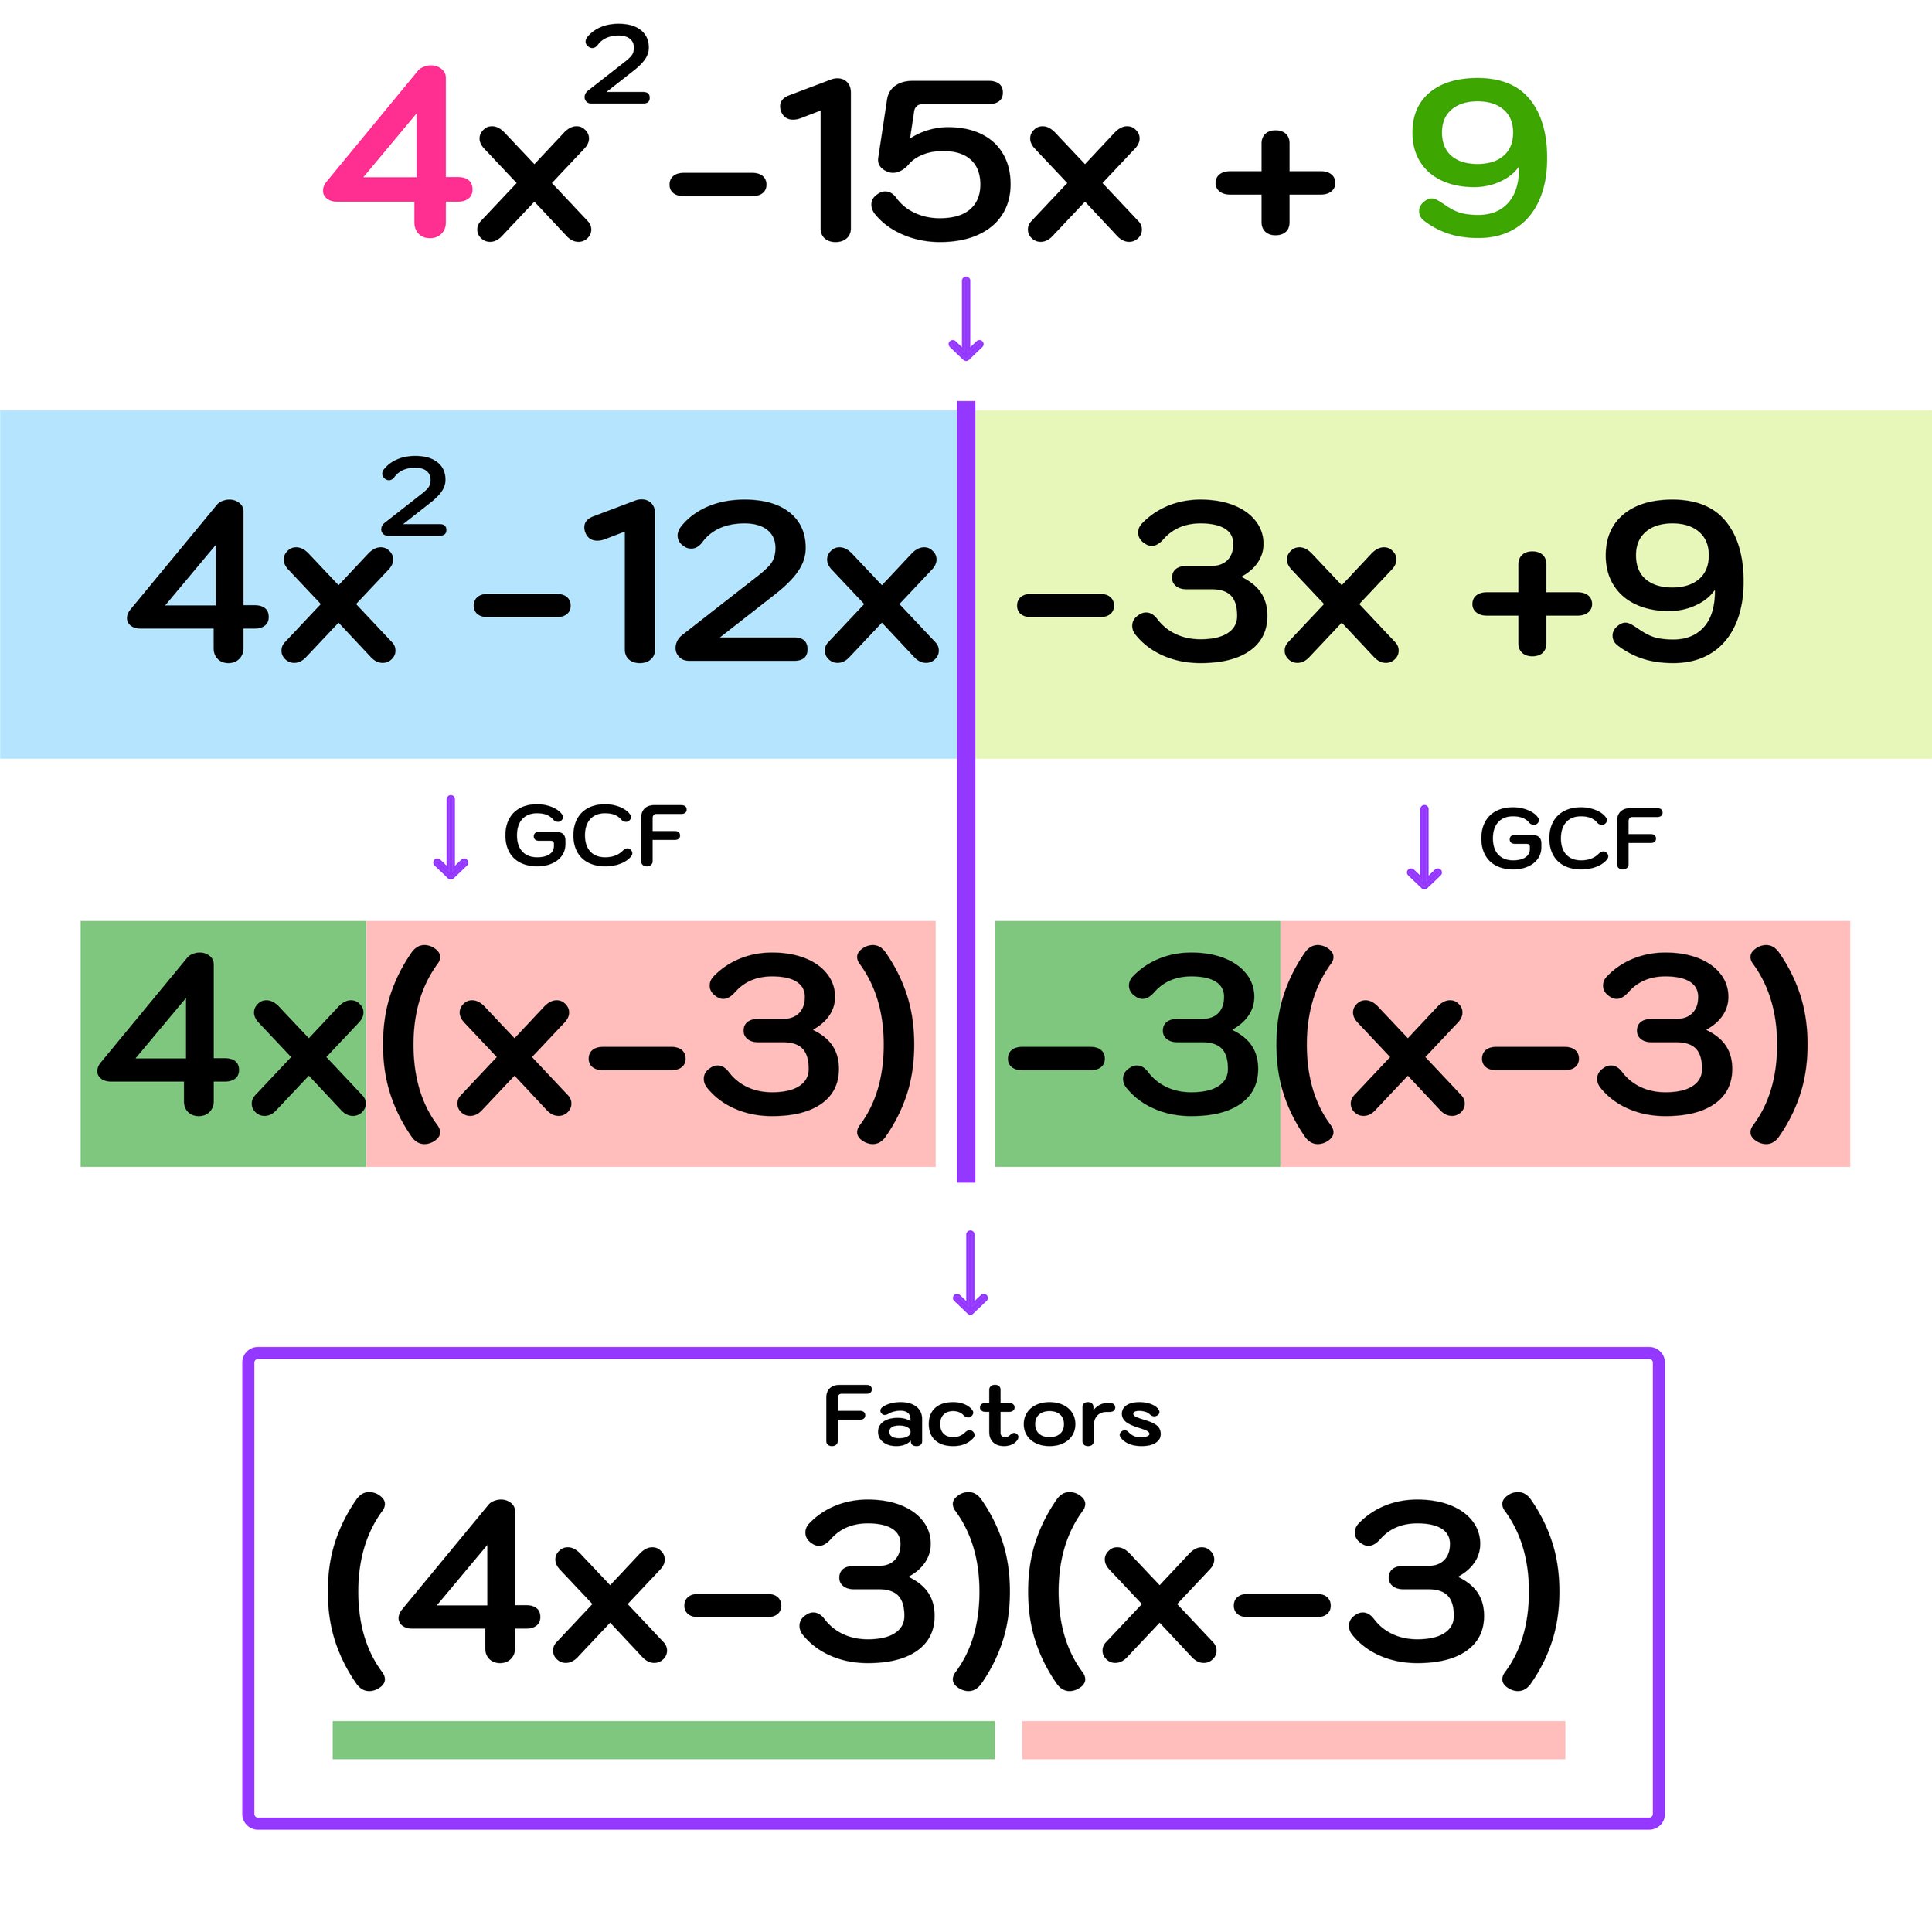
Figure 15: The factors are (4x-3)(x-3)


Now, you can conclude that the factors of 4x² - 15x + 9 are (4x-3) and (x-3).

You can again use double distribution on (4x-3)(x-3) to verify that your solution is correct.

If you need more step-by-step help with how to factor polynomials with 3 terms when a does not equal 1, visit out our free Factoring Polynomials Worksheet Library, where you can download free PDF practice worksheets with answer keys.

Otherwise, continue on to the final section where you will learn how to factor polynomials with 4 terms.


How to Factor Polynomials with 4 Terms

The last section of this guide will cover how to factor polynomials with 4 terms and how to factor cubic polynomials.

In this section, we are going to apply a grouping method for how to factor a cubic polynomial that is very similar to the way that you factored trinomials when the leading coefficient, a, did not equal one in the last section. So, you may want to review that section before moving onto the 4 term polynomial factoring examples, however, it is not completely necessary, as we will be taking a step-by-step approach to solving two examples of factoring cubic polynomials.

Now, lets go ahead and work through our first example on how to factor cubic polynomials.


Figure 16: Polynomials with 4 terms are referred to as cubic polynomials.


Example #1: Factor 2x³ - 3x² + 18x - 27

For the first example, we have to factor the cubic polynomial: 2x³ - 3x² + 18x - 27

Step One: Split the cubic polynomial into groups of two binomials.

To factor this 4 term polynomial, we are going to apply what is called the grouping method, which requires you to split the polynomial into two groups (two separate binomials) with the goal of factoring a GCF out of each one.


Figure 17: How to Factor Cubic Polynomials by Grouping: The first step is to split the polynomial into two groups of binomials.


Remember that the goal is to create two separate binomials that have a GCF. If there is no apparent GCF, you have the option of swapping the positions of the middle terms (- 3x² and 18x), but that is not necessary for factoring this 4 term polynomial.

In this example, by the end of step one, you now have two groups to factor:

  • (2x³ - 3x²)

  • (18x - 27)

Step Two: Factor each binomial by pulling out a GCF

Now, go ahead and divide a GCF out of each binomial as follows:

  • (2x³ - 3x²) → x²(2x - 3)

  • (18x - 27) → 9(2x - 3)

This step is illustrated in Figure 18 below.


Figure 18: How to factor a cubic polynomial by grouping.


Step Three: Identify the factors

Notice that both results have a (2x-3) term. This is important and expected. If both results do not share a same term, then you either made a mistake or the polynomial with 4 terms is not factorable.

But, since we were able to factor each group by pulling out a GCF that resulted in both groups sharing a common factor of (2x-3), we know that we can factor out the other terms (x² and +9), so now have our factors: (x²+9) and (2x-3)

Final Answer: The factors of 2x³ - 3x² + 18x - 27 are (x²+9) and (2x-3)

The entire process of how to factor polynomials by 4 terms by grouping is illustrated in Figure 19 below.


Figure 19: The factors of 2x³ - 3x² + 18x - 27 are (x²+9) and (2x-3)


Example #2: Factor 3y³ + 18y² + y + 6

Let’s gain some more practice with how to factor a cubic polynomial by grouping by solving one more example problem.

In this case, we have to factor the cubic polynomial 3y³ + 18y² + y + 6 using the same grouping method as the previous example.

Step One: Split the cubic polynomial into groups of two binomials.

Start by splitting the cubic polynomial into two groups (two separate binomials).


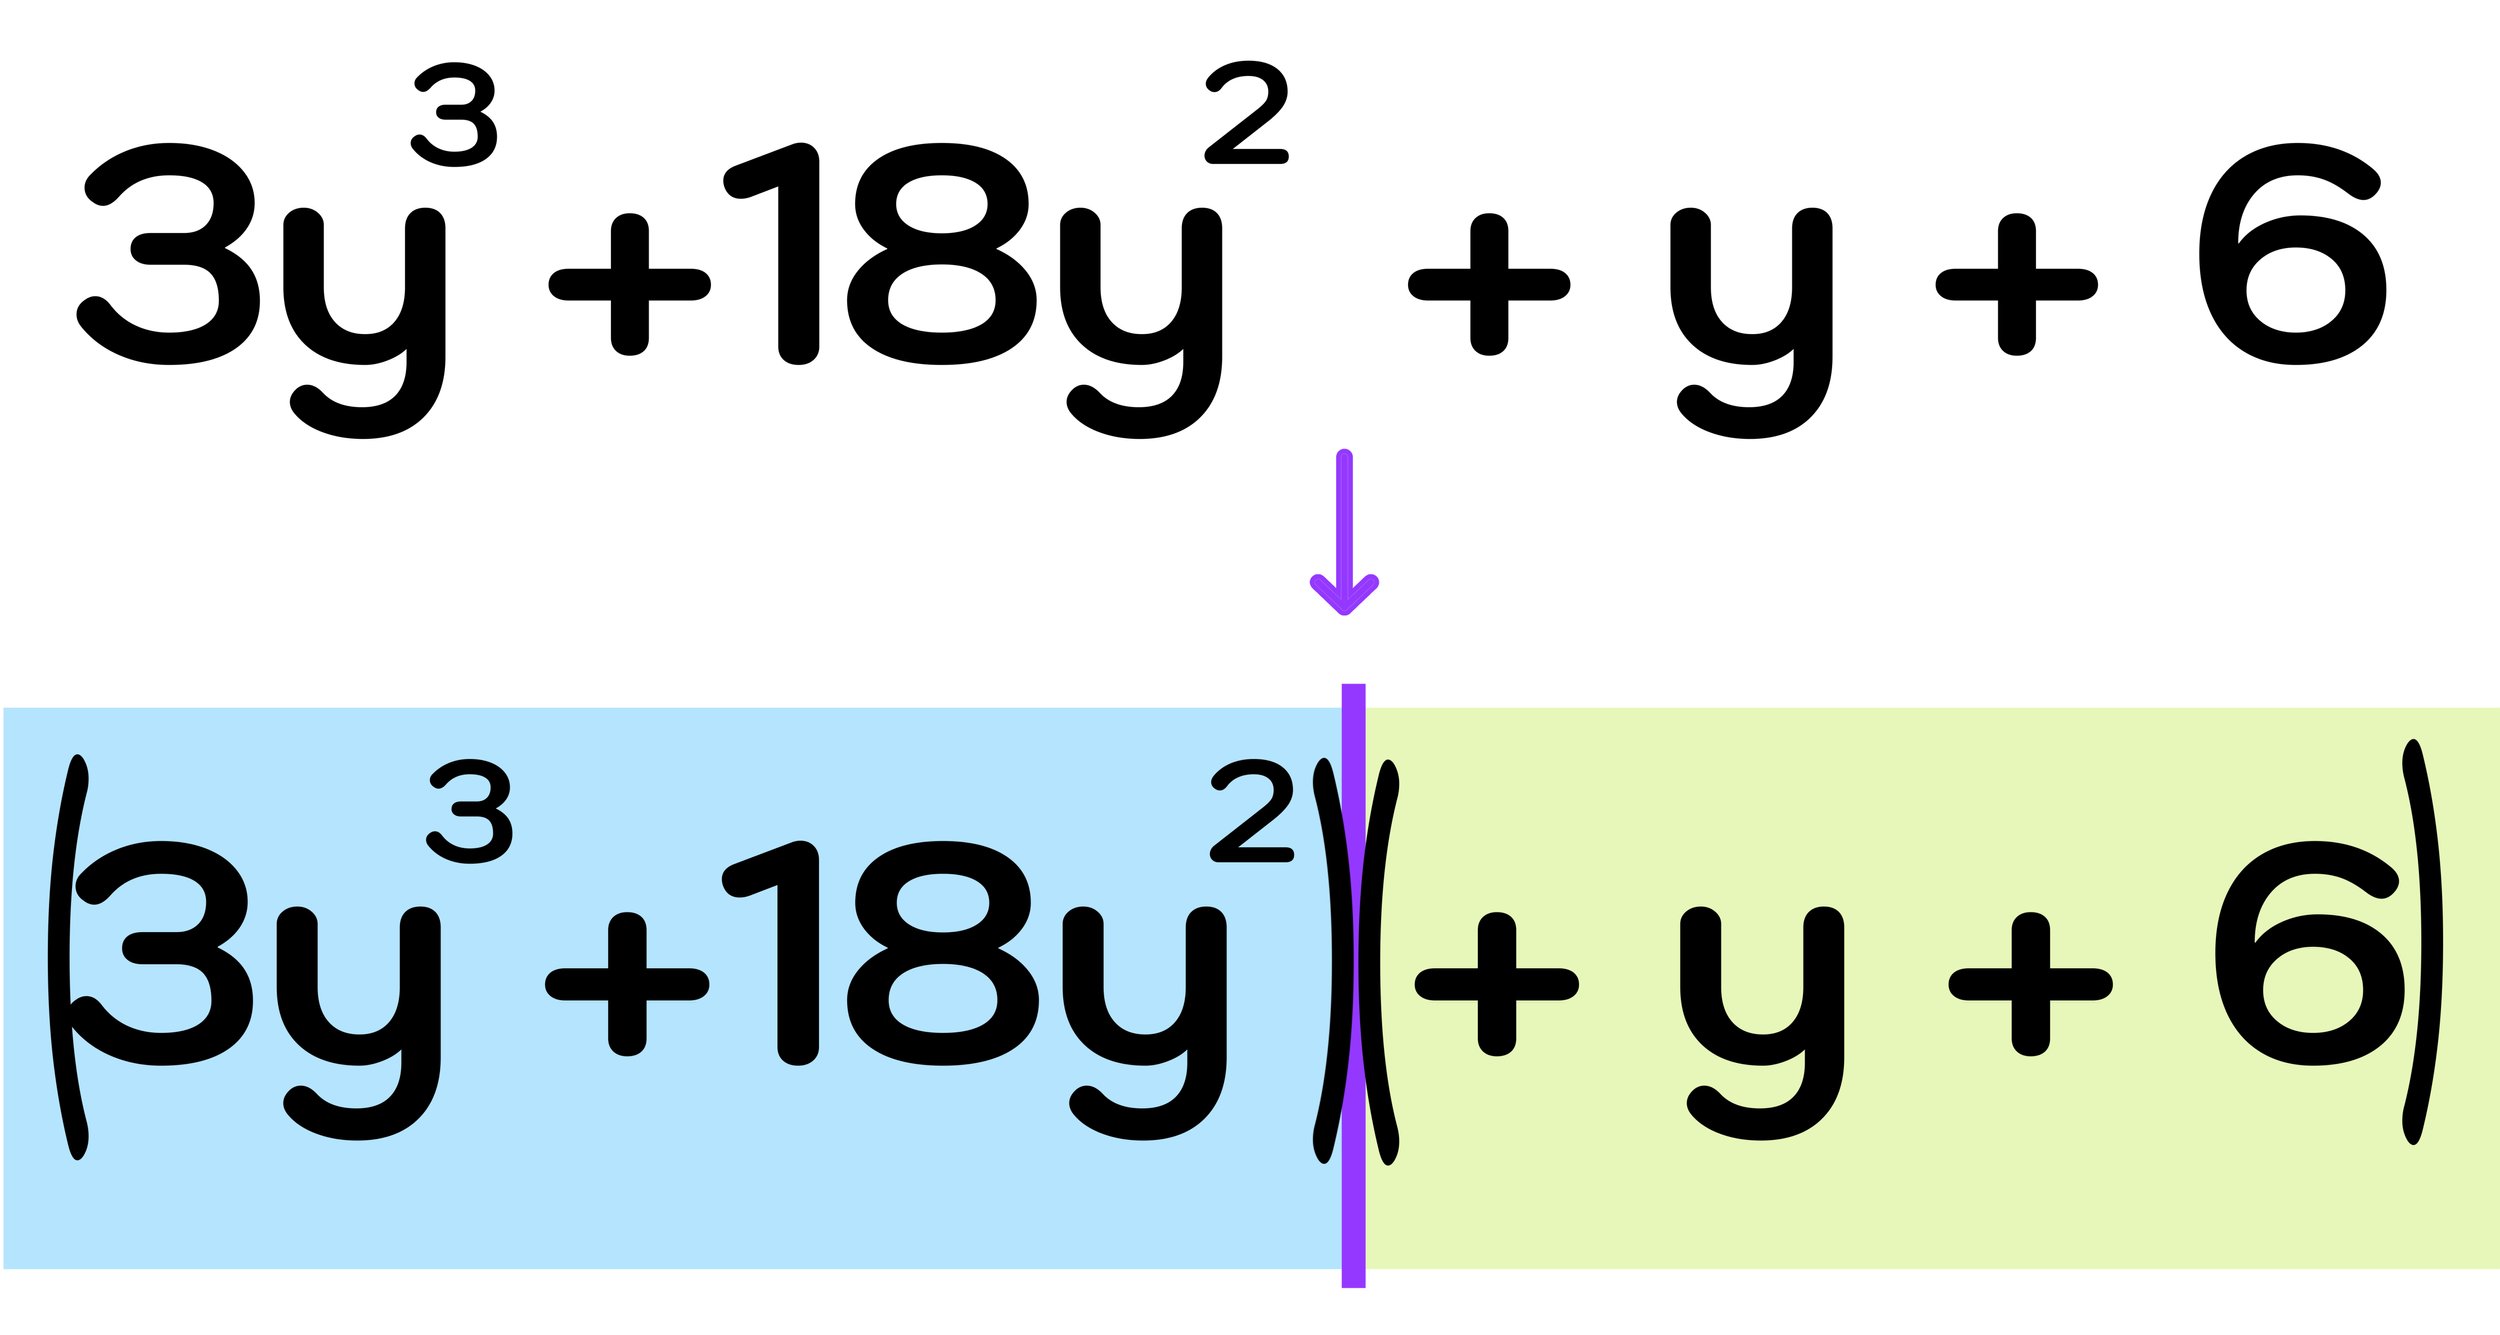
Figure 20: Split the cubic polynomial into two groups of binomials and check to see if they can both be factored by pulling out a GCF.


As shown in Figure 20 above, by completing step one, you are left with these two groups

  • (3y³ +18y²)

  • (y+6)

Hold on! Before moving onto the next step, you should notice that the second group (y+6) cannot be factored by pulling out a GCF (because there is no greatest common factor between 1y and 6).

However, notice that we can swap the middle terms of the cubic polynomial (18y² and +y) as shown in Figure 21 below.

Now, we can factor a new 4 term polynomial 3y³ + y + 18y² + 6 that is equivalent to the original 4 term polynomial since the commutative property of addition allows you to rearrange the terms.


Figure 21: The commutative property of addition allows you to rearrange the middle terms when you are unable to group and GCF the original cubic polynomial.


Notice that you can split this new polynomial into two binomials that can be factored by pulling out a GCF:

  • (3y³ + y)

  • (18y² + 6)


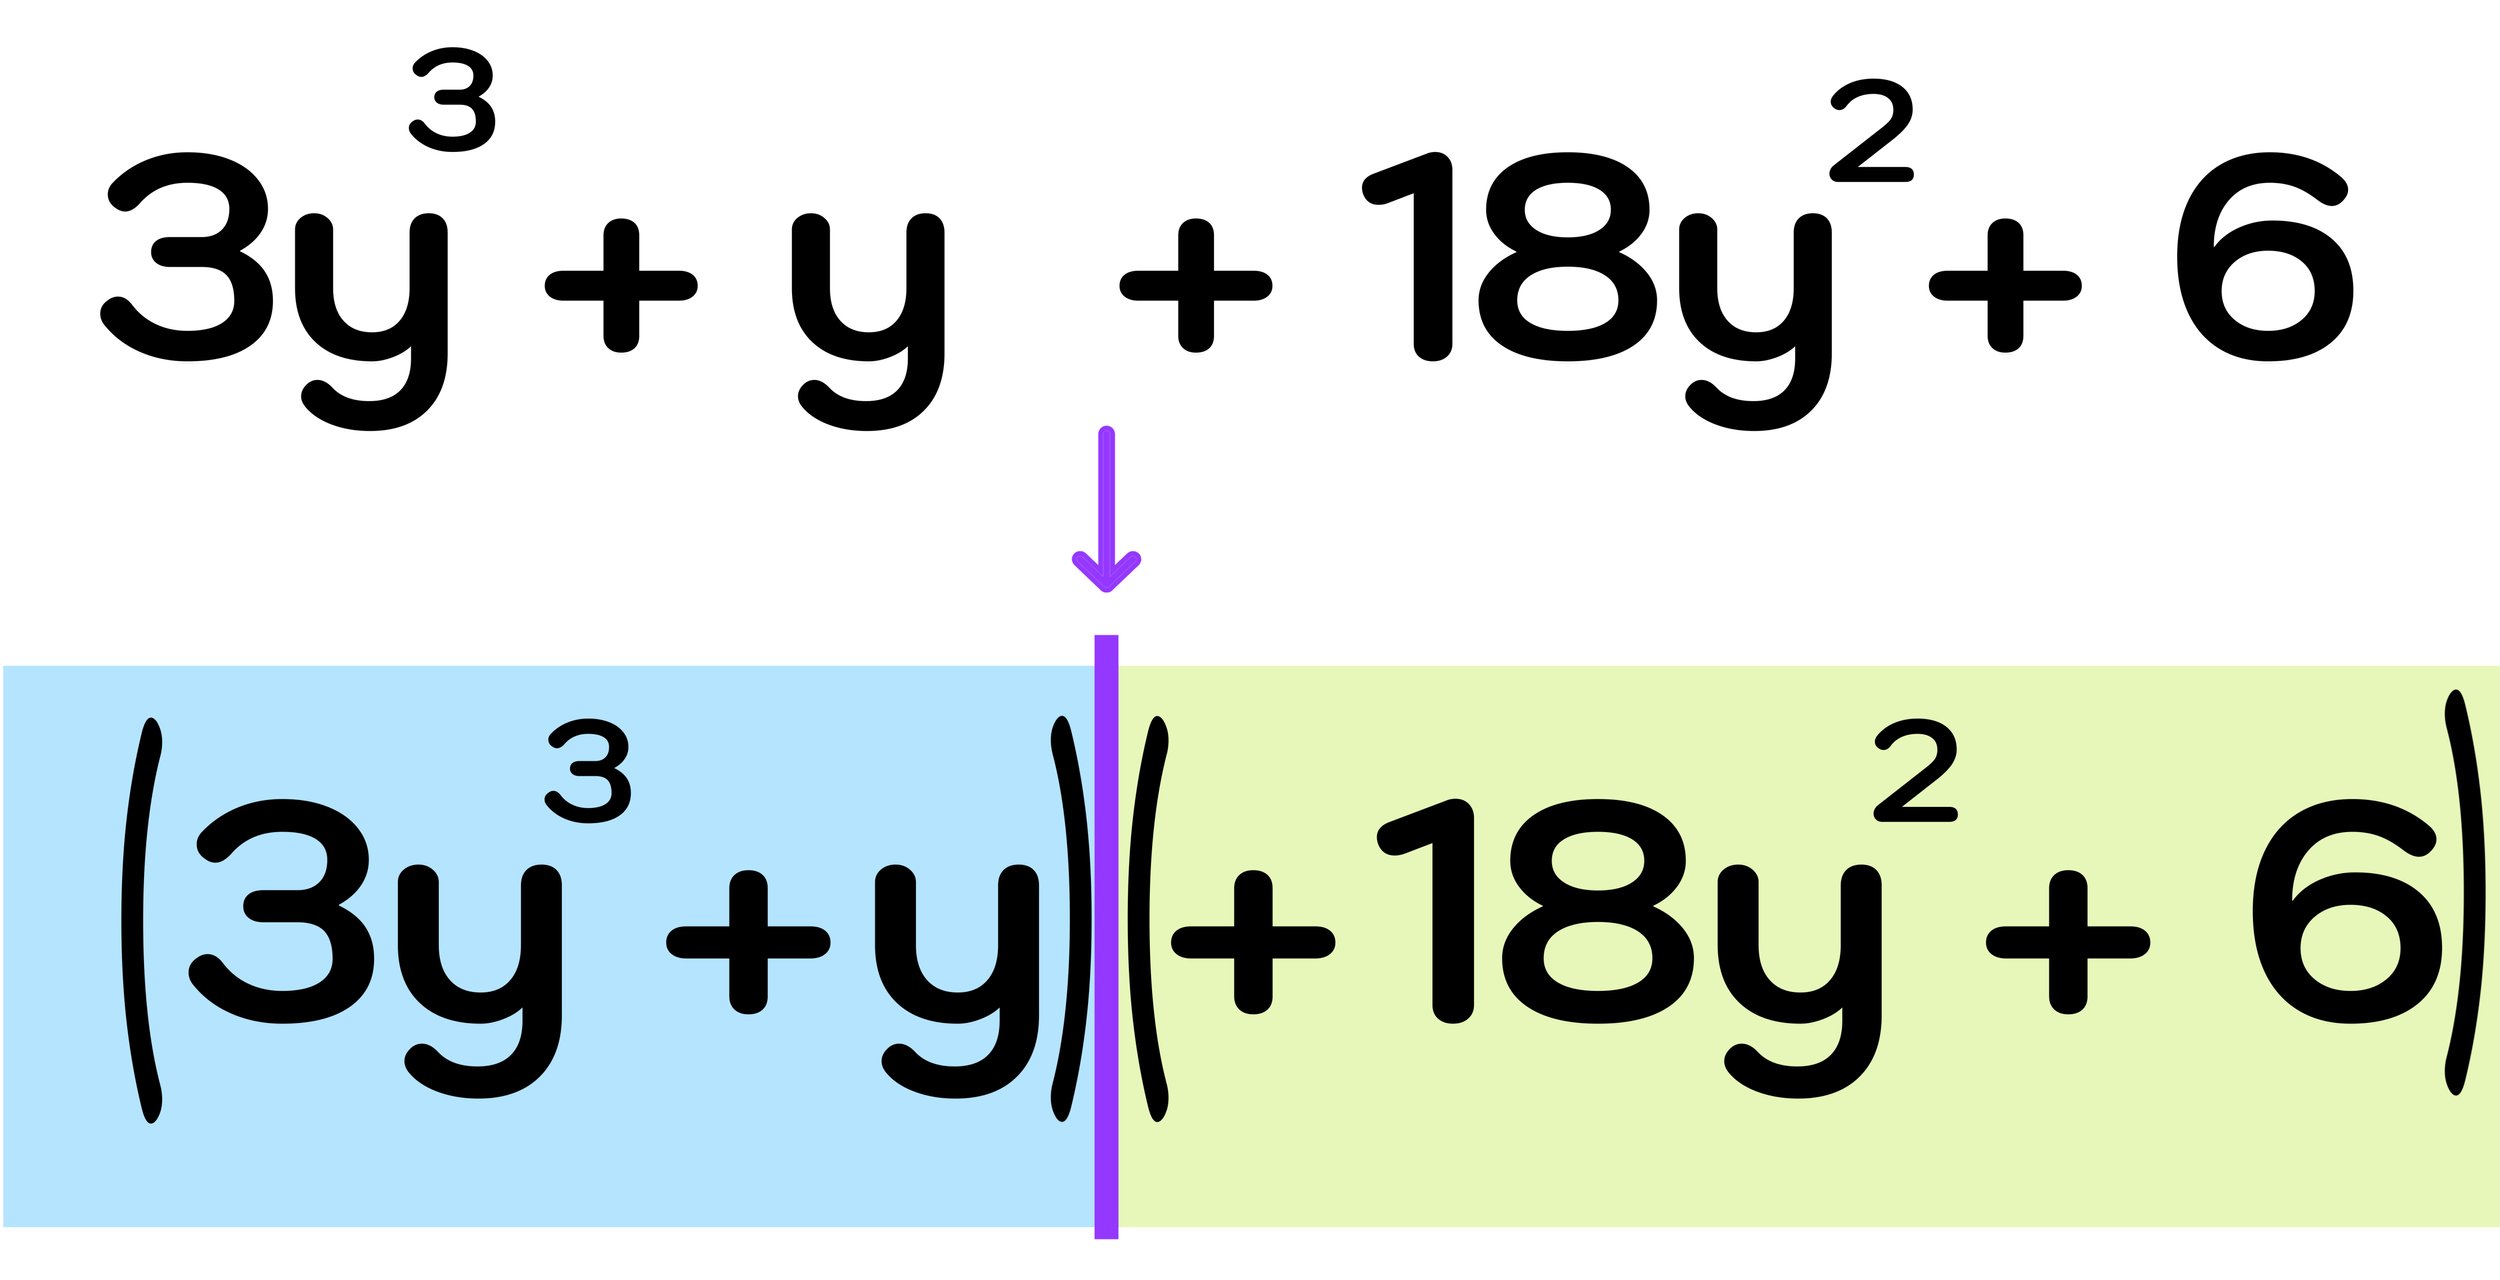
Figure 22: After rearranging the original cubic polynomial, you can split it into two binomial groups that can be factoring by pulling out a GCF.


Step Two: Factor each binomial by pulling out a GCF

As illustrated in Figure 22 above, after rearranging the original cubic polynomial, you can split it into two binomial groups that can be factoring by pulling out a GCF as follows:

  • (3y³ + y) → y(3y² + 1)

  • (18y² + 6) → 6(3y² + 1)

Step Three: Identify the factors

Now, you can see that both factors have a (3y² + 1) term, which means that you have factored correctly.

Final Answer: The factors of 3y³ + 18y² + y + 6 are (y+6) and (3y² + 1)

The entire process of how to factor polynomials a cubic polynomial like the one in this example is illustrated in Figure 23 below.


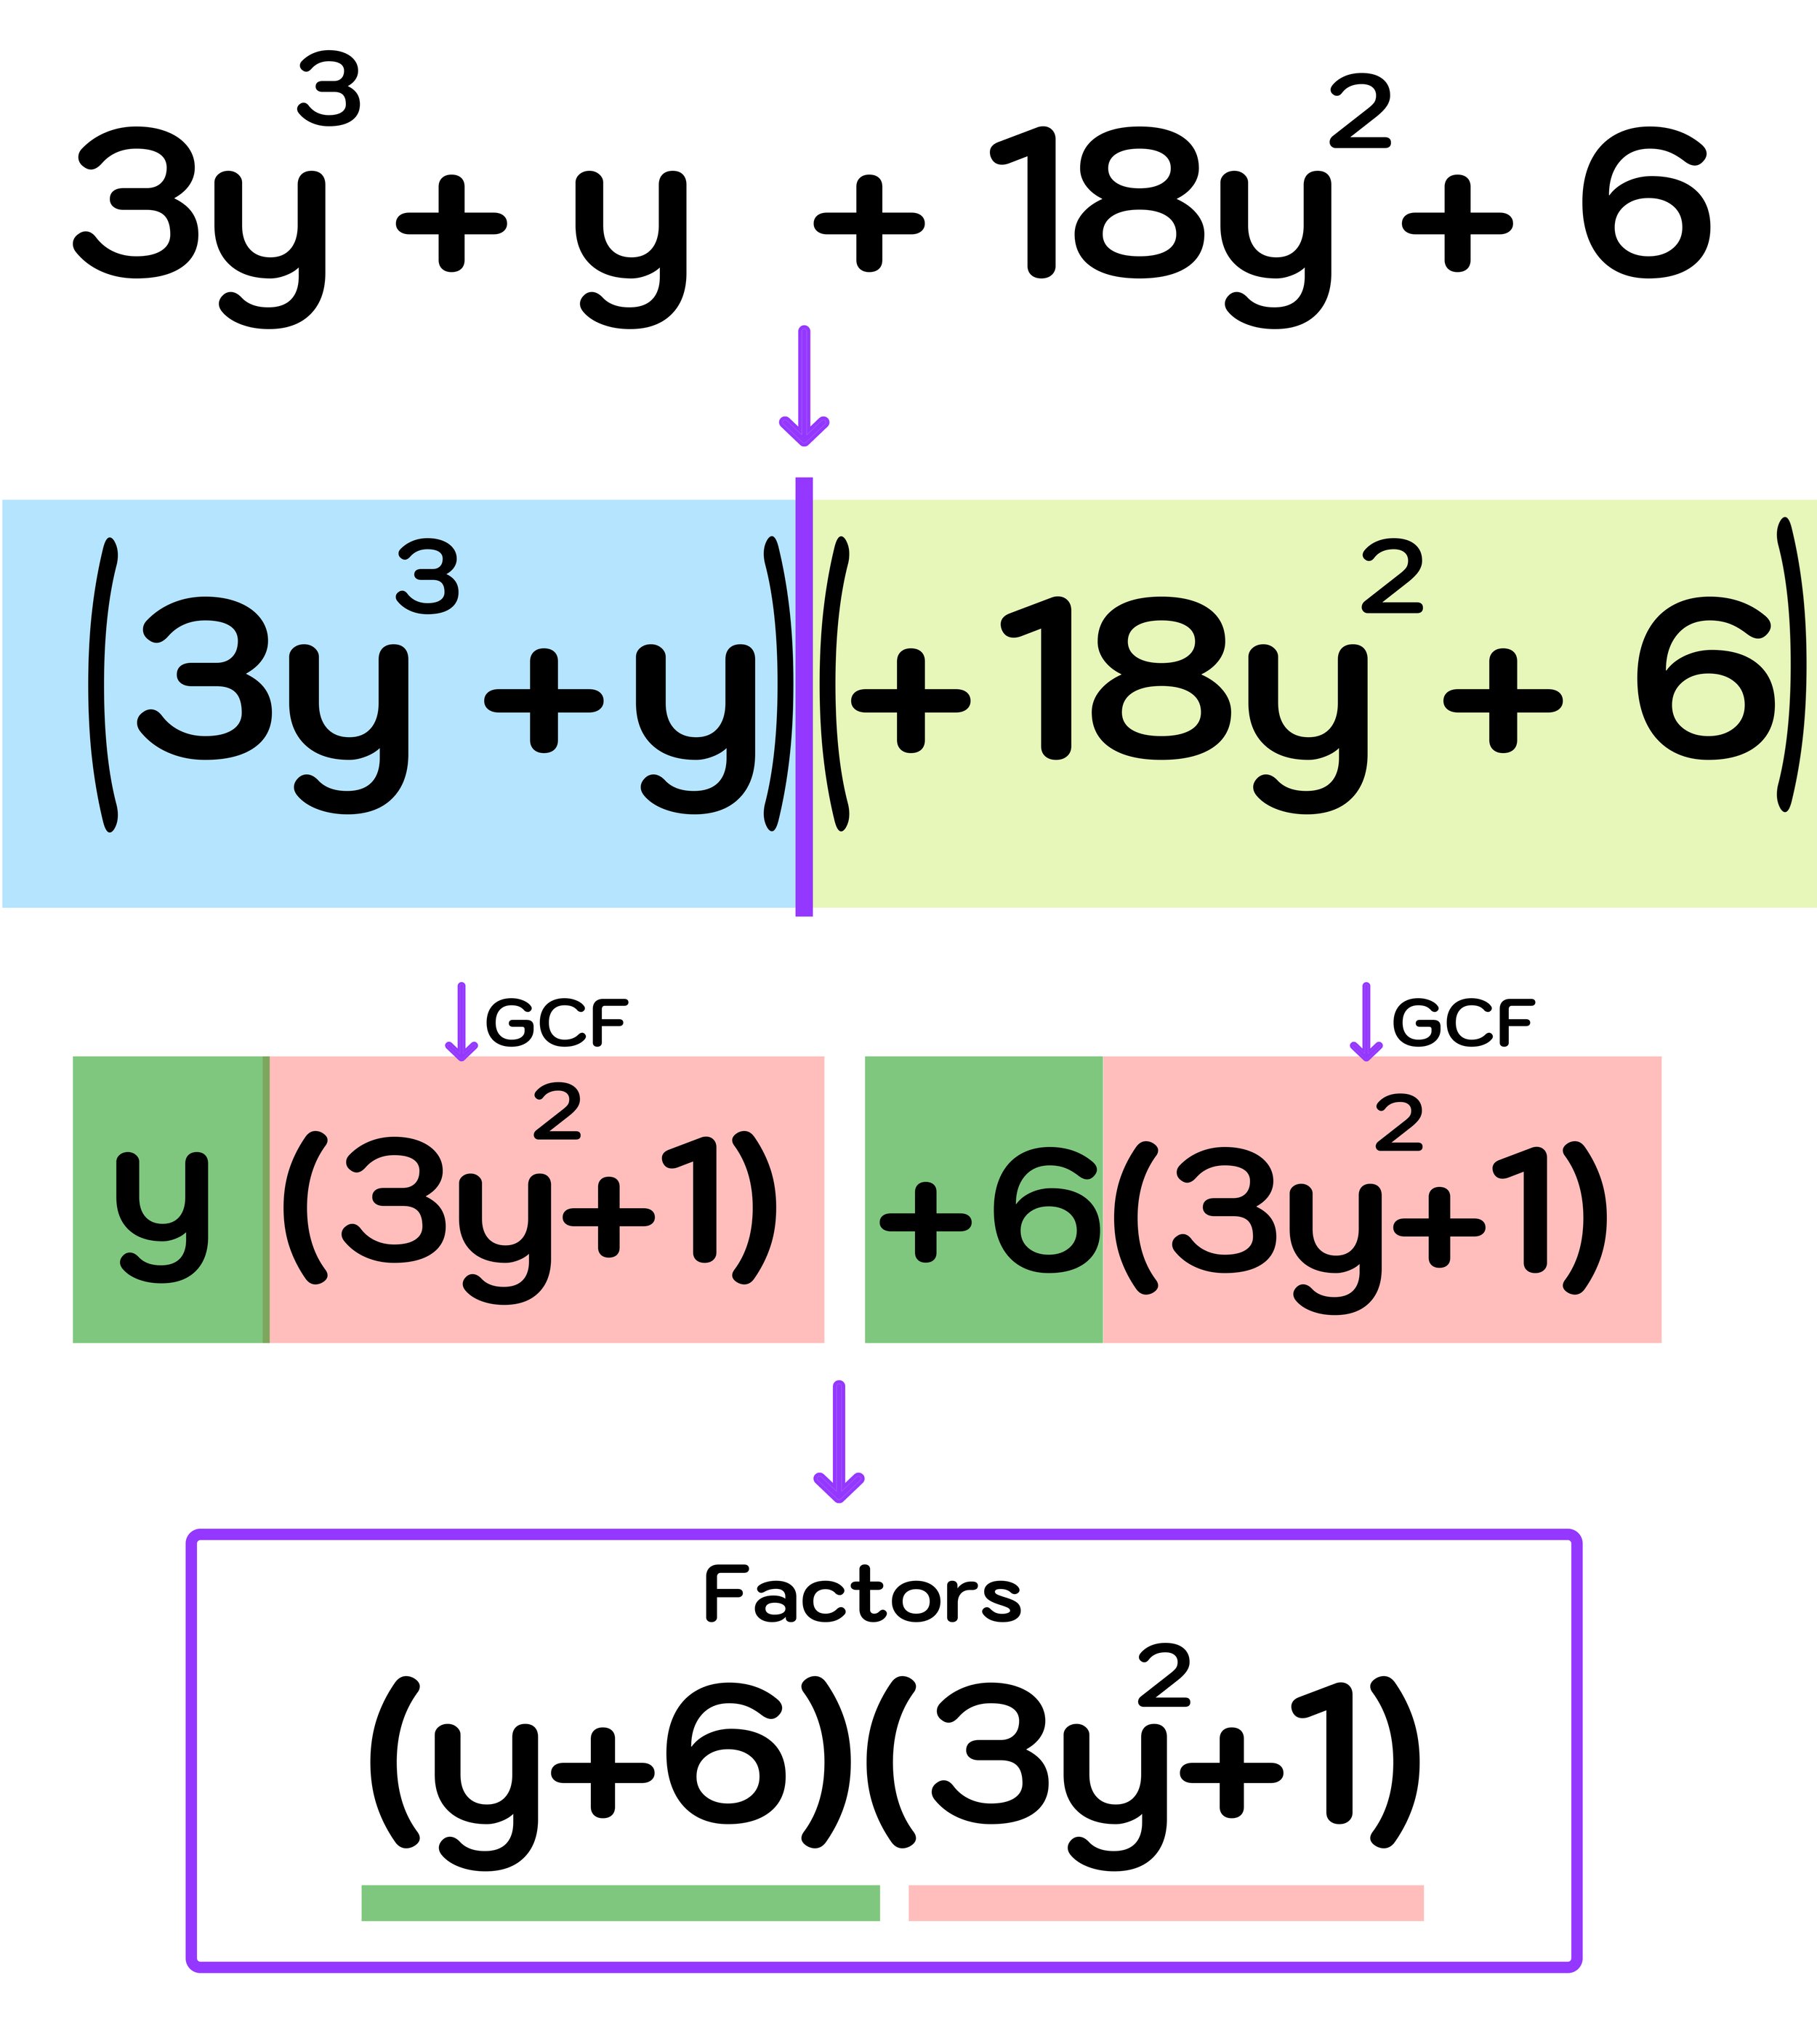
Figure 23: How to factor cubic polynomials by grouping (step-by-step).


Factoring Polynomials Advanced Problems

Now that we have covered how to factor polynomials in a variety of different ways, let’s take a look at two advanced factoring polynomials problems. These are the type of questions that you might find on a unit test or a standardized exam. Let’s see if we can apply what we learned earlier in this guide to solve it.

Advanced Factoring Polynomials Problem #1

Factor: (2/3)x² + (1/3)x -1

At first glance, this factoring problem looks different than our previous examples because it has fractions as coefficients. However, since the polynomial is in ax² +bx + c form, we can factor it using a familiar strategy.

First, let’s identify the values of a, b, and c:

  • a= 2/3

  • b=1/3

  • c=-1

Since 2/3, 1/3, and 1 do not share any common factors, we can not pull out a GCF.

Figure 24: Factoring Polynomials Advanced Problem #1

But, we can use the AC method to factor this trinomial as follows:

Step One: Identify the values of a and c and multiply them together

In this case, a=2/3 and c= -1, so

  • a x c = 2/3 x -1 = (-2/3)x

Step Two: Factor and replace the middle term

For the next step, we have to use our result from step one to factor and replace the middle term (1/3)x:

The middle term is currently -1x and note that:

  • (1/3)x = (-2/3)x + 1x

Since our current middle term ((1/3)x is equivalent to (-2/3)x + 1x, we can rewrite the original trinomial as:

  • (2/3)x² - (2/3)x + 1x -1

Step Three: Split the new polynomial down the middle and take the GCF of each side

For the third step in the AC method, we have to split the polynomial down the middle and take the GCF of each side:

  • First Half: (2/3)x² - (2/3)x

  • Second Half: 1x -1

After taking out the GCF, we are left with:

  • First Half: (2/3)x² - (2/3)x → (2/3)x(x-1)

  • Second Half: 1x -1 → +1(x-1)

Step Four: Identify the Factors

Finally, you just have to identify the factors, which are ((2/3)x+1)(x-1)

Final Answer: (2/3)x² + (1/3)x -1 = ((2/3)x+1)(x-1)

The entire step-by-step process for solving this problem is shown in Figure 24.


Advanced Factoring Polynomials Problem #2

Factor: x³ -3x² -4x + 12

We can factor this cubic polynomial by grouping:

  • (x³ -3x²) + (-4x + 12)

Next, we have to factor each separate group:

  • (x³ -3x²) → x²(x-3)

  • (-4x + 12) → -4(x-3)

Now, we can factor out (x-3), and rewrite the result as:

  • (x²-4)(x-3)

While this may look like a final answer, we should notice that (x²-4) is a difference of two squares that we can factor as:

  • (x²-4) = (x+2)(x-2)

Finally, we can conclude that:

Final Answer: x³ -3x² -4x + 12 = (x-3)(x+2)(x-2)


Free Factoring Polynomials Practice Worksheets

If you want to further test your understanding of factoring polynomials, including the difference of two squares, factoring trinomials, factoring by completing the square, and factoring polynomials by grouping, then visit the Mashup Math Factoring Polynomials Worksheet Library, where you can download several free PDF practice worksheets with complete answer keys.

Click here to access our free Factoring Polynomials Worksheet Library.


How to Factor Polynomials: Conclusion

Learning how to factor a polynomial is an important algebra skill that every math student must learn at some point.

While factoring polynomials can be tricky, there are several useful and effective strategies that you can use to factor polynomials. The strategy that you choose will depend on how many terms a polynomial has (as you will often be dealing with factoring polynomials with 2, 3, or 4 terms).

The best way to get better at factoring polynomials (especially cubic polynomials that have 4 terms) is by working through practice problems step-by-step. If you feel like you need more practice, we highly recommend working through the examples in this guide several times to gain more experience.

Keep Learning:


3rd Grade Word Problems—Free PDF Worksheet Library

Comment

3rd Grade Word Problems—Free PDF Worksheet Library

3rd Grade Word Problems—Free PDF Worksheets with Answer Keys

Looking for Free Printable 3rd Grade Math Worksheets?


Are you looking for free and engaging 3rd grade math word problems worksheets to share with your students?


Whether you are a 3rd grade classroom teacher or a parent of a 3rd grade student, you could use some free and engaging word problems for 3rd grade students to help them to develop important foundational math skills. This page shares a huge collection of 3rd grade word problems that cover topics including addition, subtraction, two-step problems, elapsed time, and more.

Jump to a Topic:

Whether you’re in need of worksheets for addition or subtraction word problems, two-step word problems for 3rd grade students, telling time and elapsed time word problems, area and perimeter word problems, or even measurement word problems, the 3rd grade word problems worksheet collection below will surely have something for you.


All of our 3rd grade math word problems worksheets are easy to print and share in your classroom.


3rd Grade Word Problems: Single-Digit Addition

Math Skill Focus: Simple Addition, Adding Single-Digit Numbers

The following 3rd Grade Word Problems focus on basic addition in real-world scenarios.

You can preview any of the worksheets in this collection by clicking on any of the image boxes below, and you can download the corresponding PDF file by clicking on any of the blue text links. Each PDF file will include a set of word problems for 3rd grade students followed by a complete answer key on the last page.

For example, Dotty made 2 sugar cookies and 7 chocolate chip cookies. How many cookies did she make in total?

Worksheet A

Worksheet B

Worksheet C

These 3rd grade word problems worksheets focus on the basic foundational skill of adding single-digit numbers in a real-world context. They require students to identify key information, use mathematical thinking, correctly perform simple addition, and express their answer in writing.


3rd Grade Word Problems: Double-Digit Addition

Math Skill Focus: Simple Addition, Adding Double-Digit Numbers

Once your students have mastered solving single-digit word problems for 3rd grade, the next step is to work through similar problems that involve adding two-digit numbers to solve word problems related to real-world scenarios.

For example, Elly is making donuts to sell at a local bake sale. He bakes 24 chocolate donuts, 21 vanilla donuts, and 15 cinnamon donuts. How many donuts did Elly bake?

Worksheet A

Worksheet B

Worksheet C


Do you want more free 3rd Grade Math Activities in your inbox every week?


3rd Grade Word Problems: Single-Digit Subtraction

Math Skill Focus: Simple Subtraction, Subtracting Single-Digit Numbers

The following 3rd Grade Word Problems focus on basic subtraction in real-world scenarios. Once students have mastered these types of 3rd grade math word problems, they can move onto the double-digit subtraction word problems in the next section.

For example, Ruben planted 12 flower seeds in his garden. After the first week, 3 of the seeds sprouted. After the second week, 5 more of the seeds sprouted. How may of the seeds did not sprout?

Worksheet A

Worksheet B

Worksheet C


3rd Grade Word Problems: Double-Digit Subtraction

Math Skill Focus: Simple Subtraction, Subtracting Double-Digit Numbers

Once your students are comfortable with solving 3rd grade math word problems involving single-digit subtraction, they can take the next step to solving problems involving finding the difference of two-digit numbers in a word problem format.

For example, Bethany has to cleanup after a dinner party. She has to wash 28 dishes in total. She has already washed 12 of the dishes. How many dishes does she have left to wash?

Worksheet A

Worksheet B

Worksheet C

In the next section, we will share some word problems for 3rd grade that focus on mixed addition and subtraction, where students will have to extend their thinking to using the context clues from each problem to determine whether they have to perform addition or subtraction to solve each problem.


3rd Grade Word Problems: Mixed Addition and Subtraction

Math Skill Focus: Mixed Addition and Subtraction, Word Problem Solving

This next set of 3rd grade math word problems require students to use their math skills to determine whether or not they have to use addition or subtraction to solve each word problem.

For example, There were 24 notebooks in a bin. Students took 11 for their backpacks. How many notebooks are left in the bin?


3rd Grade Word Problems: Two-Step Word Problems

Math Skill Focus: Use addition and/or subtraction to solve two-step word problems

One of the biggest differences between 2nd grade math and 3rd grade math is that 3rd graders begin learning how to solve word problems that require multiple steps to solve.

For example, Joey has 10 apples. He gives 4 apples to Josh and 3 apples to Jane. How many apples does Joey have left?

Worksheet A

Worksheet B

Worksheet C

The next two sections will share word problems for 3rd grade students that focus on two auxiliary topics: elapsed time and area and perimeter of rectangles.


3rd Grade Word Problems: Elapsed Time

Math Skill Focus: Solve word problems involving time, units of time (minutes, hours, etc.), and elapsed time

Outside of learning how to solve word problems involving operations, another important 3rd grade math topic is dealing with time, units of time, and elapsed time. This section shares three 3rd grade word problems worksheets related to elapsed time.

For example, Jackson started his homework at 3:15 PM. He finished at 3:50 PM. How many minutes did he spend on completing his homework?

Worksheet A

Worksheet B

Worksheet C


3rd Grade Word Problems: Area and Perimeter of Rectangles

Math Skill Focus: Solve word problems involving area and perimeter of rectangles

This final section includes 3rd grade math word problems worksheets on finding the area and/or perimeter of rectangular figures in real-world scenarios.

For example, Aaron is building a small rectangular flower box that is 5 feet long and 3 feet wide. What is the area, in square feet, of Aaron’s flower box?

Note that Worksheet A focuses on area only, Worksheet focuses on perimeter only, and Worksheet C involved mixed area and perimeter 3rd grade math word problems.

Worksheet A

Worksheet B

Worksheet C


Looking for More 3rd Grade Practice Worksheets?

Be sure to visit our Free 3rd Grade Math Worksheet Library, which shares hundreds of free PDF practice worksheets for a variety of 3rd grade topics.


Helpful Hints for Solving 3rd Grade Math Word Problems

The focus of our 3rd grade word problems worksheets is to give early elementary students to apply their procedural math skills to real-world situations and scenarios. Rather than just asking students to solve a simple math operation problem (e.g. 9 + 7 = ?), these types of problems are more advanced, as they require students to apply reading comprehension and to use context clues to find answers.

Since math word problems are more advanced, many students will initially struggle with them, and it takes time and practice to get better at solving 3rd grade word problems (one-step or two-step) whether they involve addition, subtraction, multiplication, mixed operations, elapsed time, or area and perimeter.

If your 3rd grader is having a hard time with solving any of the problems on any of our 3rd grade word problems worksheets, here are a few helpful hints to improve their chances of correctly solving any given word problem:


  • Read Each Question Carefully: One of the biggest reasons why 3rd graders struggle with word problems is because they fail to read each question carefully and correctly assess exactly what the problem is asking them to do. Before students attempt to solve a math word problem, they need to read to problem, identify and keywords or important information, and identify exactly what the question is asking them to do. Many students will benefit greatly from using a marker to underline key information or by using a colored highlighter.

  • Ask Questions Before You Start: While this advice applies to solving any math problem, it is particularly useful whenever students are working on math word problems. Once you have carefully read a question and identify the important information, you should ask yourself “what is this question asking me to do?” and “what will the final answer look like?”. These two questions help students come up with a plan before they attempt to solve a problem. For example, if a question asks students to find the area of a rectangle, they should be aware that their final answer will have to be in terms of square units.

Helpful Hints for Solving 3rd Grade Word Problems: Always show your work and answer using complete sentences.

  • Show Your Work: All of our 3rd grade word problems worksheets require students to show their work. But, what does showing your work actually look like? In addition to students writing out how they performed their operations, they should also be encouraged to use additional visual aids such as drawing diagrams or using tally marks. For example, when solving an area of a rectangle word problem, it is incredibly helpful to draw a rectangle and label the length of each side before attempting to solve the problem. Or, if a question involves combining a pile of 13 apples with a pile of 9 apples, students can draw each pile and then count the total number of apples.

  • Write Your Final Answer in Sentence Form: In math, word problems typically have “word answers”, so students should get used to expressing their final answer to any word problem by using a complete sentence. While this is a general rule, it is good practice for students. For example, when solving the problem “Ethan read 32 pages on Monday and 21 pages on Tuesday. He wants to read 120 pages this week. How many more pages does he need to read? “, the final answer is not just 67, but “Ethan needs to read 67 more pages.”

(Do you want free K-8 math resources and activities in your inbox every week? Click here to sign up for our free math education email newsletter)

More Math Education Posts You Will Love:

Comment

53 Funny Teacher Memes to Brighten Your Day!

Comment

53 Funny Teacher Memes to Brighten Your Day!

53 Funny Teacher Memes Every Educator Can Relate To

Get Ready to Laugh Out Loud with These Funny Memes About Teaching!

Ready for Some Funny Teacher Memes?

Being a teacher is one of the toughest—and often most under-appreciated—careers a person can have.

And, while teaching can be an incredibly rewarding job with tons of positives (like making a difference in the daily lives of your students), there are also some negatives and frustrations that accompany the task of educating students for a living.

In the spirit of taking the bad with the good when it comes to be a teacher, it can fun be to celebrate the quirks of the profession, many of which only yourself and fellow teachers can truly understand.

So, let’s take a moment to celebrate the craft that is being a professional educator in a fun and humorous way by sharing the best and funniest teacher memes that the internet has to offer!

Below you will find our collection of the 53 best teacher memes, many of which are all too relatable to those who work inside of a classroom. Each teacher meme shines a light on some of the more frustrating and/or perplexing aspects of being a teacher at any grade level.

Whether you are dealing with rowdy children, out-of-touch administrators, delusional parents, or never-ending meetings and conferences that obviously could have been emails, this page surely has a meme or two that will have you rolling on the floor laughing in no time!

A hysterical teacher meme or two is just what you need to make it through your day!

Before you jump into our collection of 53 funny teacher memes, remember that each teach meme is meant to be playful and they are meant to be taken light-heartedly. Also remember that laughter is often the best medicine and it’s totally fine to laugh out loud at some of the vexing aspects of being an educator.

Whenever you are ready to laugh, scroll down to start enjoying our funny teacher memes and, if you find any memes to be exceptionally hysterical, then feel free to share this page with your fellow teachers to spread some much-needed joy and laughter :)


Funny Teacher Memes #1-10

1.) This can happen to the best of us.


Teacher Meme #1: When you forget to remember…


2.) I swear, I was only gone for two seconds!


Teacher Meme #2: 😬


3.) When the classroom telephone starts ringing the tenth time today…


4.) Yes, yessssss….


This may be the best teacher meme of all time!


5.) Your students doing anything to avoid actually doing their classwork…


Funny Teacher Meme via Reddit User u/aRabidGorilla


6.) All of the moisturizer in the world couldn’t save us!


Teaching Memes Every Educator Can Relate To!


7.) Is this even written in English?


Funny Teacher Memes #7


8.) Your reaction to accidentally overhearig your students’ personal conversations…


9.) You can not possibly be even remotely serious…


Teaching Memes #10


10.) When you’re in the middle of an awesome lesson and the fire alarm goes off…

 
Embed Block
Add an embed URL or code. Learn more
 

Funny Teacher Memes #11-20

Are you ready for the next ten hysterical teacher memes that will have you and your colleagues laughing out loud?

11.) We’re all thinking it…


Funny Memes About Teaching: What does the principle even do?


12.) When you start handing out rulers to your students…


13.) It’s sad—I mean, funny—because it’s true.


Teacher Memes: Sad, but True.


14.) May I laugh at this funny teacher meme?


Funny Teacher Memes #14


15.) You shall not pass!


Teacher Meme #11


16.) Good riddance!


Funny Teacher Memes #16


17.) When April Fools’ Day falls on the weekend….


18.) Dream on, dreamers…


19.) We actually just sat around and waited….


This teacher meme hits hard!


20.) If looks could kill…


53 Best Teacher Memes #20: Always show your work!


Funny Teacher Memes #21-30

Let’s keep the good times going with our next ten funny teacher memes!

21.) Every day is important!


Funny Teacher Memes #21


22.) Is anyone even listening to me?


My favorite teacher meme of all time!


23.) When you find out that you have to waste your off period sitting through another meeting…


24.) Just smile and nod…smile and nod…


Teacher Meme #24: Is this relatable to you?


25.) Some say that she’s still waiting…


Funny Teacher Memes


26.) This one is all too real!


Funny Memes About Teaching!


27.) Just gotta’ keep on truckin’…


This teacher meme is a little too real, isn’t it?


28.) When the copy machine is broken again…


29.) How sweet it is!


Funny Teacher Meme #29: Gotta savor the good stuff!


30.) When a student asks you how old you are…


Funny Teacher Memes #31-40

And now for ten more funny memes teacher edition.

31.) Let me just rest my eyes for a quick second…


Funny Teacher Memes: Teachers at home at 7:38pm…


32.) When a past student tells you that you were their favorite teacher…


33.) There can only be one…


Teacher Memes #33: The Teacher’s Dilemma.


34.) You couldn’t use the telephone and go on the internet at the same time!


35.) When a student’s math homework is written in pen…


36.) Wink, wink…


This is my favorite teacher meme of all time!


37.) Whatchu’ want me to say?


Teacher Meme #37: This one is spicy, we know!


38.) Back in my day….


Funny Teacher Memes #38


39.) Don’t pop the Champagne too early!


I have this teacher meme posted in my classroom!


40.) When you get an email telling you that your after-schooling meeting was cancelled…


Funny Teacher Memes #41-53

Our funny teacher memes collection wraps up with 13 more super funny teacher memes that will have your sides hurting!

41.) Feelin’ hot, hot, hot!


Can you relate to this funny teacher meme?


42.) Ya gotta’ love it!


Funny Teacher Memes #42


43.) When your class gets interrupted by a knock at the door…


44.) I guess it just doesn’t work that way…


45.) When you already explained something five different ways and students are still saying that they don’t get it…


46.) It takes two to Tango….


I also have this teacher meme posted in my classroom.


47.) When you find out that your students were well-behaved for the sub…


48.) If only a Panera Bread platter could solve all of our problems…


Is teacher meme #48 a truth bomb?


49.) No, I will not cover hall duty right now…


50.) The Parent-Teacher Conference Day experience in a nutshell…


51.) Most of us will probably go this way…


52) I’m not crying, you’re crying!


Funny Teacher Meme #52


53.) Every teacher after the last day of school before summer vacation…


That wraps up our list of the 53 funniest teacher memes that the internet has to offer! We hope that you these memes brightened up your day, and that you had a few laughs along the way. If you are looking for a few different ways that you can share and enjoy these teacher memes, here are a few ideas:

  • Revisit this page whenever the demands of teaching are weighing you down and you need a good chuckle or two to restore your sanity.

  • Share your favorite teacher memes in your teacher group chat or email chain to indulge in some humorous commiseration!

  • Post a funny teacher meme on social media to connect with fellow teachers, parents, and administrators.

  • Print and post a few funny teacher memes in your classroom to share some insight and humor with your students. This can be a fun way to give your students an idea of some of the challenges of being a teacher and working with students for a living.

  • Use these memes in meeting and/or professional development presentations to serve as an icebreaker or to simply break things up by injectiing some light-hearted and topical humor into the mix.

(Do you want more free K-8 math resources and activities in your inbox every week? Click here to sign up for our math education email newsletter)

Did you laugh, cry, or both? Share your reaction in the comments below!

More K-8 Education Resources You Will Love:

Comment

Quadratic Formula Examples—Solved Step-by-Step

Comment

Quadratic Formula Examples—Solved Step-by-Step

Quadratic Formula Examples Tutorial

Step-by-Step Guide: Examples of How to Find the Roots of a Quadratic Function using the Quadratic Formula


Step-by-Step Guide: Quadratic Formula Examples Solved


Are you ready to work through a few quadratic formula examples to gain some more practice and experience with solving quadratic equations using the quadratic formula?

In math, the quadratic formula, x= (-b ± [√(b² - 4ac)]) / 2a is an incredibly important and useful formula that you can use to find the solutions (also known as roots) or any quadratic equation of the form ax² + bx + c = 0 (where a ≠ 0), whether it is easy to factor or not!

If you know how to use the quadratic formula, then you can solve a variety of algebra problems involving quadratic equations, and learning how to use it correctly is something that you can easily learn with some practice and repetition.

This free Quadratic Formula Examples Step-by-Step Guide includes a short review of the quadratic formula as well as several different practice problems that we will work through and solve using the quadratic formula with a step-by-step explanation. The guide is organize by the following sections, and you can click on any of the hyperlinks below to jump to any particular spot:

Before we dive into any of the quadratic formula examples, let’s start off with a quick review of the quadratic formula and why it is such a useful algebra tool.


Figure 01: The Quadratic Formula


What is the Quadratic Formula?

Before you can learn how to use the quadratic formula, it is important that you understand what a quadratic equation is.

Definition: A quadratic equation is a function of the form ax² + bx + c = 0 (where a does not equal zero). On a graph, a quadratic equation can be represented by a parabola. The x-values where the parabola crosses the x-axis is called the solutions, or roots, of the quadratic equation.

For example, consider the following quadratic equation:

  • x² + 5x + 6 = 0

Notice that this equation is in ax² + bx + c = 0 form, where…

  • a=1

  • b=5

  • c=6

If we want to find the solutions, or roots, of this quadratic equation, we have a few options.

First, we could factor this quadratic equation by looking for two values that add to 5 and also multiply to 6, which, in this case, would be 2 and 3. So we could say that…

  • x² + 5x + 6 = 0 → (x+2)(x+3) = 0

We could then solve for each factor as follows:

  • x + 2 = 0 → x = -2

  • x + 3 = 0 → x = -3

Now we can conclude that the solutions of this quadratic are x=-2 or x=-3.


Figure 02: What are the solutions (or roots) of a quadratic equation?


Another option for finding the solutions to a quadratic equation is to look at its graph. The solutions, or roots, will be the x-values where the graph crosses the x—axis. Note that quadratic equations can have two roots, one root, or even no real roots (as you will see later in this guide).

As for the equation x² + 5x + 6 = 0, the corresponding graph in Figure 02 above confirms that the equation has solutions at x=-2 and x=-3.

But what do we do when a quadratic equation is very difficult to factor or when we do not have access to a clear graph? Well, this is where the quadratic formula comes into play.

Definition: Any quadratic equation of the form ax² + bx + c = 0 (where a ≠ 0), can be solved using the quadratic formula, which states that…

  • x= (-b ± [√(b² - 4ac)]) / 2a

Why is the quadratic formula so useful? Because, as the definition states, it can be used to find the solutions to any quadratic equation. While the quadratic equation that we just looked at, x² + 5x + 6 = 0, was pretty easy to work with and solve, it is considered extremely simple. As you move farther along your algebra journey, you will come across more and more complex quadratic equations that can be very difficult to factor or even graph.

However, if you know how to use the quadratic formula, you can successfully solve any quadratic equation. With this in mind, let’s go ahead and work through some quadratic formula examples so you can gain some practice.

And we will start by using it to solve x² + 5x + 6 = 0, because we already know that the solutions are x=-2 and x=-3. If the quadratic formula works, then it should yield us that same result. Once we work through this first simple example, we will move onto more complex examples of how to use the quadratic formula to solve quadratic equations.


Figure 03: To use the quadratic formula, start by identifying the values of a, b, and c.


Quadratic Formula Examples

We will begin by using the quadratic formula to solve the equation shown in Figure 02 above: x² + 5x + 6 = 0

Example #1: Solve x² + 5x + 6 = 0

First, notice that our equation is in ax² + bx + c = 0 form where:

  • a=1

  • b=5

  • c=6

Identifying the values of a, b, and c will always be the first step (provided that the equation is already in ax² + bx + c = 0 form).

Now that we know the values of a, b, and c, we can plug them into the quadratic equation as follows:

  • x= (-b ± [√(b² - 4ac)]) / 2a

  • x= -(5) ± [√(5² - 4(1)(6))]) / 2(1)

  • x= -5 ± [√(25 - 24)] / 2

  • x= -5 ± [√(1)] / 2

  • x= (-5 ± 1) / 2

Now we are left with x= (-5 ± 1) / 2. Note that the ± mean “plus or minus” meaning that we have to split this result into two separate equations:

  • Plus: x = (-5 + 1) / 2

  • Minus: x = (-5 - 1) / 2

By solving these two separate equations, we can find the solutions to the quadratic function x² + 5x + 6 = 0.

  • x = (-5 + 1) / 2 = -4/2 = -2 x=-2

  • x = (-5 - 1) / 2 = -6/2 = -3 x=-3

After solving both equations, we are left with x=-2 and x=-3, which we already knew were the solutions to x² + 5x + 6 = 0. So, we have confirmed that the quadratic formula can be used to find the solutions to any quadratic equation of the form ax² + bx + c = 0.

Final Answer: x=-2 and x=-3

The steps to solving the quadratic formula example is illustrated in Figure 04 below.


Figure 04: Quadratic Formula Examples Step-by-Step


Example #2: Solve 2x² + 2x -12 = 0

For our next quadratic formula example, we will again start by identifying the values of a, b, and c as follows:

  • a=2

  • b=2

  • c=-12

Make sure that you correctly identify the sign (positive or negative) as well, since this is necessary to using to quadratic formula correctly.

Next, we can substitute these values for a, b, and c into the quadratic formula as follows:

  • x= (-b ± [√(b² - 4ac)]) / 2a

  • x= -(2) ± [√(2² - 4(2)(-12))]) / 2(2)

  • x= -2 ± [√(4 - -96)] / 4

  • x= -2 ± [√(100)] / 4

  • x= (-2 ± 10) / 4

Our result is x= (-2 ± 10) / 4. From here, we can rewrite e the result as two separate equations by “spitting” the ± sign as follows:

  • Plus: x= (-2 + 10) / 4

  • Minus:x= (-2 - 10) / 4

Now we can solve each individual equation to find the values of x that will be the solutions of this quadratic equation.

  • x= (-2 + 10) / 4 = 8/4 = 2 x=2

  • x = (-2 - 10) / 4 = -12/4 = 3 x=3

We are left with two values for x: x=2 and x=-3, and we can conclude that the quadratic equation 2x² + 2x -12 = 0 has the following solutions:

Final Answer: x=2 and x=-3

Figure 05 shows the step-by-step process for solving this quadratic formula example.


Figure 05: Quadratic Formula Examples #2 Solved


Example #3: Solve 2x² -5x + 3 = 0

For the next of our quadratic formula examples calls for us to use the quadratic formula to find the solutions to a quadratic function where:

  • a=2

  • b=-5

  • c=3

The process of substituting a, b, and c into quadratic formula will be exactly the same as the last two quadratic formula examples.

  • x= (-b ± [√(b² - 4ac)]) / 2a

  • x= -(-5) ± [√(-5² - 4(2)(3))]) / 2(2)

  • x= 5 ± [√(25 - 24)] / 4

  • x= 5 ± [√(1)] / 4

  • x= (5 ± 1) / 4

Are you starting to get the hang of it? Now that we have simplified our equation, we are left with x= (5 ± 1) / 4. And, just like the last two examples, we can go ahead and split this result into two separate equations as follows:

  • Plus: x= (5 + 1) / 4

  • Minus: x= (5 - 1) / 4

Finally, we just have to solve each equation to get our final answer (i.e. the values of the solutions).

  • x= (5+1) / 4 = 6/4 = 3/2 x=3/2

  • x= (5-1) / 4 = 4/4 = 1 x=1

Notice that the result of the first equation ended up as a fraction (3/2). This is totally fine! It just means that the parabola will cross the x-axis in the middle of a box (rather than hitting directly at an integer coordinate).

Final Answer: x=3/2 and x=1

All of the steps for solving this example are shown in Figure 06 below.


Figure 06: Sometimes a quadratic formula will give you a solution that is a fraction.


Example #4: Solve 3x² + 2 = 7x

The fourth and final of our quadratic formula examples looks a bit different. The given equation 3x² + 2 = 7x is not in ax² + bx + c = 0 form.

Whenever this is the case, we will have to see if we can use algebra to rearrange the equation so to make into ax² + bx + c = 0 form. We can do that by using inverse operations to move the 7x to the left-side of the equation as follows:

  • 3x² + 2 = 7x

  • 3x² + 2 (-7x) = 7x (-7x)

  • 3x² + 2 -7x = 0

Notice that result, 3x² + 2 -7x = 0, still isn’t in ax² + bx + c = 0 form. However, the commutative property allows us to rearrange the terms as follows:

  • 3x² + 2 -7x = → 3x² -7x +2

Now we have an equivalent equation, 3x² -7x +2=0, that is in ax² + bx + c = 0 form, where:

  • a=3

  • b=-7

  • c=2

Sometimes you will be given equations that have to be rearranged in order to use the quadratic formula. If you can not rearrange an equation so that it can be expressed in ax² + bx + c = 0 form, then you can not solve it using the quadratic formula.

This example, however, can now be solved using the quadratic formula as follows:

  • x= (-b ± [√(b² - 4ac)]) / 2a

  • x= -(-7) ± [√(-7² - 4(3)(2))]) / 2(3)

  • x= 7 ± [√(49 - 24)] / 6

  • x= 7 ± [√(25)] / 6

  • x= (7 ± 5) / 6

Now we are left with a much easier equation to work with: x= (7 ± 5) / 6. Let’s go ahead and split it into two separate equations to solve it:

  • Plus: x= (7 + 5) / 6

  • Minus: x= (7 - 5) / 6

We can solve for x in each equation as follows:

  • x= (7+5) / 6 = 12/6 = 2 x=2

  • x= (7-5) / 6 = 2/6 = 1/3 x=1/3

Final Answer: x=2 and x=1/3

That’s all that there is to it! You can review of the steps to solving this quadratic formula example by looking at the illustration in Figure 07 below.


Figure 07: Quadratic Formula Examples: Rearranging an equation to put it into ax² + bx + c = 0 form.


Do you need more practice with using the Quadratic Formula?

Check out our free library of Quadratic Formula Worksheets (with answer keys)


Keep Learning:

Comment

Log Rules Explained! (Free Chart)

Comment

Log Rules Explained! (Free Chart)

Everything you need to know about the natural log rules.

The Natural Log Rules Explained

In math, log rules (also known as logarithm rules) are a set of rules or laws that you can use whenever you have to simplify a math expression containing logarithms. Basically, log rules are a useful tool that, when used correctly, make logarithms and logarithmic equations simpler and easier to work with when solving problems.

Once you become more familiar with the log rules and how to use the, you will be able to apply them to a variety of math problems involving logarithms. In fact, understanding and remembering the log rules is essentially a requirement when it comes to working with logarithmic expressions, so understanding these rules is essential for any student who is currently learning about logarithms.

The following free guide to the Log Rules shares and explains the rules of logs (including exponent log rules), what they represent, and, most importantly, how you can use them to simplify a given logarithmic expression.

You have the option of clicking on any of the text links below to jump to any one section of this log rules guide, or you can work through each section in order—the choice is up to you!

When you reach the end of this free guide on the rules of logs, you will have gained a solid understanding of the natural log rules and how to apply them to solving complex math problems. Let’s get started!


Figure 01: What is the relationship between the logarithmic function and the exponential function?


Quick Review: Logarithms

While this first section is optional, we recommend that you start off with a quick recap of some key math concepts and vocabulary terms related to logs.

The first important thing to understand is that logarithmic functions and exponential functions go hand-in-hand, as they are considered inverses of each other. So, make sure that you have a strong understanding of the laws of exponents before moving forward.

Since the logarithmic function is an inverse of the exponential function, we can say that:

  • aˣ = M logₐM = x

  • logₐM = x aˣ = M

The log of any value, M, can be expressed in exponential form as the exponent to which the base value of the logarithm must be raised to in order to equal M.

Understanding this inverse relationship between the logarithmic function and the exponential function will help you to better understand the log rules described in the following sections of this guide.

Learning natural log rules shared in the next section will help you to break down complex log expressions into simpler terms, which is a critical skill when it comes to learning how to successfully work with logs, how to model situations using logs, and how to solve a variety of math problems that involve logs.


What are the Log Rules?

The natural log rules are set of laws that you can use to simplify, expand, or solve logarithmic functions and equations.

The chart in Figure 02 below illustrates all of the log rules. Simply click the blue text link below the chart to download it as a printable PDF, which you can use as a study tool and a reference guide.

The section that follows the log rules chart will share an in-depth explanation of each of the log rules along with examples.


Figure 02: The Natural Log Rules and the Change of Base Formula


Each of the following log rules apply provided that:

  • a≠1 and a>0, b≠1 and b>0, a=b, and M, N, and x are real numbers where M>0 and N>0

Log Rules: The Product Rule

The first of the natural log rules that we will cover in this guide is the product rule:

  • logₐ(MN) = logₐM + logₐN


Figure 03: The product rule of logarithms.


The product rule states that the logarithm a product equals the sum of the logarithms of the factors that make up the product.

For example, we could use the product rule to expand log₃(xy) as follows:

  • log₃(xy) = log₃x + log₃y

Pretty straightforward, right? The product rule of logarithms is a simple tool that will allow you to expand logarithmic expressions and equations, which often makes them easier to work with.


Log Rules: The Quotient Rule

The second of the natural log rules that we will cover in this guide is called the quotient rule, which states that:

  • logₐ(M/N) = logₐM - logₐN; or

  • logₐ(MN) = logₐM - logₐN


Figure 04: Natural Log Rules: The Quotient Rule


The quotient rule of logs says that the logarithm a quotient equals the difference of the logarithms that are being divided (i.e. it equals the logarithm of the numerator value minus the logarithm of the denominator value).

For example, we could use the quotient rule to expand log₇(x/y) as follows:

  • log₇(x/y) = log₇x - log₇y

Notice that the product rule and the quotient rule of logarithms are very similar to the corresponding laws of exponents, which should make sense because the logarithmic function and the exponential function are inverses of each other.


Log Rules: The Power Rule

The next natural log rule is called the power rule, which states that:

  • logₐ(Mˣ) = x logₐM


Figure 05: Log Rules: The Power Rule


The power rule of logarithms says that the log of a number raised to an exponent is equal to the product of the exponent value and the logarithm of the base value.

For example, we could use the power rule to rewrite log₄(k⁸) as follows:

  • log₄(k⁸) = 8 log₄k

The power rule of logarithms is extremely useful and it often comes in handy when you are dealing with the logarithms of exponential values, so make sure that you understand it well before moving forward.


Log Rules: The Zero Rule

Moving on, the next log rule on our list is the zero rule, which states that:

  • logₐ(1) = 0


Figure 06: Log Rules: The Zero Rule


Simply put, the zero rule of logs states that the log of 1 will always equal zero as long as the base value is positive and not equal to one.

For example, we could use the zero rule to rewrite log₂(1) as follows:

  • log₂(1) = 0

This simple rule can be very useful whenever you are trying to simplify a complex logarithmic expression or equation. The ability to zero out or cancel out a term can make things much simpler and easier to work with.


Log Rules: The Identity Rule

The fifth log rule on our list is called the identity rule, which states that:

  • logₐ(a) = 1


Figure 07: Natural Log Rules: The Identity Rule


The identity rule says that whenever you take the logarithm of a value that is equal to its base value, then the result will always equal 1 provided that the base value is greater than zero and not equal to one.

For example, we could use the identity rule to rewrite log₈(8) as follows:

  • log₈(8) = 1

Similarly, we could also use the identity rule to rewrite logₓ(x) as follows:

  • logₓ(x) = 1

Just like the zero rule, the identity rule is useful as it can sometimes help you with simplifying complex log expressions and equations.


Log Rules: The Inverse Property of Logs

The next log rule that we will cover in this guide is called the inverse property of logarithms rule, which states that:

  • logₐ(aˣ) = x


Figure 08: The inverse property of logs rule.


The inverse property of logs rule states that the log of a number raised to an exponent with a base value that is equal to the base value of the logarithm is equal to the value of the exponent.

For example, we could use the inverse property of logs rule to rewrite log₃(3ᵏ) as follows:

  • log₃(3ᵏ) = k

Again, this is another useful tool that you can use to simplify complicated log expressions and equations.


Log Rules: The Inverse Property of Exponents

The seventh log rule that we will cover is the inverse property of exponents rule, which states that:

  • a^(logₐ(x)) = x


Figure 09: Log Rule #7: The Inverse Property of Exponents


The inverse property of exponents log rule states whenever a base number with an exponent that is a logarithm equal to that base number, the result will equal the number in parenthesis.

For example, we could use the inverse property of exponents log rule to rewrite x^(logₓ(y²)) as follows:

  • x^(logₓ(y²)) = y²


Log Rules: The Change of Base Formula

The eighth and final log rule is the change of base formula, which states that:

  • logₐ(x) = (log꜀(x)) / (log꜀(a))


Figure 10: Log Rule: The Change of Base Formula


Conclusion: Natural Log Rules

In algebra, you will eventually have to learn how to simplify, expand, and generally work with logarithmic expressions and equations. The logarithm function is the inverse of the exponential function, and the corresponding log rules are similar to the exponent rules (i.e. they are a collection of laws that will help you to make complex log expressions and equations easier to work with). By studying and learning how to the natural log rules, you will be better able to understand logarithms and to solve difficult math problems involving logarithms. Feel free to bookmark this guide and return whenever you need a review of the rules of logs.

Keep Learning:

Comment