Why Every Teacher Should Say “No” More Often
The importance of setting boundaries and avoiding teacher burnout.

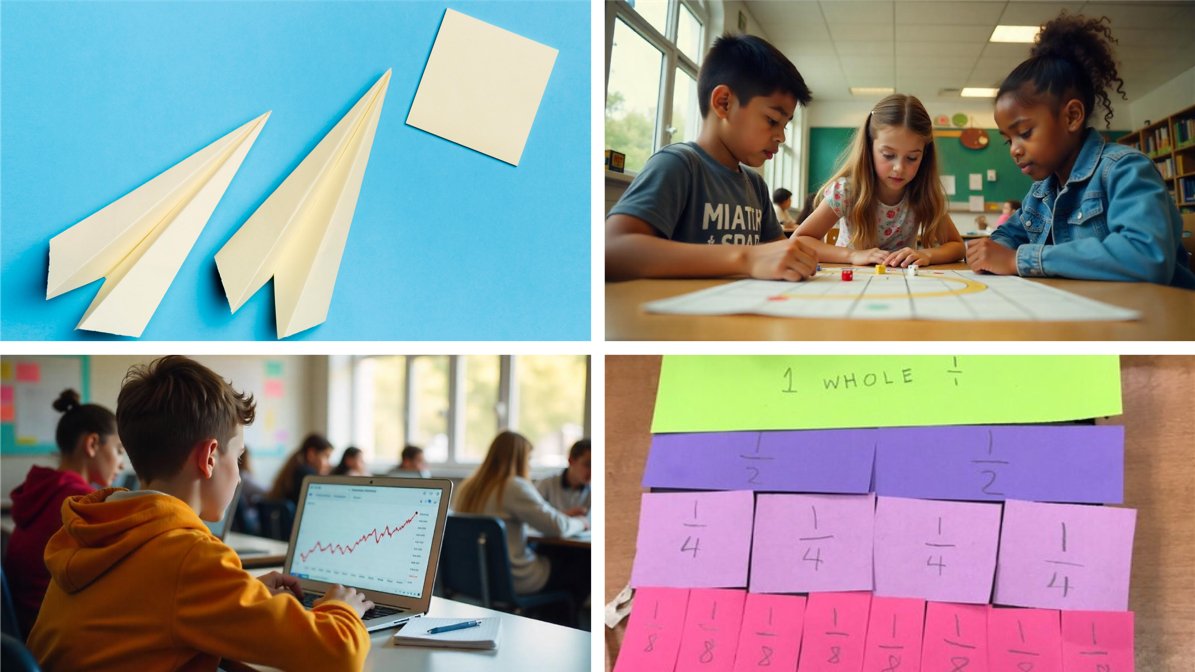
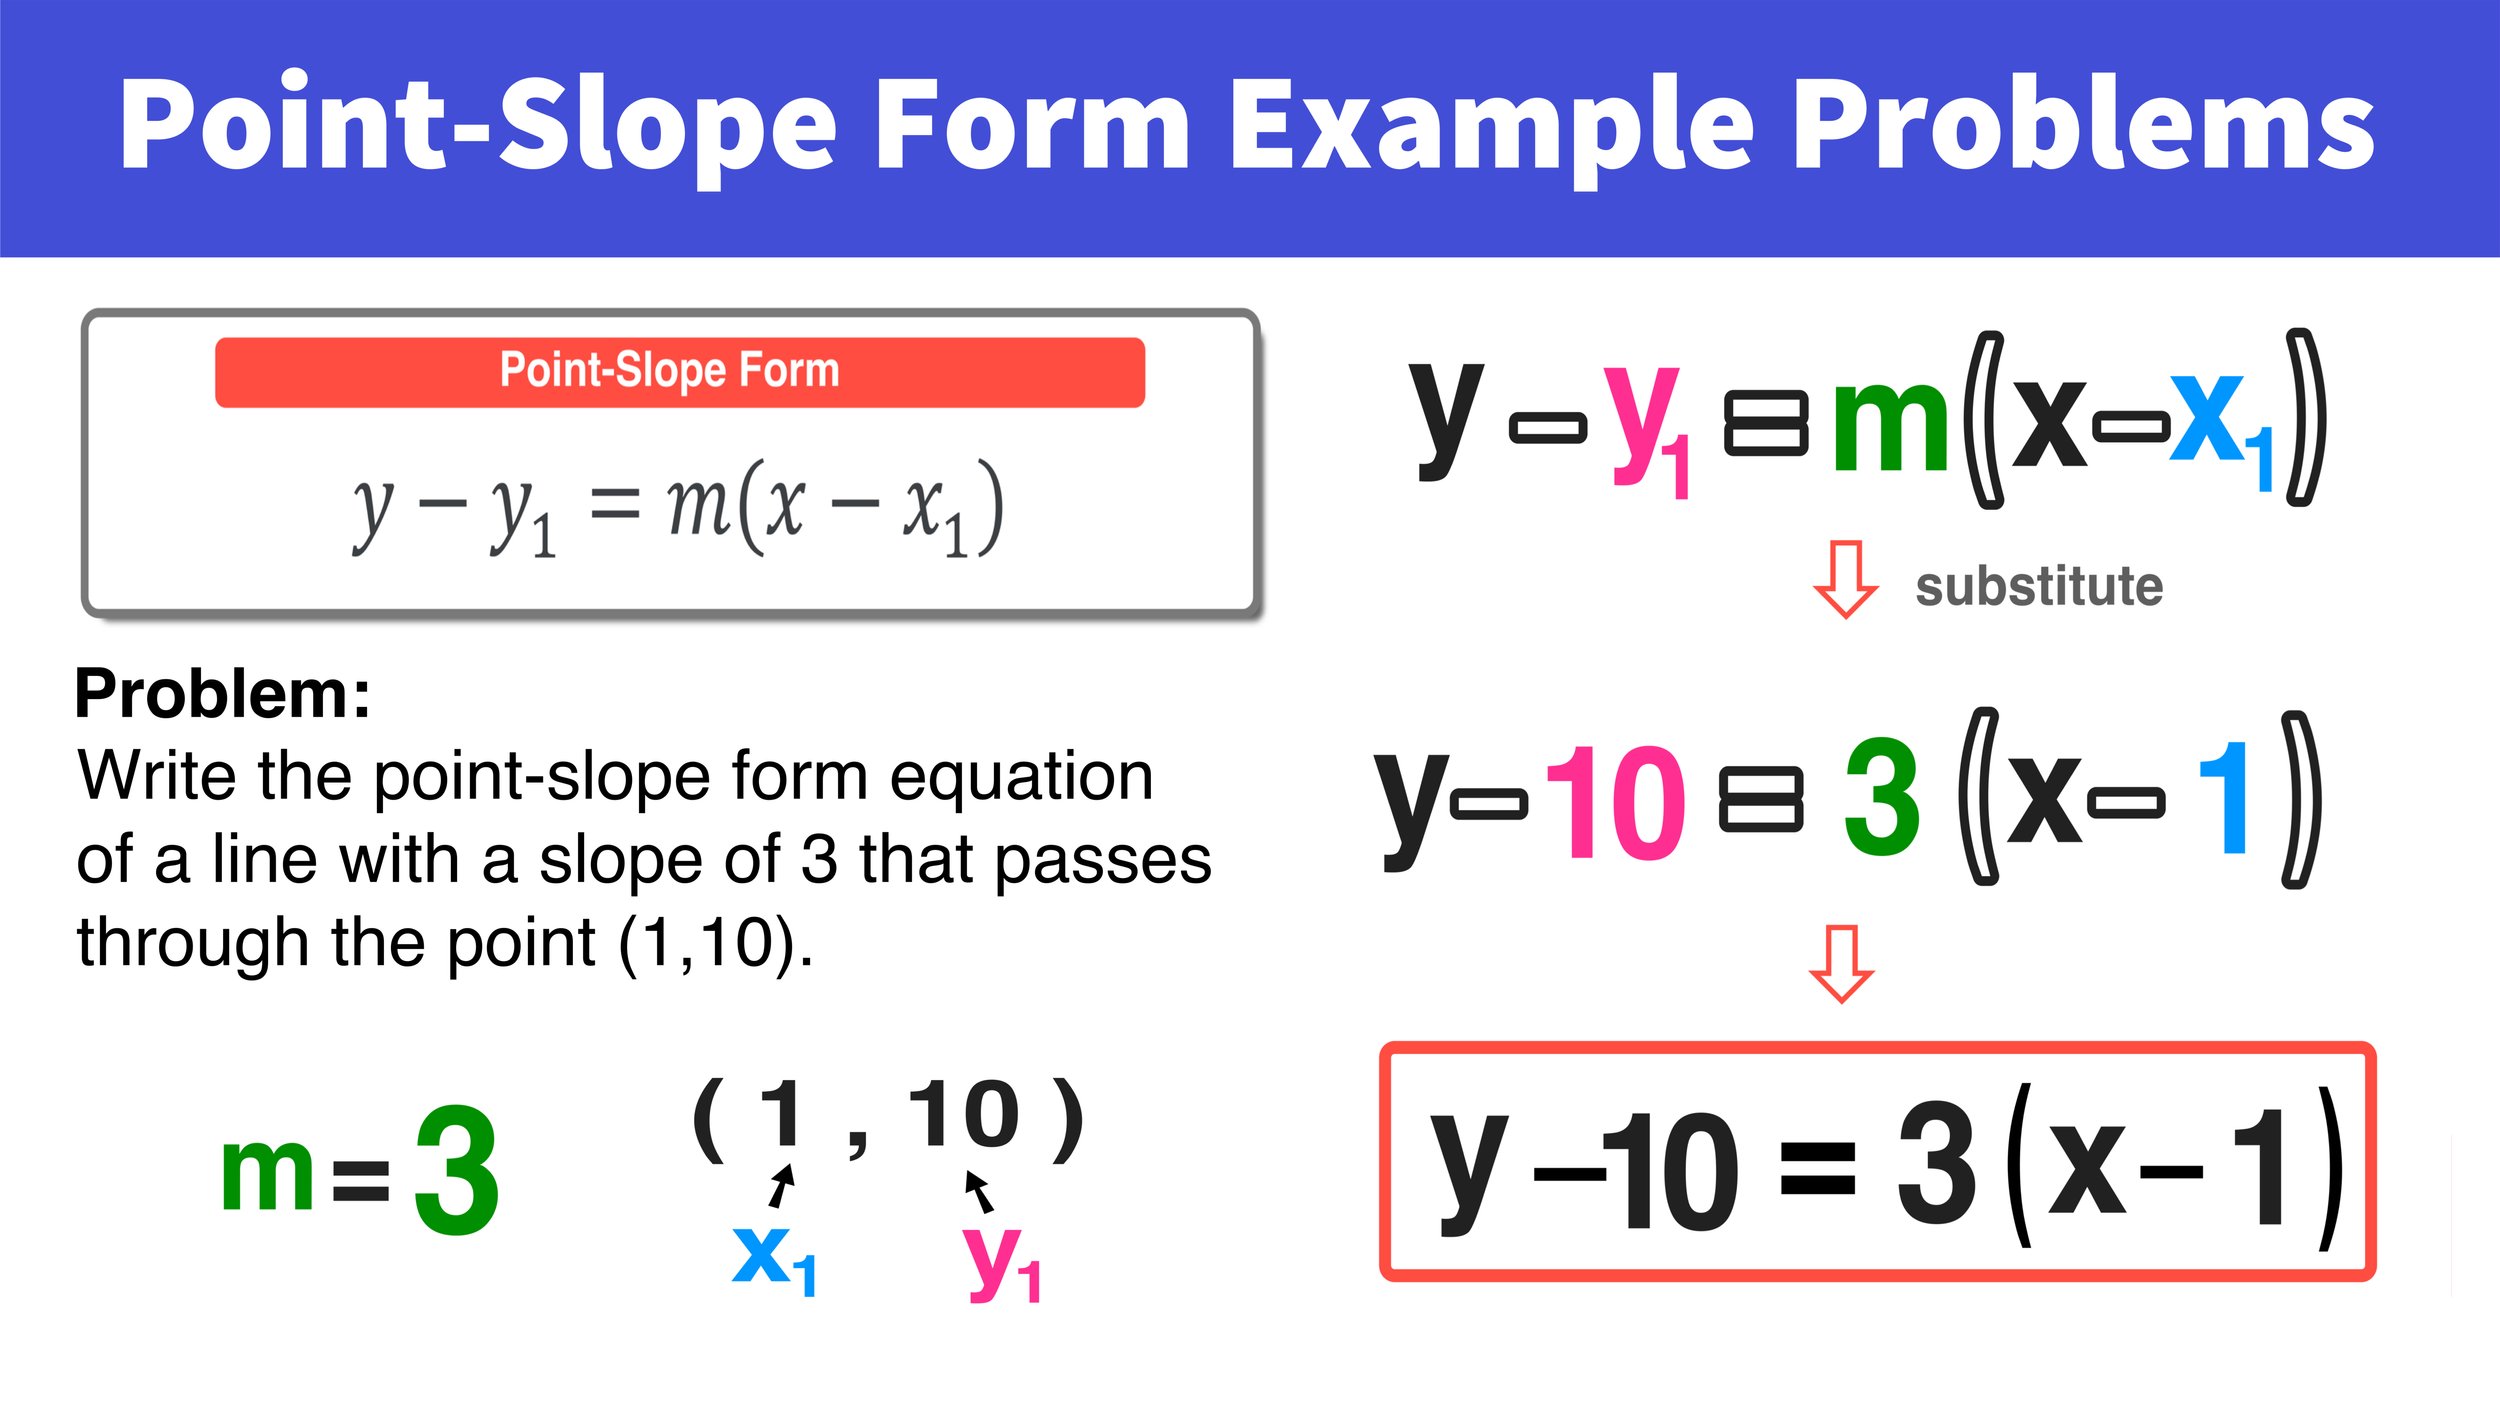
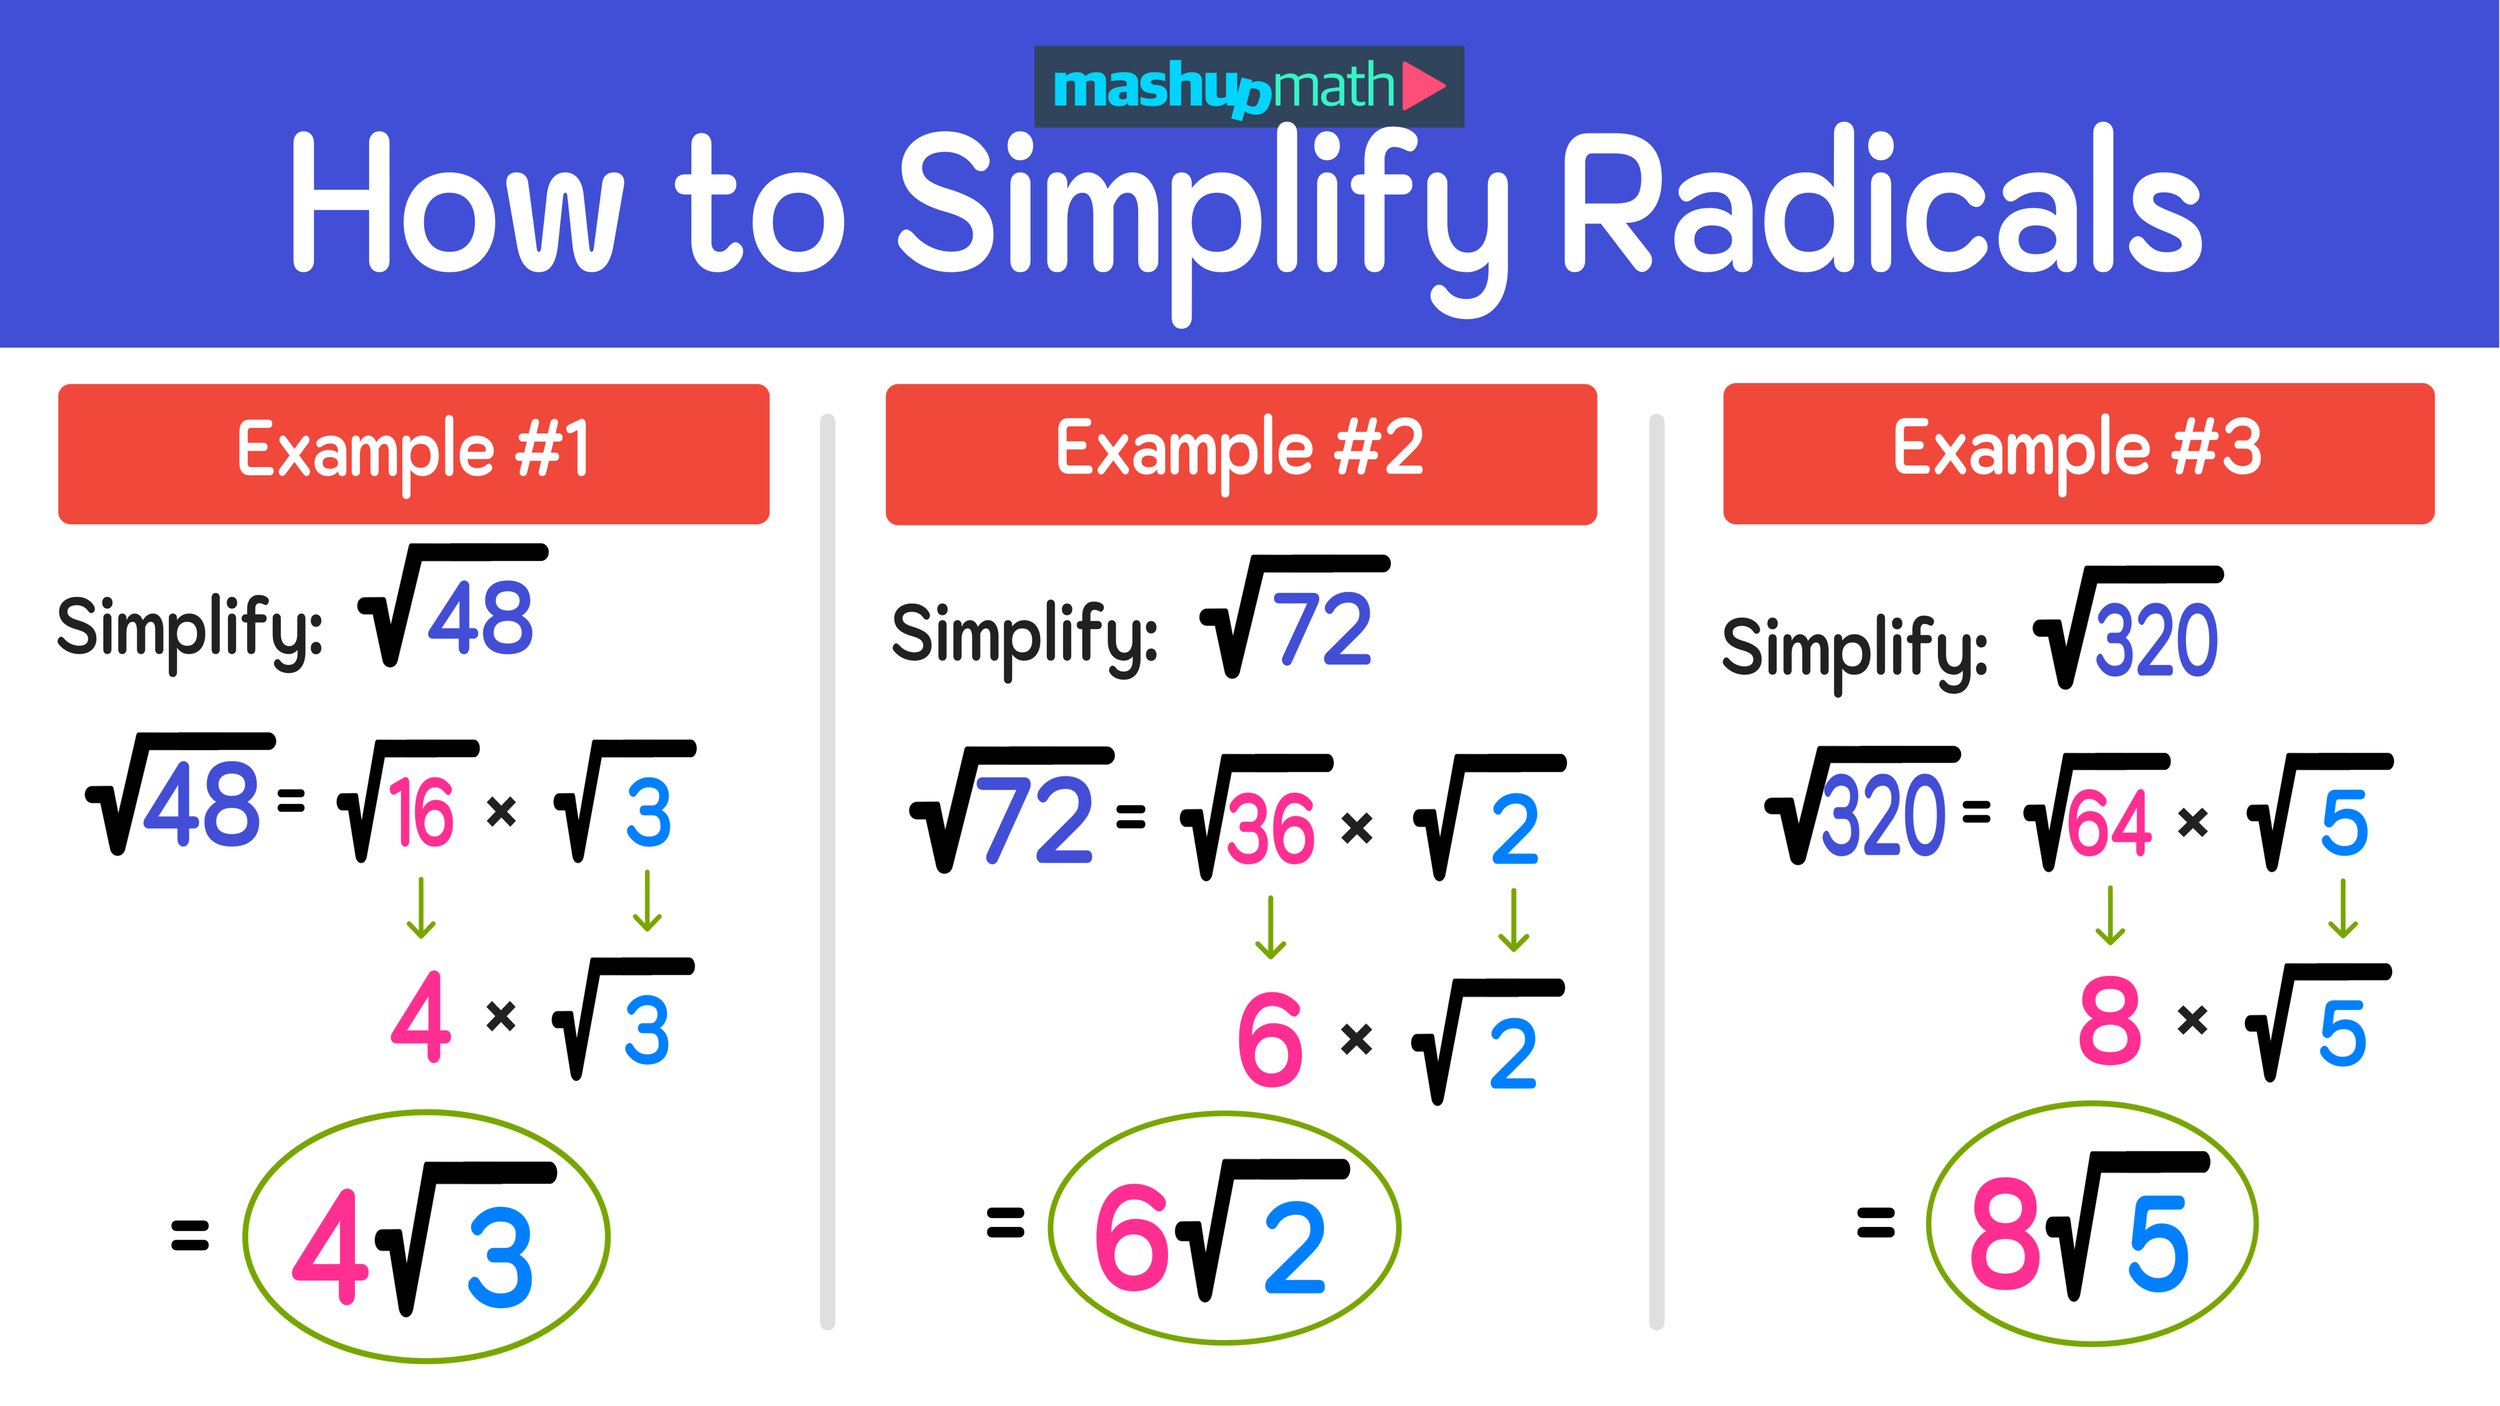
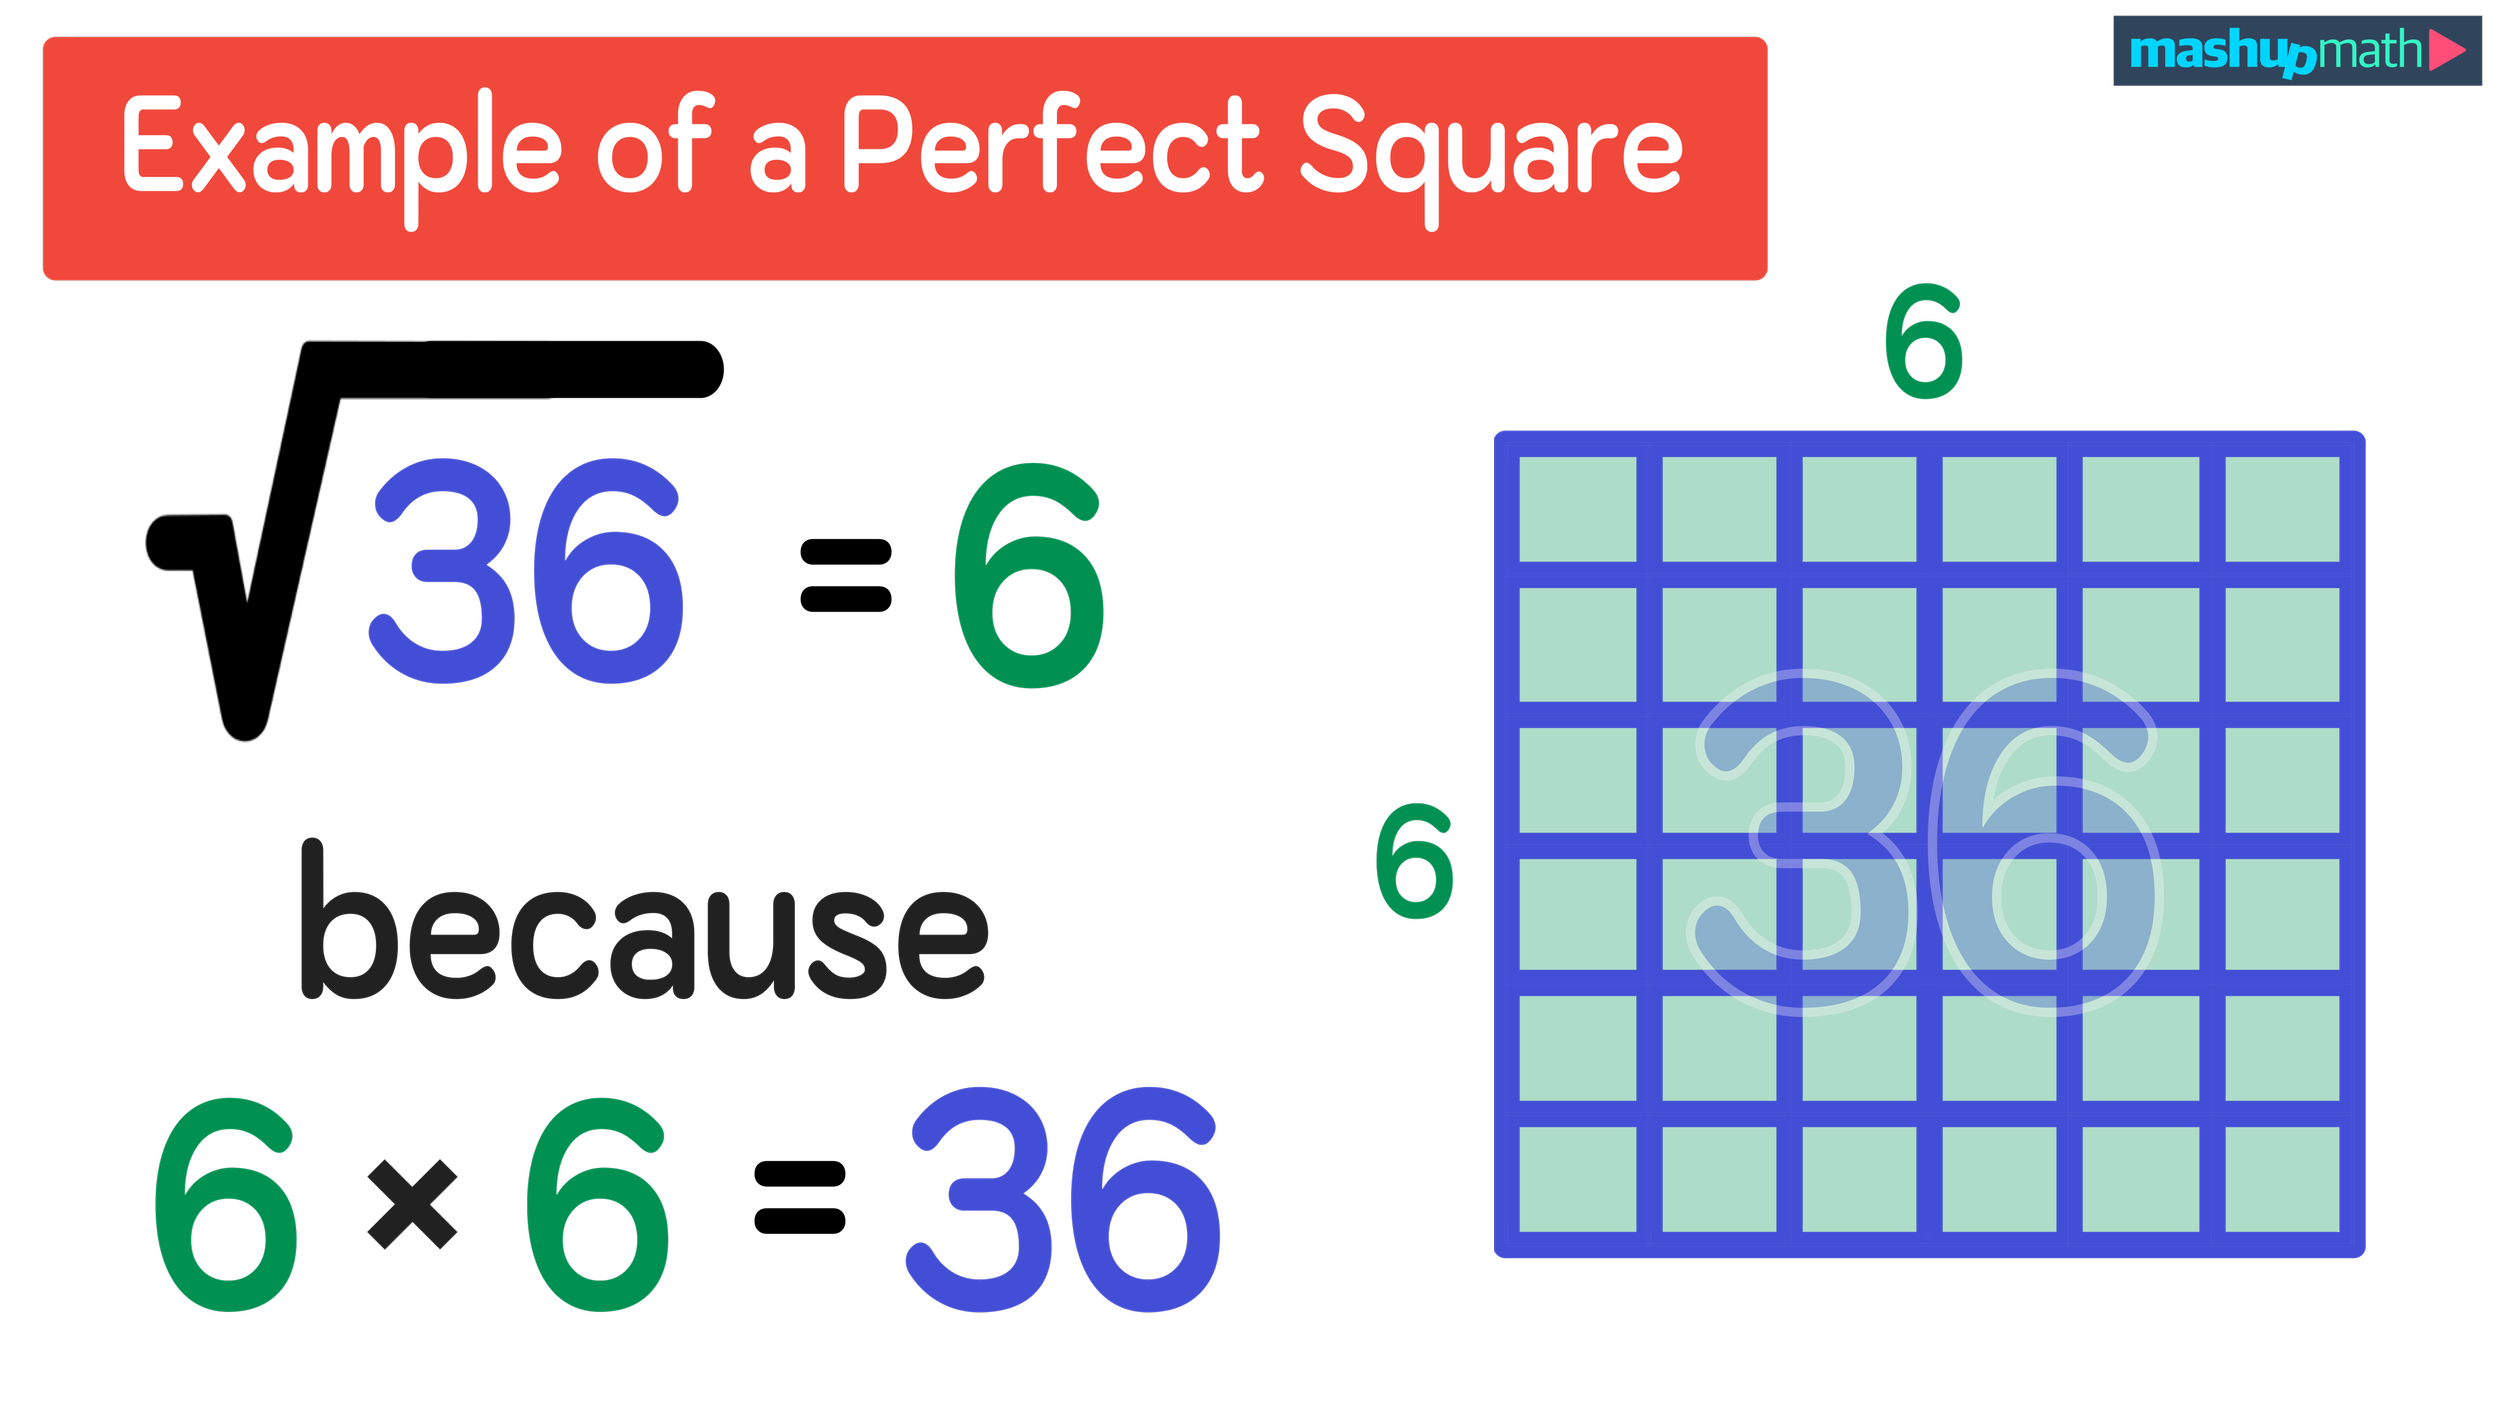
However, as a teacher, you have the right to say '“no” to unreasonable requests without feeling guilty. (Image: Mashup Math MJ)
Dedicated teachers are in short supply and students, parents and administrators are masters of—often unfairly— squeezing every last drop of energy from them.
Teaching is an important and rewarding profession, but the job is also incredibly demanding. Teachers of all grade levels are saddled with an overwhelming amount of daily responsibilities that extend way beyond their duties inside of the classroom. In an effort to be a team player (and often in fear of not letting others down), many teachers struggle with setting healthy boundaries, which often leads to intense exhaustion and burnout before the school year is over.
However, as a teacher, you have the right to say '“no” to unreasonable requests without feeling guilty.
Setting Boundaries
While it’s true that teaching is an inherently selfless profession and many teachers view themselves as servants to their students, schools, and communities, it is also true that well-balanced students have well-balanced teachers.
It can be hard to say to taking on more responsibilities, but one of the best reasons for learning to say “no” more often is to conserve and prioritize your energy. Your energy is a finite resource and the mental and emotional demands of teaching are taxing enough. Every time to agree to take on an additional responsibility or task, you are giving away more and more of your precious energy, leaving your students with a lesser and more exhausted version of you.
When you learn to set healthy boundaries and decline any requests for commitments that will leave you overextended, you will have more time and energy to focus on your primary task—teaching your students.

When the demands of being a teacher prevent you from setting healthy boundaries, you are at increased risk of reaching a point of burnout. ((Image: Mashup Math MJ)
Burnout and Selective Engagement
What happens to teachers who never learn how to set healthy boundaries? Many of them experience teacher burnout—a persistent state of stress causing feelings of cynicism, detachment, and both mental and physical exhaustion. Teacher burnout leads many teachers to feel helpless, ineffective, and incapable of being an effective educator.
When the demands of being a teacher prevent you from setting healthy boundaries, you are at increased risk of reaching a point of burnout. However, learning how to say “no” and set personal and professional boundaries will allow you to reach a healthy work-life balance where you don’t constantly feel like you are overcommitted or stretched too thin.
The best way to maintain such a work-life balance and healthy boundaries is through something called selective engagement.
Selective engagement is when a teacher chooses to focus on the roles and responsibilities that have the greatest impact on their students and their school community. This doesn’t mean that a teacher should say no to every request that does directly relate to her classroom teaching responsibilities. However, it does mean that teachers must be realistic about how much time and energy that have to give and that they should thoughtfully choose to give their attention to responsibilities that will not lead them to teacher burnout.

One major benefit of setting boundaries is that your students will receive higher quality classroom instruction and lesson planning from a teacher who is able to be energized, present, and focused. (Image: Mashup Math MJ)
Strategies for Saying “No”
Saying “no” can be difficult, which is why many consider it an artform in itself.
In Kenny Nguyen's TED Talk, The Art of Saying No, the practice of declining certain requests is the key to saying yes to others. If you have set priorities for your students and yourself and expect to get through the school year with your stamina and sanity intact, then you simply can not say 'yes' to every request.
Whenever you say “yes” to one thing, you are saying “no” to everything else. And, conversely, whenever you say “no” to one thing, you are effectively saying “yes” to your other commitments. In essence, the less commitments that you make allows you to give more of yourself to the commitments that you currently have.
Need some help with setting healthy boundaries and learning how to say “no” more often? Here are some helpful strategies for saying “no” without feeling guilty:
Be Direct: Whenever saying “no”, it’s important to be clear and concise in your response. Never half-commit or leave any room for misinterpretation.
Decline with Grace: Always express gratitude for whatever opportunity you are declining and be respectful.
Don’t Over-Explain: Never feel like you have to give a detailed explanation justifying why you can’t commit to something if you don’t want to.
Share Alternatives: If possible, you can make suggestions for other solutions or staff members who may be available to help.
Setting Boundaries Will Make You a More Effective Teacher
When you learn to set healthy and effective boundaries, the positives greatly outweigh the negatives. One major benefit is that your students will receive higher quality classroom instruction and lesson planning from a teacher who is able to be energized, present, and focused.
Great teachers, of course, are team players, and saying 'no' sometimes won't change that. Understanding where your limits are and never feeling guilty about putting a cap on how far you're willing to extend yourself is the key to being a healthy and effective educator.
Otherwise, like many teachers often do, you can fall victim to exhaustion and burnout towards the middle/end of the school year, leaving you feeling overwhelmed, unhappy, and ineffective. You just may find out that saying 'no' more often prepares you for the perfect times to say 'yes'!
Do you think it's important for teachers to learn to say 'no' more often? Share your thoughts in the comments section below!
(Never miss a Mashup Math blog--click here to get our weekly newsletter!)
More Education Insights You Will Love: