Associative Property of Multiplication Explained in 3 Easy Steps

Comment

Associative Property of Multiplication Explained in 3 Easy Steps

Associative Property of Multiplication Definition

In math, the associative property of multiplication is a rule which states that the groupings of values or variables being multiplied together does not affect the product or outcome.

The associative property of multiplication can help you to model and solve simple and complex multiplication problems. This rule is a fundamental law in mathematics and applies to any multiplication problem.

The following guide to understanding and applying the associative property of multiplication will share a step-by-step tutorial as well as a free associative property of multiplication worksheet.

Let’s start off by looking at a few examples…

Associative Property of Multiplication Example


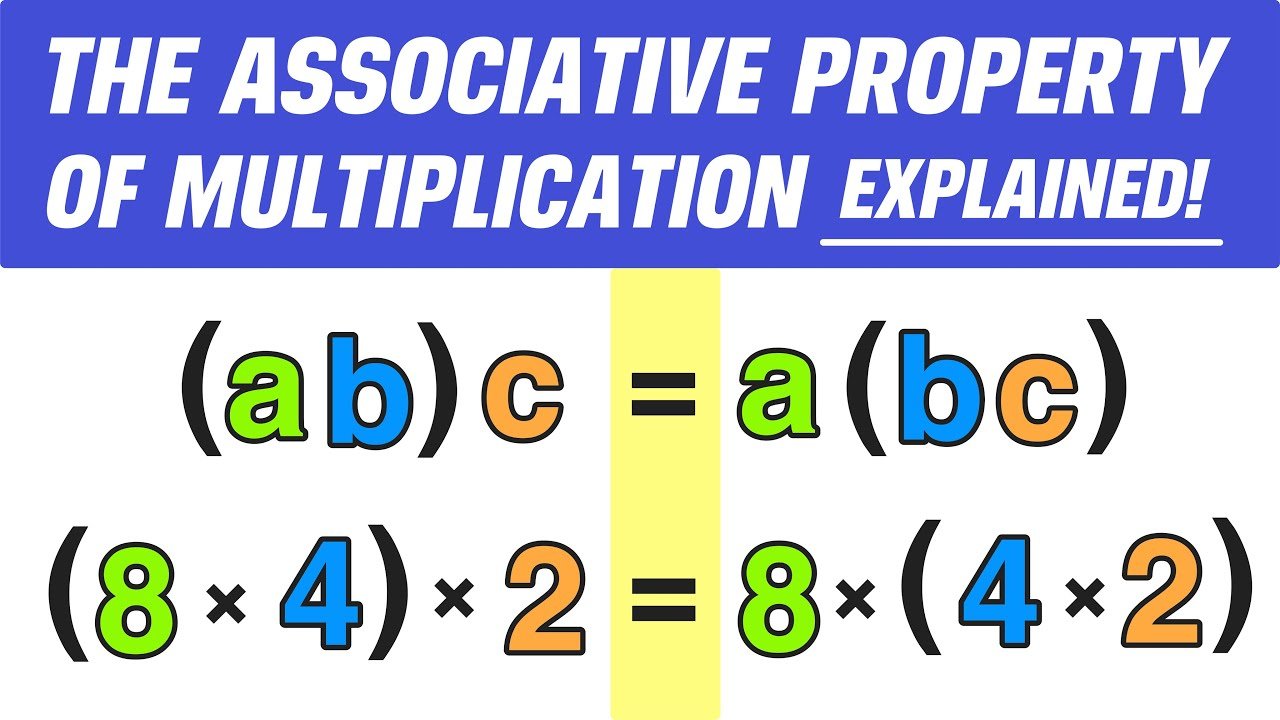
Take a look at the equation above:

(a x b) x c = a (b x c)

Notice that the terms (a, b, and c) are in the same order, but grouped differently. On the left side of the equals sign, a and b are in parenthesis. On the right side of the equal side, b and c are in parenthesis. And, according to the order of operations, you must perform operations inside of parenthesis first.

So, according to the associative property of multiplication, the left side of the equal sign and the right side of the equal sign will always equal the same value, no matter what values a, b, and c represent.

Now, let’s go ahead and explore why the associative property proves this equation to be true by substituting numerical values in for a, b, and c:

a=8, b=4, c=2


Step One: Follow the order of operations by performing multiplication inside of the parenthesis first.

In this example, perform (8 x 4) on the left side of the equation and (4 x 2) on the right side of the equation as follows:

(8 x 4 ) x 2 = 8 x (4 x 2)

32 x 2 = 8 x 8


Step Two: After working out the products inside of the parenthesis, the next step is to multiply the next line of the equation. In this case, 32 x 2 on the left side, and 8 x 8 on the right side.

32 x 2 = 8 x 8

64 = 64

Step Three: Verify your answer.

Remember that, according to the associative property of multiplication definition, the groupings of values or variables being multiplied together does not affect the product or outcome. Therefore, the left side of the equation and the right side of the equation should equal the same value.

In this example, the associative property holds true since both sides of the equation are equal to 64.

See Also: Check Out This Awesome Mean, Median, and Mode Activity

Associative Property of Multiplication Example Recap:

(8 x 4 ) x 2 = 8 x (4 x 2)

32 x 2 = 8 x 8

64 = 64 ✓

What About Division?

Now that you understand the associative property of multiplication, let’s see if the inverse of multiplication—division—is also associative.

What if we reused the associative property of multiplication example from before, but changed the multiplication signs to division signs?


Just like the last example, a=8, b=4, and c=2, the order of the terms is the same on both sides of the equal sign, but the terms are grouped differently. And also notice that the operation is no longer multiplication, but division.

Step One: Follow the order of operations by performing division inside of the parenthesis first.

In this example, perform (8 ÷ 4) on the left side of the equation and (4 ÷ 2) on the right side of the equation as follows:

(8 ÷ 4 ) ÷ 2 = 8 ÷ (4 ÷ 2)

2 ÷ 2 = 8 ÷ 2


Step Two: After working out the quotients inside of the parenthesis, the next step is to divide the next line of the equation. In this case, 2 ÷ 2 on the left side, and 8 ÷ 8 on the right side.

2 ÷ 2 = 8 ÷ 2

1 4

Step Three: Verify your answer.

Remember that, the associative property states that different groupings of the terms in an equation should not change the result. In the first example, we proved that the associative property works for multiplication since both sides of the equation equaled the same number (64=64).

However, in the division example, we see that the left side of the equation and the right side of the equation result in different values. In this case, 1 and 4, which are obviously nit equal.

Therefore, in this example, the associative property does not hold true for division since both sides of the equation are not equal.


Associative Property of Division Example Recap:

(8 ÷ 4 ) ÷ 2 = 8 ÷ (4 ÷ 2)

2 ÷ 2 = 8 ÷ 2

1 ≠ 4 ✕

Conclusion: Associative Property Math Facts

The previous example has shown us that the associative property works for multiplication, but it does not work for division.

Therefore, as long as all of the terms are being multiplied (not divided), the groupings of values or variables being multiplied together does not affect the product or outcome.

So, (a x b) x c = a x (b x c) for any real number values represented by a, b, and c.

Key idea: The associative property of multiplication can be applied when the terms are in the SAME ORDER, but GROUPED DIFFERENTLY.

The Associative Property of Multiplication Video

Are you looking for a more in-depth and visual explanation of the associative property of multiplication? Check out our free YouTube video using the link below:

Tags: associative property of multiplication, associative property example, associative property of multiplication example, associative property of multiplication definition, associative property in math, associative law of multiplication, the associative property of multiplication


Have thoughts? Share your thoughts in the comments section below!

(Never miss a Mashup Math blog--click here to get our weekly newsletter!)

By Anthony Persico

Anthony is the content crafter and head educator for YouTube's MashUp Math. You can often find me happily developing animated math lessons to share on my YouTube channel . Or spending way too much time at the gym or playing on my phone.

More Free Math Resources You Will Love:


Comment

Number Bonds Explained: Free Worksheets Included

Comment

Number Bonds Explained: Free Worksheets Included

What is a Number Bond?

Number Bond Definition

What is a number bond? A number bond is a simple visual math aid that is used to show a given number can be represented as the sum of two numbers.

Do you want free K-8 math resources in your inbox every week? Click here to join our mailing list

Number Bond Example: 5

Let’s take a closer look at the number 5. You know that the number 5 can be thought of as the sum of 4 and 1, the sum of 3 and 2, or the sum of 5 and 0. In terms of number bonds, these different ways of expressing the number 5 as the composite sum of two numbers can be visually represented using number bonds as follows:


And, since addition is commutative, meaning that the order of the terms does not matter (e.g. 2+3=5 and 3+2=5), you can also express the above number bonds in reverse order as follows:


Looking to learn more about the commutative math property? Click here to access our free step-by-step guide

Now that you understand what number bonds are and what they represent, it’s time to explore why they are such a useful tool for helping your students to develop strong number sense and fluency with performing operations on numbers.

For starters, the visual nature of number bonds is an excellent way to help students to conceptualize numbers and how they can be expressed as a composite sum of two numbers. By understanding this composite nature of numbers, students are better equipped to perform mental math quickly and accurately and perform advanced operations.

 For example, imagine a student becoming familiar with the following number bonds for 10:


With this understanding, a student could easily and accurately solve an expanded addition problem by combining terms that equal 10 as follows:


Number Bond Example: Number Bonds to 10

Now that you understand the value of having your students practice and understand number bonds, you can start by focusing on number bonds to 10. The diagram below shows the number bonds to 10.


Free Number Bonds Worksheet

 Are you looking for free printable number bonds worksheets (with answer keys included) that will give your students plenty of practice with completing number bonds to 10? If so, use the links below to download your free pdf number bonds worksheet.

➔ Click here to download your free Number Bonds worksheet

Subtraction Number Bonds

Everything related to number bonds that we have covered so far have related to the fact that number bonds represent how a number can be expressed as the sum of two other numbers. But what about subtraction? We know that addition and subtraction share an inverse relationship. This inverse relationship can be explored via number bonds (note that this is an advanced step that should not be explored until your students have completely mastered the number bonds to 10 and possibly beyond.

Number Bond Example 03: Subtraction

For example, how could a student use her understanding of number bonds to solve the problem 10 - ___ = 7?

In this example, the student knows that one of the number bonds for 10 includes the number 7 and that the other number is 3 (because 7+3=10).

With this understanding in mind, it is a logical conclusion that 10 – 3 = 7 meaning that the missing number is 3.

This answer may seem extremely simple to find and you may even think that the use of a number bond is not even necessary. However, if we rewrite this problem as:

10 – X = 7 where x=3

We can see how understanding number bonds can apply to more advanced problems including high school level algebra.

Observe the diagram below that represents this application of subtraction number bonds:

Conclusion

Number bonds are simple visual tools that are used to show how a number can be represented as a composite sum of two other numbers. A number bond includes a whole number with two branches stemming from the number and leading to the two other numbers whose sum is equal to the original whole number. Number bonds are a valuable visual tool for helping students to practice and develop number sense, which is a critical foundational math skill that students will need to be successful at higher level of mathematics.

Do you want free K-8 math resources in your inbox every week? Click here to join our mailing list

Tags:  number bond, number bonds to 10, number bond example, number bonds worksheet, number bonds to 10 worksheet, number bonds to 5, number bonds kindergarten, subtraction number bonds, complete the number bond


Share your thoughts in the comments section below!

(Never miss a Mashup Math blog--click here to get our weekly newsletter!)

By Anthony Persico

Anthony is the content crafter and head educator for YouTube's MashUp Math. You can often find me happily developing animated math lessons to share on my YouTube channel . Or spending way too much time at the gym or playing on my phone.

More Free Math Resources You Will Love:

Comment

Free Multiplication Chart Printable — Times Table Chart Practice

1 Comment

Free Multiplication Chart Printable — Times Table Chart Practice

Free Multiplication Chart Printable PDF

Are you looking for a free multiplication chart printable to use as a practice aide for learning your times tables? If so, this post shares some helpful information on how you can use a blank multiplication table to learn your multiplication and times tables facts quickly and efficiently. You can also download a free printable 12x12 multiplication table chart that you fill in on your own.

Before you get started, it’s important that you understand some key information relating to multiplication charts and times tables. Let’s quickly focus on answering three key questions (understanding the answers to these questions make learning your multiplication chart facts much easier and will save you lots of time in the long run).

  • How do you read a multiplication chart? How do you read a multiplication table?

  • Why does the order of the terms not matter in multiplication?

  • What should you always be looking for when filling in a blank multiplication chart?

(Do you want more free math resources and activities in your inbox every week? Click here to sign up for our free mailing list)

How do you read a multiplication chart? How do you read a multiplication table?

Multiplication charts and multiplication tables work like a Bingo board, where the number inside of each box represents the product of the corresponding column and row.

For example, 4 x 5 = 20

Now that you understand how multiplication tables work, you can fill in each box with the number that is equal to the product of the corresponding column and row.

Why does the order of the terms not matter in multiplication?

Since multiplication is commutative, the order of the terms does not matter.

For example, 3 x 7 = 21 AND 7 x 3 = 21

Notice that, even when the order of the terms is reversed (3 x 7 or 7 x 3), the outcome is the same since they both equal 21. This fact is always true when multiplying integers together.

Now that you understand that multiplication is commutative, you will have a much easier time completing your printable multiplication chart.

What should you always be looking for when filling in a blank multiplication chart?

Whenever you are filling in a multiplication table or multiplication chart, you should always be looking for patterns!

For example, take a closer look at the 5 times table and see if you notice any patterns…

Download: Free Multiplication Chart Printable

Now that you know how to read a multiplication chart, why the order doesn’t matter when multiplying terms, and why you should always look for patterns, you are ready to download your free multiplication chart that you can print and use as a reference guide and as a practice tool.

Note that the following times table charts are 12x12, which means that they only include times tables from the numbers one to twelve in numerical order.

To download your free printable multiplication chart as pdf file, simply click one of the two links below to download and save the file. You have the option to download a blank multiplication chart that you can fill in yourself or a completed multiplication chart that you can print and use as a quick reference whenever you need help with multiplying numbers.

Click here to download your free BLANK MULTIPLICATION CHART (PRINTABLE)

Click here to download your free COMPLETED MULTIPLICATION CHART (PRINTABLE)

Looking for more help with practicing your times tables?

Click the link below to watch our corresponding video lesson on how to complete a 12x12 multiplication chart for a closer look at how to learn your times tables. The video is the perfect companion for sitting down and filling out your blank multiplication table until you are eventually able to fill it out completely on your own. After all, practice makes perfect! (We highly recommend printing out multiple copies of our blank multiplication table chart and filling them out until you no longer need a guide).

Conclusion:

Completing a blank multiplication table and using a filled-in multiplication chart as a reference is a great way to learn your times tables and your multiplication facts. We recommend printing out several copies of our blank chart and filling them out using our video lesson as a guide until you can fill out the entire table on your own. Then, you can use our filled-out reference table to help you while you work on problems.

Lastly, always keep these three ideas in mind whenever you are studying and/or learning your multiplication facts: (1) a multiplication table works like a bingo board where the number in each box represents the product of the corresponding row and column, (2) multiplication is commutative, which means that the order of the terms does not matter (example: 2x8=16 and 8x2=16), and (3) always look for patterns and relationships between the numbers (this will help you to always remember your multiplication facts!).

More Resources You Will Love:

1 Comment

How to Find the Surface Area of a Cube

Comment

How to Find the Surface Area of a Cube

SurfaceArea.jpg

How to Find the Surface Area of a Cube in 3 Easy Steps

Learning how to find the surface area of a cube and how to apply the surface area of a cube formula is a critical and important math/geometry skill that every student should master. Fortunately, calculating the area of a cube is a pretty straightforward task as long as you are able to follow three simple steps for finding the surface area of any cube that are demonstrated in this lesson.

Are you ready to get started?

The following free How to Find the Surface Area of a Cube lesson guide is a step-by-step tutorial that will teach you how to use a simple method for calculating the surface area of a cube using the surface area of a cube formula to solve homework problems, test questions, and more.

This guide also includes a completely free surface area of a cube calculator that can be used to make fast calculations and find the surface area of a cube almost immediately (and while we do not recommend relying on a calculator to solve surface area problems, having access to a calculator can be a very helpful tool when it comes to checking your work—but more on that later!)

Now we are ready to learn how to find the surface area (sometimes referred to as SA) of a cube and we will start with a quick recap of some very important vocabulary and definitions.

In math, what is a cube?

Definition: A cube is a box-shaped three-dimensional figure that has six equal and identical square faces.

The most important word in this definition is equal. A cube is unique in that all of its faces are squares with side lengths, also known as edges, that have the same length (unlike rectangular prisms).

Also make a note that the terms cube and rectangular cube both mean the exact same thing (some questions will refer to a cube as a rectangular cube).

What is the surface area of a cube? What is the SA of a cube?

Definition: The surface area of a cube refers to the total area of all of the faces on the outside of the figure.

The key word in this definition is outside since surface area refers to how many square units it would take to cover the outside of the figure

Surface area is always expressed in square units.

Snip20211005_2.png
 

Surface Area of a Cube Formula

Before we get to the practice problems, you need to understand how to use the surface area of a cube formula, which states that the SA of a cube is equal to six times the side length, s, raised to the second power (also known as squared).

If you know the length of one of the edge lengths (or sides), you can simply input the value into the formula and solve to find the surface area.

 Again, remember that SA is measured in square units and that your answers should always include units.

Formula Reference:

Snip20210930_20-1.png
 

Now that you know the surface area of a cube formula, you can use the following 3-step method to solve the practice problems below:

Step 1: Identify the value of s, the edge length of the cube

Step 2: Substitute that value for s into the surface area of a cube formula

Step 3: Solve and express your answer in square units


Example #1: Find the Surface Area of the Cube

Find the surface area of a cube with a side length of 4 cm.


To solve this problem, we will use the previously mentioned 3-step process:

Step 1: Identify the value of s, the edge length of the cube

In this example, the cube has a side length of 4 cm, so S=4

Step 2: Substitute that value for s into the surface area of a cube formula

Next, substitute 4 for s in the SA of a cube formula as follows

SA = 6(s^2) ➝ SA= 6(4^2) ➝ SA = 6(16) ➝ SA = 96

Notice that 2x and 4x are like terms that can be combined.
 

Step 3: Solve and express your answer in square units

Finally, you can conclude that SA equals 96, therefore…

Final Answer: The surface area of the cube is 96 square centimeters.

Remember that surface area is always expressed in square units (square centimeters in this example).

Remember that surface area is always expressed in square units (square centimeters in this example).


Example #2: Find the SA of the Cube

Find the SA of a cube-shaped box with a height of 9 inches.


In this example, the figure in question is a cube-shaped box or just a cube, so you will be using the process as Example #1 to find the surface area:

Step 1: Identify the value of s, the edge length of the cube

In this example, the cube-shaped box has a side length of 9 inches, so S=9

Step 2: Substitute that value for s into the SA of a cube formula

Next, substitute 9 for s in the SA of a cube formula as follows

SA = 6(s^2) ➝ SA= 6(9^2) ➝ SA = 6(81) ➝ SA = 486

Snip20211005_8.png
 

Step 3: Solve and express your answer in square units

Finally, you can conclude that SA equals 486, therefore…

Final Answer: The SA of the cube is 486 square inches

Snip20211005_9.png
 

How to Find the Surface Area of a Cube Video

Are you looking for more help with finding the volume and surface area of cubes? Check out our free step-by-step video lesson below:

Surface Area of a Cube Calculator

If you want to use a surface area of a cube calculator to help you when solving SA problems, we recommend Google’s free Surface Area of a Cube Calculator, which allows you to input the edge length (which they refer to as a instead of s) and find the SA with just one click.

Keep in mind that relying on a calculator is never a substitute for learning how to solve problems on your own. However, there are occasions when such a tool can come in handy, like when you want to check your final answers.

(Note: Google’s calculator uses the letter a, not s, to represent the value of the edge length.)

 
Snip20211005_13.png
 

What About the VOLUME of a Cube?

VolumeCube.jpg

Now that you’ve learned how to find the surface area of a cube, you’re ready to move on to learning how to use a different formula to find the volume of a cube.

You can use the link below to access our free guide to finding the surface area of a cube.

Click here to access a free Volume of a Cube step-by-step guide.

Conclusion: How to Find the Surface Area of a Cube

You can find the SA of any cube with edge length S by following this easy 3-step process:

Step 1: Identify the value of s, the edge length of the cube

Step 2: Substitute that value for s into the surface area of a cube formula

Step 3: Solve and express your answer in square units

Keep Learning:

 
Pin-SA-Cube.jpg

Comment

How to Find the Volume of a Cube

Comment

How to Find the Volume of a Cube

VolumeCube.jpg

How to Find the Volume of a Cube in 3 Easy Steps

Understanding how to find the volume of a cube and how to use the volume of a cube formula is an important and useful mathematics and, more commonly geometry, skill that is relatively simple and easy to do as long as you can follow the 3 easy steps that will be outlined in this lesson.

 This free How to Find the Volume of a Cube step-by-step guide will teach you an easy method for finding the volume of a cube using the volume of a cube formula. By learning this skill, you will be able to solve any problems that call on you to find the volume of a cube (or a rectangular cube) involving any type of units.

This lesson also shares a free volume of a cube calculator that you can use to quickly input values and find the volume of a cube with just one click.

But before you learn the 3 steps for finding the volume of a cube, we will do a quick review of key vocabulary and definitions related to this topic.

What is a cube in math?

Definition: A cube is a box-shaped three-dimensional figure that has six equal and identical square faces.

The key word in this definition is equal. Unlike a rectangular prism, all of the faces of a cube are squares whose side lengths, also known as edges, have the same length.

Note that there is no difference between the term cube and rectangular cube. They both mean the same thing!

Snip20210930_16.png

What is the volume of a cube?

Definition: The volume of a cube refers to the number of unit cubes it would take to completely fill the inside of the figure.

The key word in the definition is inside, since volume refers to how much space is inside of the figure.

Volume is always expressed in cubic units.

giphy.gif
 

Volume of a Cube Formula

Before we work through a few practice problems, you need to be familiar with cube volume formula, which states that the volume of a cube is equal to the value of the side lengths, s, raised to the third power (also known as cubed).

 So, if you know the length of one of the sides (also known as edges), all that you have to do raise that value to the third power to find the volume.

 Again, remember that volume is measured in cubic units and that your final answer should always include the units.

Formula Reference:

Snip20210930_20.png
 

Now that you are familiar with the formula for finding the volume of a cube, you can use the following 3-step method to solve the practice problems below:

Step 1: Identify the value of s, the edge length of the cube

Step 2: Substitute that value for s into the volume of a cube formula

Step 3: Solve and express your answer in cubic units


Example #1: Find the Volume of the Cube

Find the volume of a cube with a side length of 4 cm.

 
Snip20210930_22.png
 

To solve this problem, we will use the previously mentioned 3-step process:

Step 1: Identify the value of s, the edge length of the cube

In this example, the cube has a side length of 4 cm, so S=4

Step 2: Substitute that value for s into the volume of a cube formula

Next, substitute 4 for s in the volume of a cube formula as follows

V = s^3 ➝ V = 4^3 ➝ V = 4x4x4 ➝ V = 64

Notice that 2x and 4x are like terms that can be combined.
 

Step 3: Solve and express your answer in cubic units

Finally, you can conclude that 4^ 3, or 4x4x4, equals 64, therefore…

Final Answer: The volume of the cube is 64 cubic centimeters.

Remember that volume is always expressed in cubic units (cubic centimeters in this example).

Remember that volume is always expressed in cubic units (cubic centimeters in this example).


Example #2: Find the Volume of the Cube

Find the volume of a cube-shaped box with a height of 9 inches.

 
Snip20210930_25.png
 

In this example, we are dealing with a cube-shaped box, which is still just a cube, so we can use the same three steps as Example #1 to find the volume:

Step 1: Identify the value of s, the edge length of the cube

In this example, the cube-shaped box has a side length of 9 inches, so S=9

Step 2: Substitute that value for s into the volume of a cube formula

Next, substitute 9 for s in the volume of a cube formula as follows

V = s^3 ➝ V = 9^3 ➝ V = 9x9x9 ➝ V = 729

Snip20210930_26.png
 

Step 3: Solve and express your answer in cubic units

Finally, you can conclude that 9^ 3, or 9x9x9, equals 729, therefore…

Final Answer: The volume of the cube is 729 cubic inches

Answer2.jpg
 

How to Find the Volume of a Cube

Are you looking for more help with finding the volume and surface area of cubes? Check out our free step-by-step video lesson below:

Volume of a Cube Calculator

Are you looking for a free volume of a cube calculator to quickly solve problems? While we recommend learning how to solve problems without relying on a calculator, there are times when this tool can be very useful (like when you need to check your answers for accuracy).

There are many cube volume calculator options available online, but we recommend Google’s free calculator, which you can access by Googling “volume of a cube calculator” or by clicking this link.

Note that Google used the letter a instead of the letter s.

 
Snip20210930_28.png
 

What About the Surface Area of a Cube?

SurfaceArea.jpg

Now that you know how to use a formula to find the volume of a cube, you are ready to learn how to use a different formula to find the surface area of a cube.

Whenever you are ready, use the link below to access our free guide to finding the surface area of a cube.

Click here to access a free Surface Area of a Cube step-by-step guide.

Conclusion: How to Find the Volume of a Cube

You can find the volume of any cube with edge length S by following this easy 3-step process:

Step 1: Identify the value of s, the edge length of the cube

Step 2: Substitute that value for s into the volume of a cube formula

Step 3: Solve and express your answer in cubic units

Keep Learning:

 
Pin-VolumeCube.jpg

Comment