Free Decimal to Fraction Chart (Printable PDF)

4 Comments

Free Decimal to Fraction Chart (Printable PDF)

Image: Mashup Math

Free Decimal to Fraction Conversion Chart

Are you looking for an easy reference chart for making decimal to fraction conversions?

Use the link below to download your free decimal to fraction chart as an easy-to-print PDF file.

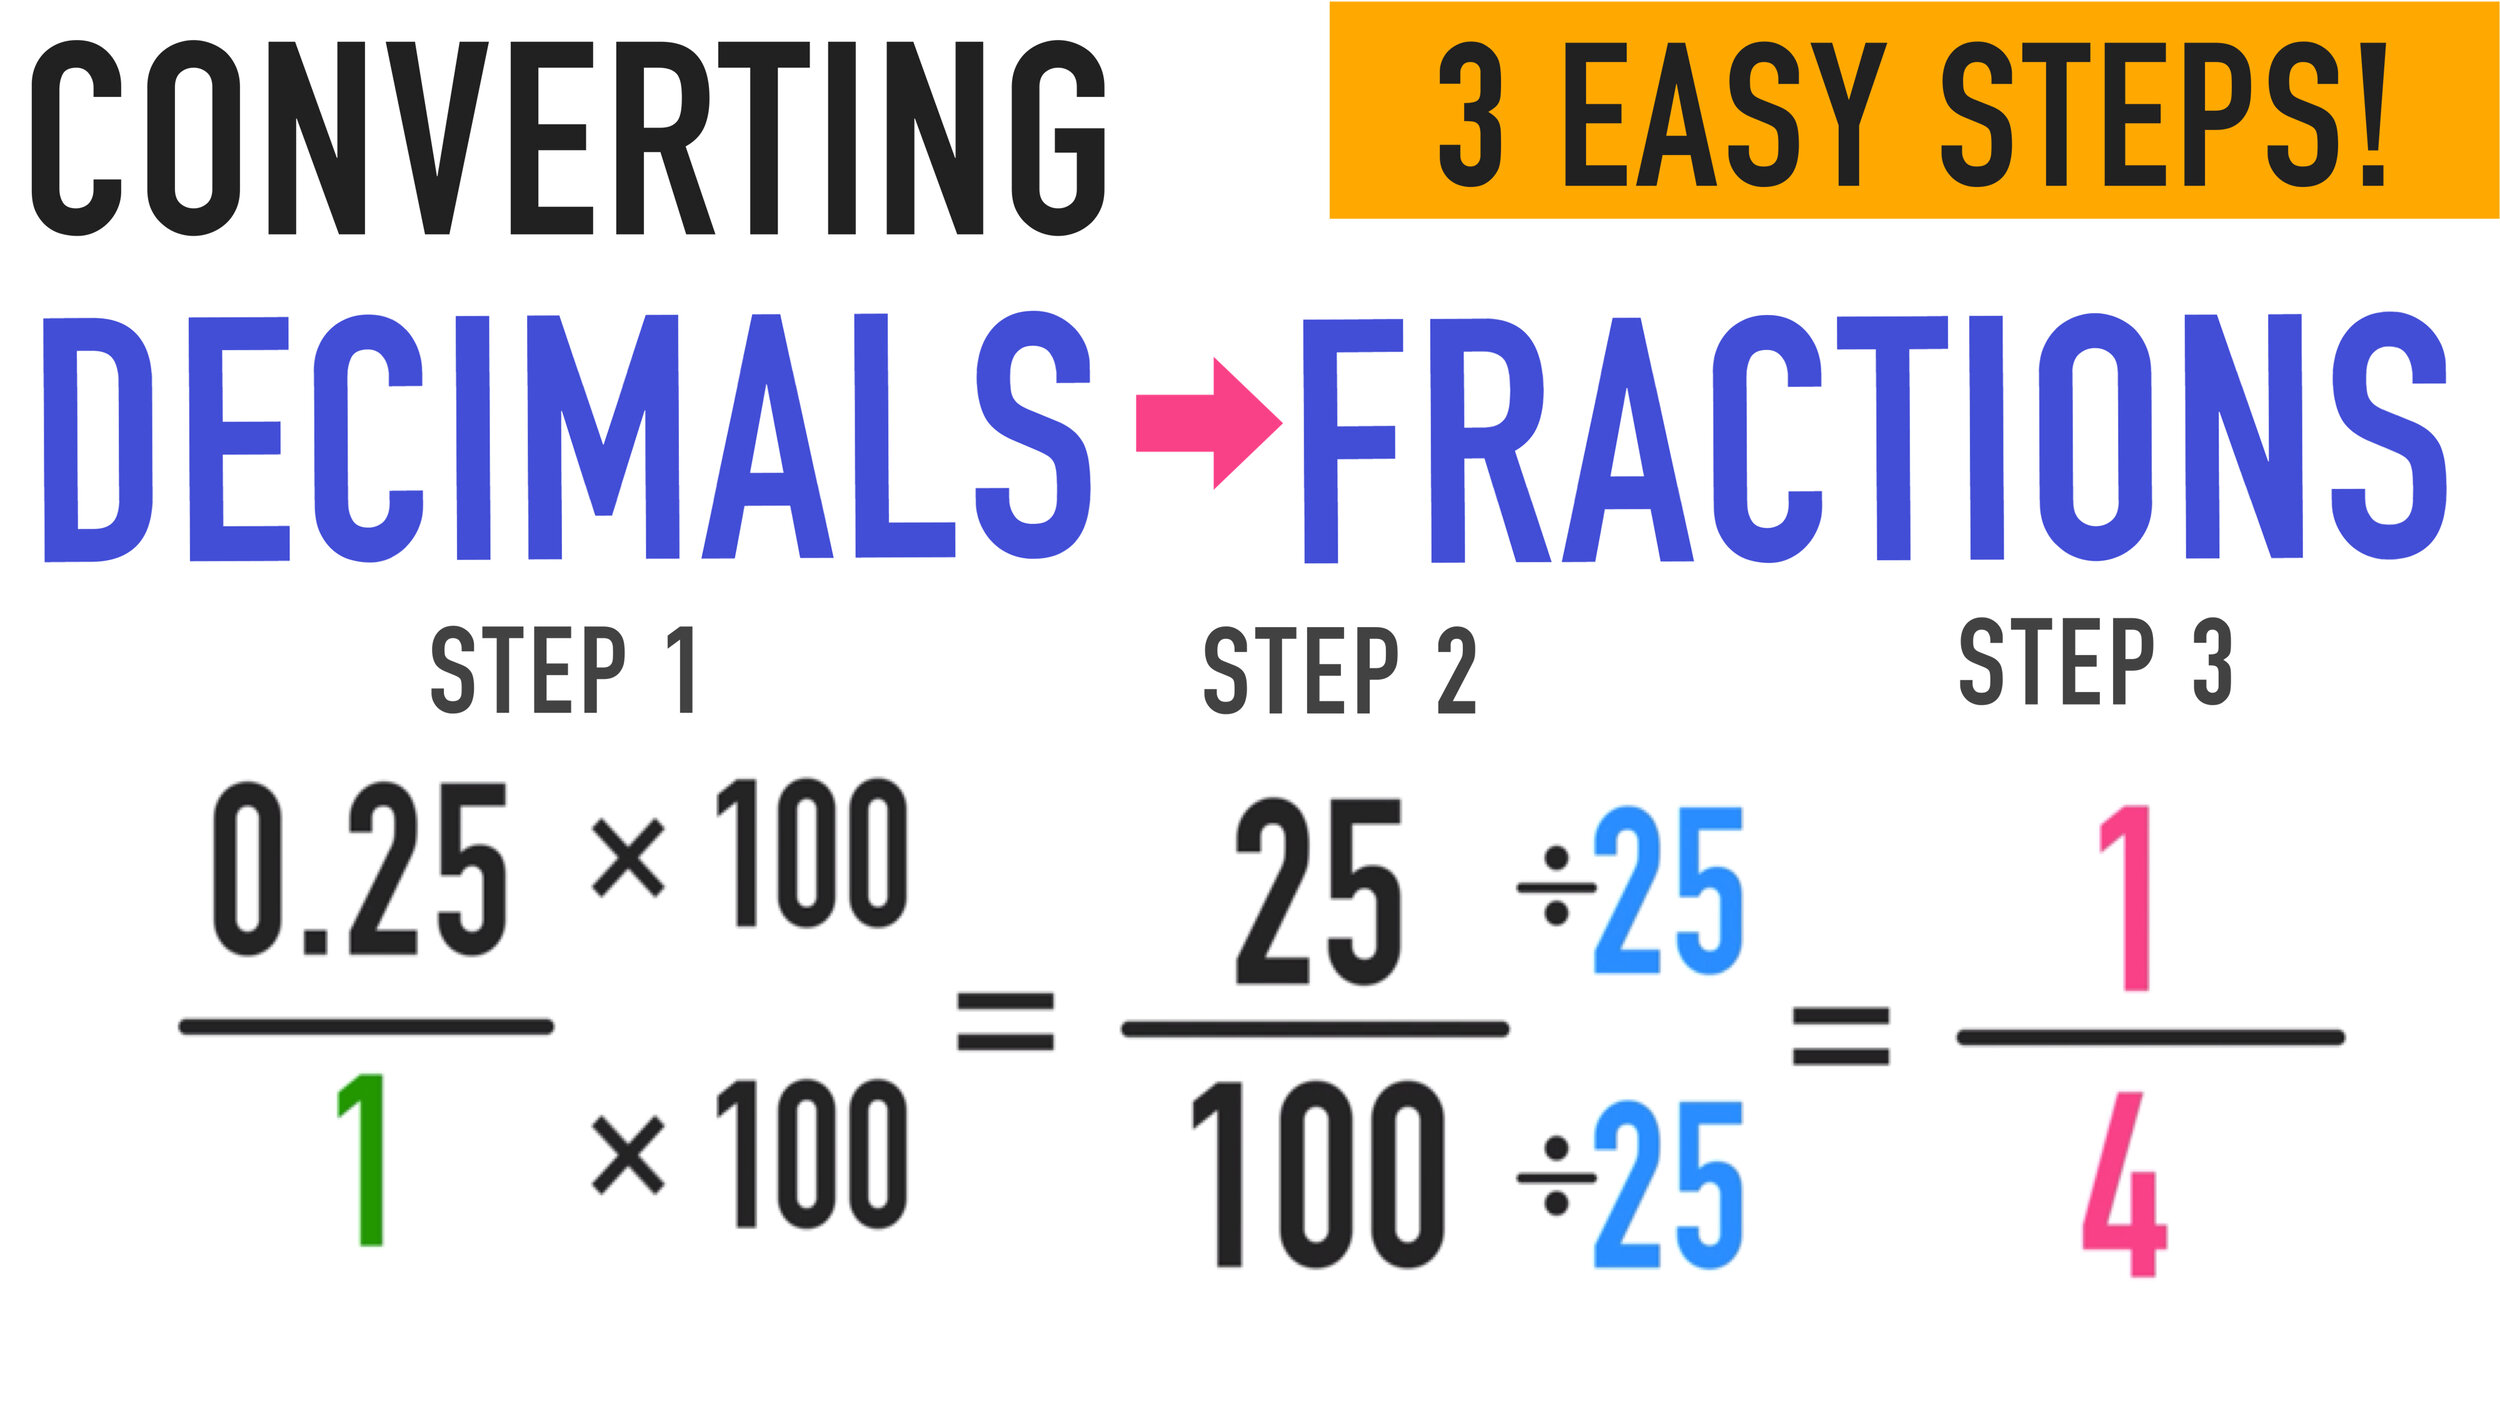
Looking to learn how to convert decimals to fractions without a chart? Check out this free converting decimal to fraction in 3 easy steps lesson guide!


Free Decimal to Fraction Chart!


Click here to download your free Decimal to Fraction Conversion Chart

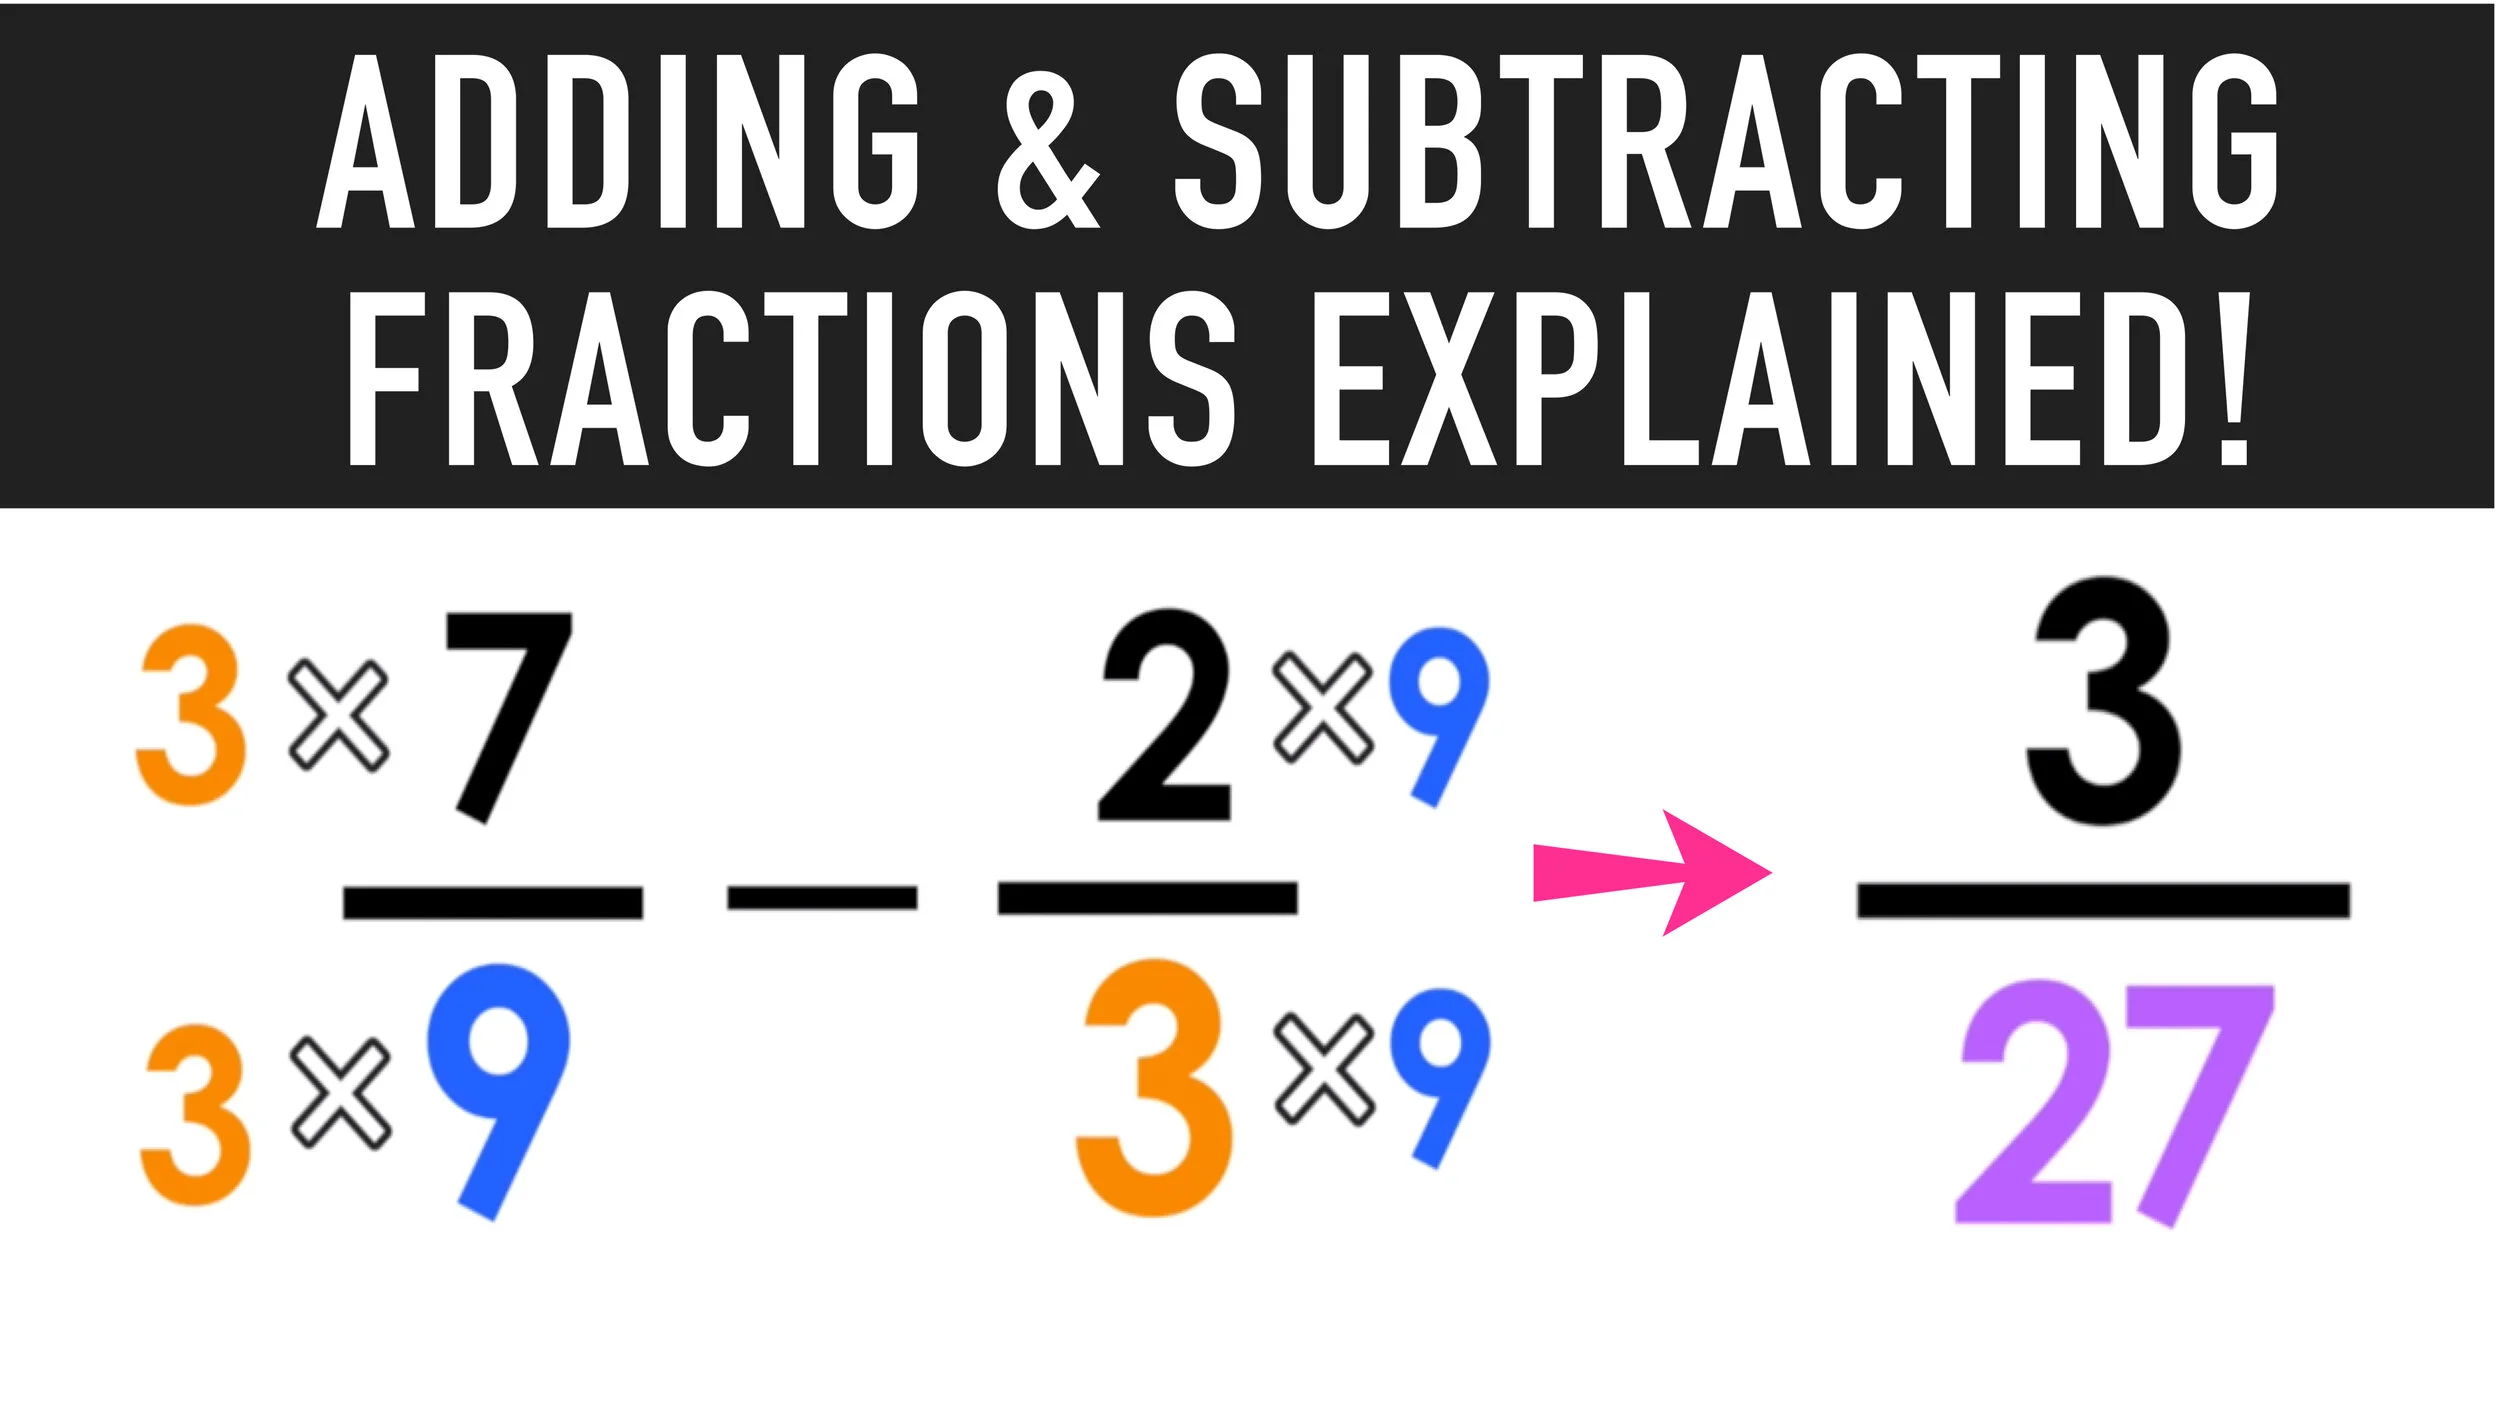
Learn How to Convert Decimal to Fraction

The following video lesson shares an easy 3-step method for converting a decimal to a fraction without a decimal to fraction chart!

If you like the video, please give it a thumbs up and leave a comment!

Need help with decimal to fraction conversions with rulers and measurement?

In addition to today’s free decimal to fraction chart, here is a free tutorial on how to read a ruler:

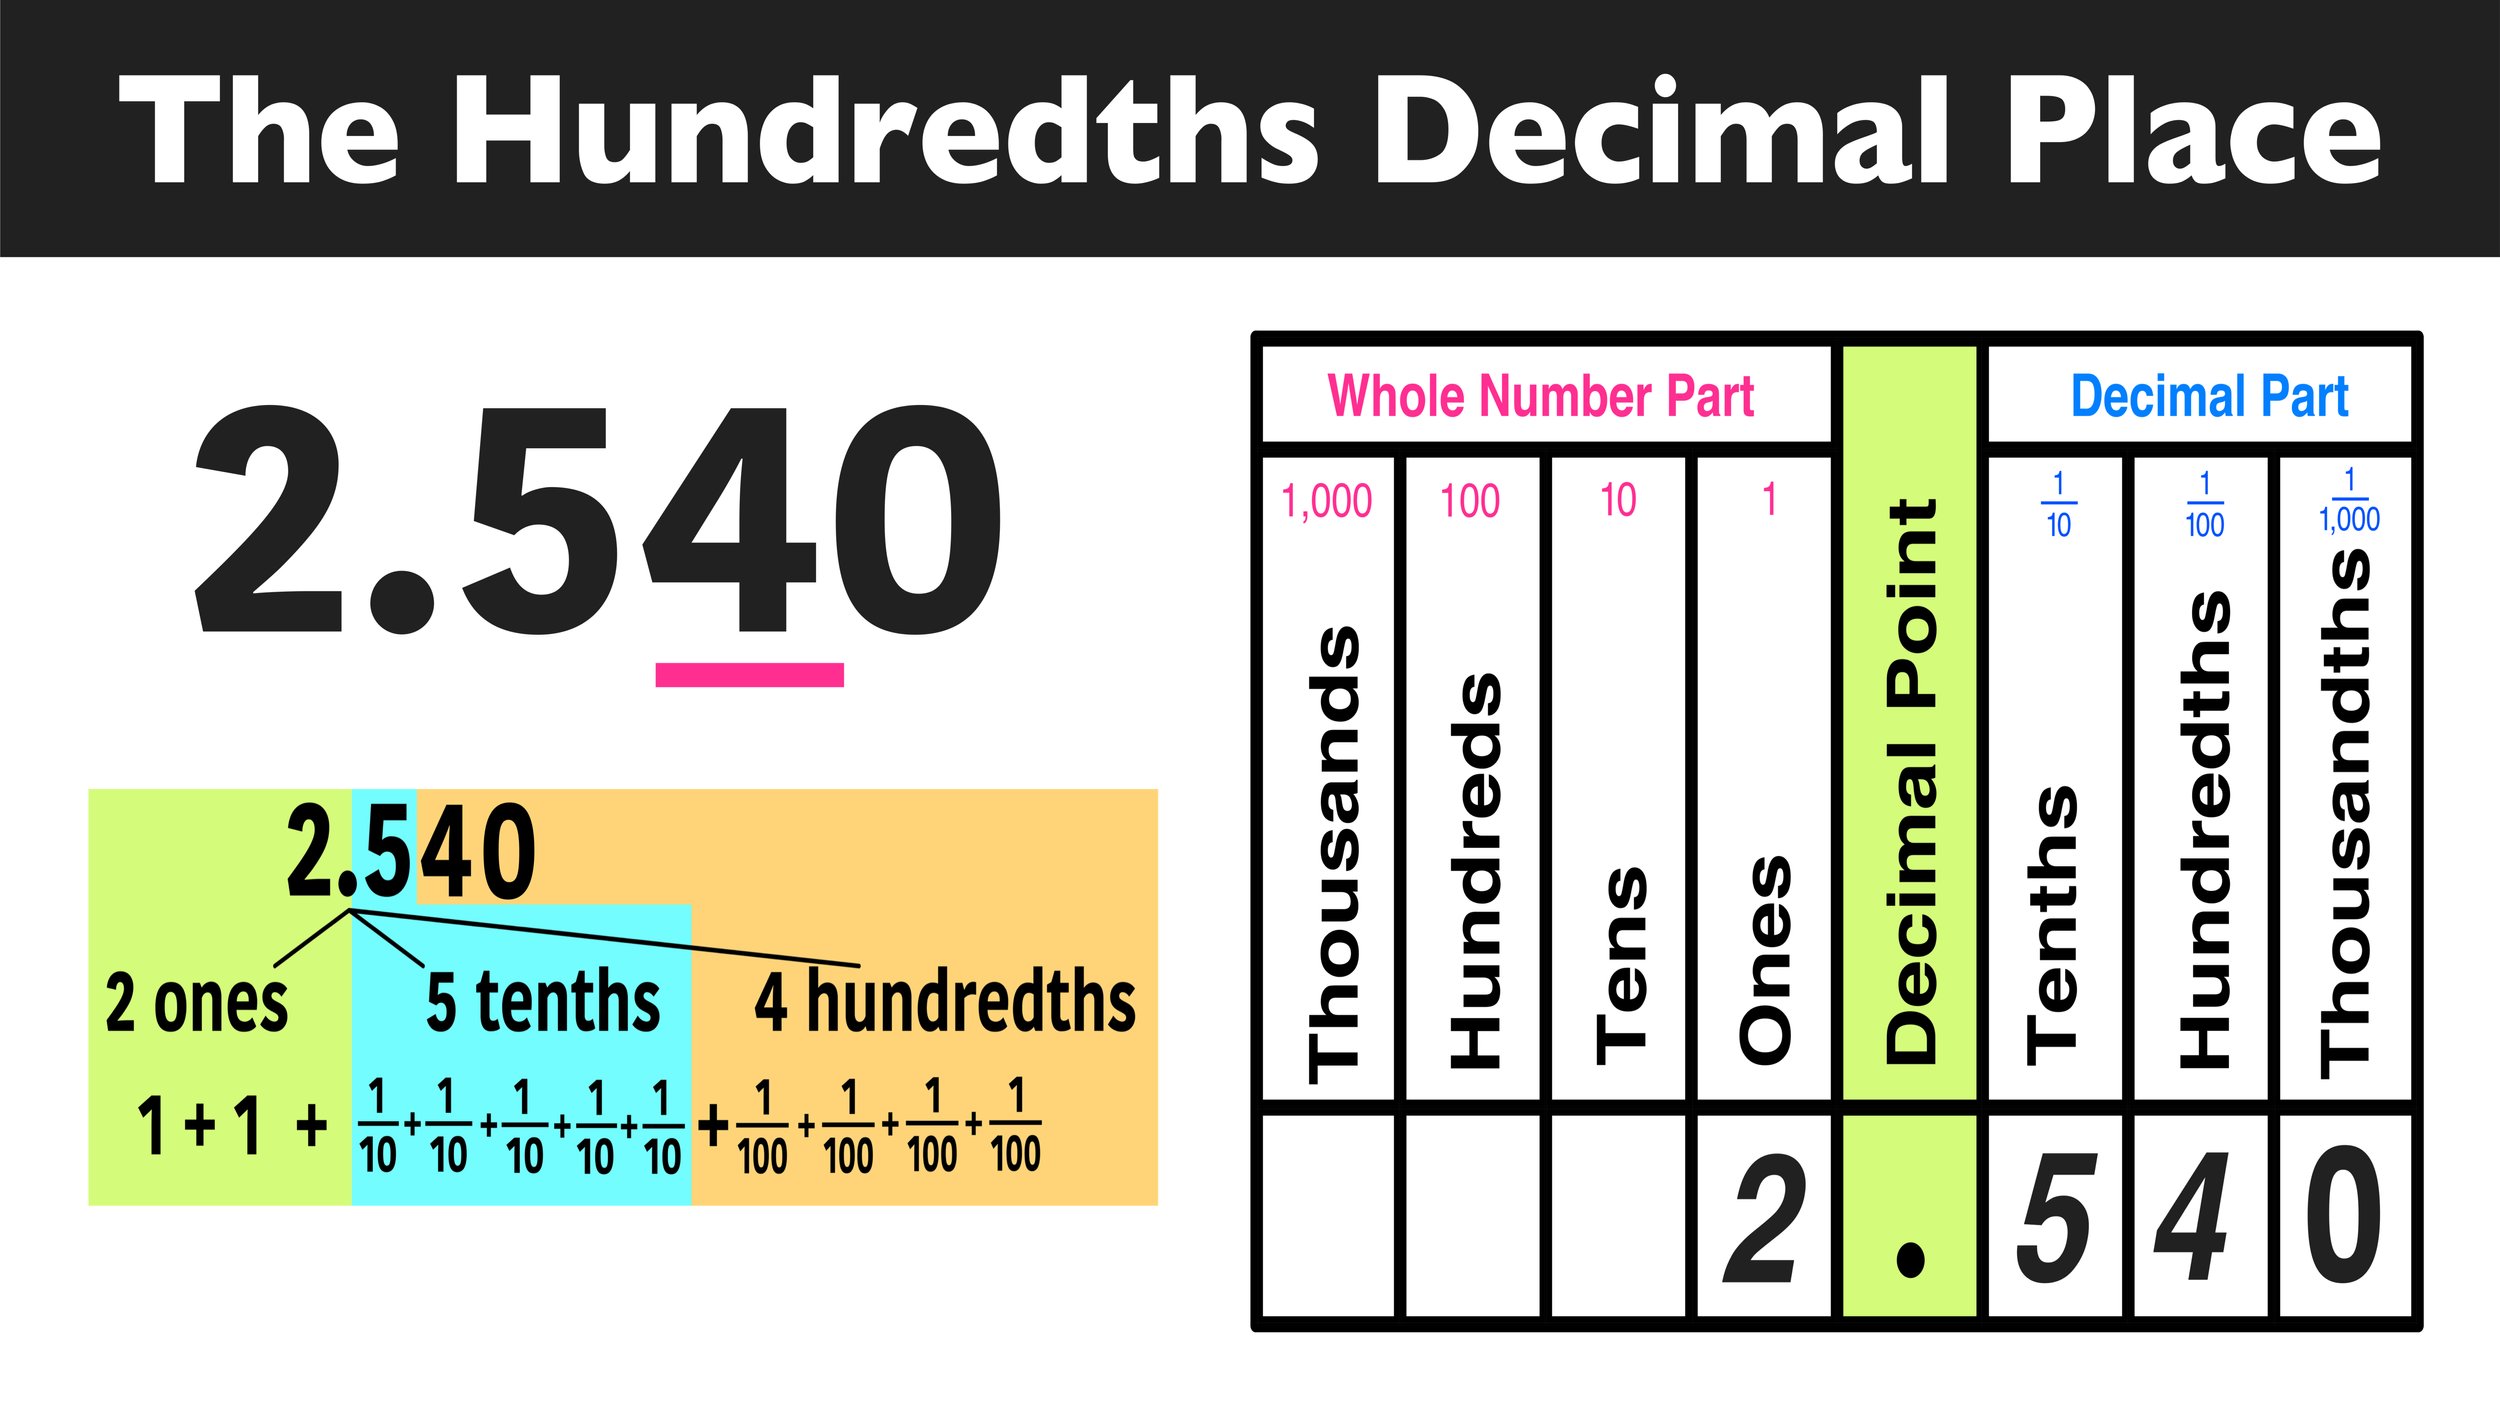
Decimal to Fraction Chart Uses

You can use the decimal and fraction chart above as a reference to quickly make conversions between decimals and fractions.

Be sure to print it out and keep it close by when you are working on problems that require you to convert decimals to fractions or vice versa.

Tags: math,maths,converting decimals to fractions,convert decimal to fraction,decimal to fraction,decimal to fraction in simplest form,decimal to fraction calculator,decimal to fraction math antics,decimal to fraction conversion,decimal to fraction khan academy,decimal to fraction thousandths,decimal to fraction mixed number,decimal to fraction chart,fractions and decimals,improper fractions,simplest form,how to convert decimals to fractions,decimal to fraction ti 84

More Free Decimals and Fractions Resources

Read More Posts About Math Education:

Share your ideas, questions, and comments below!

(Never miss a Mashup Math blog--click here to get our weekly newsletter!)

By Anthony Persico

Anthony is the content crafter and head educator for YouTube's MashUp Math . You can often find me happily developing animated math lessons to share on my YouTube channel . Or spending way too much time at the gym or playing on my phone.

4 Comments

How to Add and Subtract Fractions (Step-by-Step)

6 Comments

How to Add and Subtract Fractions (Step-by-Step)

How to Add and Subtract Fractions Explained!

How can you add and subtract fractions with different denominators?

Learn how to solve these kinds of problems.

Welcome to this free lesson guide that accompanies this Adding and Subtracting Denominators with Unlike Denominators video lesson, where you will learn how to add and subtract fractions:

  • Adding Fractions

  • Subtracting Fractions

  • Unlike Denominators

  • How to add and subtract fractions with the same denominator

  • How to add and subtract fractions with different denominators

This How to Add and Subtract Fractions with Unlike Denominators: Complete Guide includes several examples, a step-by-step tutorial, an animated video mini-lesson, and a free worksheet and answer key.


*This lesson guide accompanies our animated Adding and Subtracting Fractions with Unlike Denominators on YouTube.

Want more free math lesson guides and videos? Subscribe to our channel for free!


Before you learn how to add and subtract fractions you need to understand some key vocabulary first.

Adding and Subtracting Fractions with the Same Denominator

Let’s start by reviewing the difference between a numerator and a denominator:

Figure 1

How to Add and Subtract Fractions with Like Denominators


In the above example, 1/5 and 3/5 have common denominators (both equal 5). To add them together, you just have to add the numerators together and leave the denominator alone as follows:

Figure 2
Snip20200430_61.png
 

Since 4/5 can not be simplified any further, you can conclude that:

1/5 + 3/5 = 4/5

But what about when the denominators are not the same?

Adding and Subtracting Fractions with Unlike Denominators

How do you add and subtract fractions when the denominators are different?

You can use the following 3-step process for adding and subtracting fractions (with and without common denominators).

Snip20200430_62.png
 

Subtracting Fractions with Unlike Denominators Example

Snip20200430_63.png

STEP ONE: Get a common denominator.

Snip20200430_64.png
Snip20200430_65.png

How to add and subtract fractions.

STEP TWO: Add or subtract the numerators.

Snip20200430_66.png
Snip20200430_67.png

STEP THREE: Simplify the result if needed.

Notice that 3/27 can be simplified, since the numerator and denominator are both divisible by 3.

Snip20200430_69.png
Snip20200430_73.png

And that’s all there is to it!

Final Answer:

Snip20200430_72.png


Adding and Subtracting Fractions with Unlike Denominators: Video Tutorial

Still confused? Check out the animated video lesson below:

Check out the video lesson below to learn more about adding and subtracting fractions and for more free practice problems:


Keep Learning with More Free Lesson Guides:

Have thoughts? Share your thoughts in the comments section below!

(Never miss a Mashup Math blog--click here to get our weekly newsletter!)

By Anthony Persico

Anthony is the content crafter and head educator for YouTube's MashUp Math. You can often find me happily developing animated math lessons to share on my YouTube channel . Or spending way too much time at the gym or playing on my phone.

6 Comments

Geometry Transformations: Rotations 90, 180, 270, and 360 Degrees!

Comment

Geometry Transformations: Rotations 90, 180, 270, and 360 Degrees!

Performing Geometry Rotations: Your Complete Guide

The following step-by-step guide will show you how to perform geometry rotations of figures 90, 180, 270, and 360 degrees clockwise and counterclockwise and the definition of geometry rotations in math! (Free PDF Lesson Guide Included!)

 
maxresdefault.jpg
 

Welcome to this free lesson guide that accompanies this Geometry Rotations Explained Video Tutorial where you will learn the answers to the following key questions and information:

  • What is the geometry rotation definition and what is the definition of rotation in math?

  • How to perform clockwise and counterclockwise rotations

  • How can you rotate a triangle about the origin?

  • Several geometry rotation examples

This Complete Guide to Geometry Rotations includes several examples, a step-by-step tutorial, a PDF lesson guide, and an animated video tutorial.


*This lesson guide accompanies our animated Geometry Transformations: Rotations Explained! video.

Want more free math lesson guides and videos? Subscribe to our channel for free!


Rotation Geometry Definition

Before you learn how to perform rotations, let’s quickly review the definition of rotations in math terms.

Rotation Geometry Definition: A rotation is a change in orientation based on the following possible rotations:

  • 90 degrees clockwise rotation

  • 90 degrees counterclockwise rotation

  • 180 degree rotation

  • 270 degrees clockwise rotation

  • 270 degrees counterclockwise rotation

  • 360 degree rotation

Note that a geometry rotation does not result in a change or size and is not the same as a reflection!

Clockwise vs. Counterclockwise Rotations

There are two different directions of rotations, clockwise and counterclockwise:

Clockwise Rotations (CW) follow the path of the hands of a clock. These rotations are denoted by negative numbers.

Counterclockwise Rotations (CCW) follow the path in the opposite direction of the hands of a clock. These rotations are denoted by positive numbers.

Clockwise rotations are denoted by negative numbers.

Clockwise rotations are denoted by negative numbers.

Counterclockwise rotations are denoted by positive numbers.

Counterclockwise rotations are denoted by positive numbers.

Note that the direction of rotation (CW or CCW) doesn’t matter for 180 and 360-degree rotations, since they will both bring you to the same spot (more on this later).

Geometry Rotation Notation

Note that the following notation is used to show what kind of rotation is being performed.

For example, Figure 1 is a rotation of -270 degrees (which is a CW rotation).

Figure 1

Figure 1


Now you are ready to try a few geometry rotation examples!


Geometry Counterclockwise Rotation Examples

Example 01: 90 Degrees Counterclockwise About the Origin

Since 90 is positive, this will be a counterclockwise rotation.

Since 90 is positive, this will be a counterclockwise rotation.

In this example, you have to rotate Point C positive 90 degrees, which is a one quarter turn counterclockwise.

Point C lays in the 1st quadrant.

To perform the 90-degree counterclockwise rotation, imagine rotating the entire quadrant one-quarter turn in a counterclockwise direction.

Point C

Point C

Rotate the entire quadrant.

Rotate the entire quadrant.

Plot point C’

Plot point C’

Note the location of Point C’, the image of Point C after a 90-degree rotation.

Snip20200430_16.png

And this process could be repeated if you wanted to rotation Point C 180 degrees or 270 degrees counterclockwise:

 
Point C after a 180-degree rotation.

Point C after a 180-degree rotation.

Point C after a 270-degree rotation.

Point C after a 270-degree rotation.

 
Snip20200430_19.png

This example should help you to visually understand the concept of counterclockwise geometry rotations. Next, you will learn the rules for performing counterclockwise rotations.

>>> Before you move on, take some time to visualize what rotations look like on the coordinate plane.

<><><>


Counterclockwise Rotation Rules

You can use the following rules when performing any counterclockwise rotation.

By applying these rules to Point C (3,6) in the last example (Figure 2), you can see how applying the rule creates points that correspond with the graph!

Left: replace x with 3. Right: replace x with -9
Figure 2

Figure 2

These points should look familiar! They are the points that you plotted in the last example!

Snip20200430_19.png
 

Geometry Clockwise Rotation Examples

Example 01: 90 Degrees Clockwise About the Origin

Snip20200430_22.png

Since the rotation is 90 degrees, you will be rotating the point in a clockwise direction.

Now imagine rotating the entire 4th quadrant one-quarter turn in a clockwise direction:

Point D

Point D

Rotate the entire quadrant

Rotate the entire quadrant

Plot Point D’

Plot Point D’

Note the location of Point D’, the image of Point D after a -90-degree rotation.

Snip20200430_29.png

And this process could be repeated if you wanted to rotation Point D -180 degrees or -270 degrees counterclockwise:

Point D after -180 rotation

Point D after -180 rotation

Point D after -270 rotation

Point D after -270 rotation


This example should help you to visually understand the concept of clockwise geometry rotations. Next, you will learn the rules for performing clockwise rotations.

>>> Before you move on, take some time to visualize what rotations look like on the coordinate plane.

<><><>


Clockwise Rotation Rules

You can use the following rules when performing any clockwise rotation.

By applying these rules to Point D (5,-8) in the last example (Figure 3), you can see how applying the rule creates points that correspond with the graph!

Snip20200430_32.png
Figure 3

Figure 3

These points should look familiar! They are the points that you plotted in the last example!


More Geometry Rotations Examples

Example 01: Rotate a Line Segment 90 Degrees Clockwise

Snip20200430_39.png

You can perform this rotation by using the rules or by doing a visual rotation as follows:

Snip20200430_42.png
Snip20200430_45.png
 

Example 02: Rotate a Triangle 180 Degrees

Note that it doesn’t matter which direction go (CW or CCW) for 180 degrees rotations, since you will end up in the same position either way!

Snip20200430_47.png

You can perform this rotation by using the rules or by doing a visual rotation as follows:

Snip20200430_50.png
 

Free Geometry Rotations Lesson Guide

Looking for more help with geometry rotations?

Click the link below to download your free PDF lesson guide that corresponds with the video lesson below!

Click here to download the Your Free PDF Lesson Guide

Still Confused?

Check out this animated video tutorial on geometry rotations:


Looking for more practice with Geometry Transformations?

Check out the following free resources:

Free Tutorial on Reflections!

Free Tutorial on Reflections!

Have thoughts? Share your thoughts in the comments section below!

(Never miss a Mashup Math blog--click here to get our weekly newsletter!)

By Anthony Persico

Anthony is the content crafter and head educator for YouTube's MashUp Math. You can often find me happily developing animated math lessons to share on my YouTube channel . Or spending way too much time at the gym or playing on my phone.

Comment

Multiplying Polynomials: The Complete Guide

Comment

Multiplying Polynomials: The Complete Guide

The Best Method for Multiplying Polynomials

The following step-by-step guide will show you how to multiply polynomials using the distributive method and includes 3 examples!

 
TNAIL.jpg
 

Welcome to this free lesson guide that accompanies this Multiplying Polynomials Made Easy! video tutorial where you will learn the answers to the following key questions and information:

  • What is the best method for multiplying polynomials?

  • How to perform multiplication of polynomials

  • Multiplication of monomials, binomials, and trinomials

  • Multiplying Polynomials Using the Distributive Property

This Complete Guide to Multiplying Polynomials includes several examples, a step-by-step tutorial and an animated video tutorial.


*This lesson guide accompanies our animated Multiplying Polynomials Made Easy! video.

Want more free math lesson guides and videos? Subscribe to our channel for free!


Multiplying Polynomials Explained!

Before you learn how to multiply polynomials, let’s quickly review some important information:

The Distributive Property

Definition: The distributive property allows for you to multiply a sum by multiplying each term separately and then add all of the products together.

Dist.jpg


If you understand the distributive property, you will be able to multiply polynomials with ease.

Multiplying Polynomials Examples

Multiplying Polynomials Example 1: Multiplying by a Monomial

Figure 1

In this first example, you will be multiplying a monomial by a trinomial. You can think of this as multiplying one “thing” by “another thing” as follows:

Snip20200428_7.png

This is where using the distributive property (or distributive method) will help you!

To multiply these polynomials, start by taking the first polynomial (the purple monomial) and multiplying it by each term in the second polynomial (the green trinomial).

This can be done by multiplying 4x^2 by the first term of the green trinomial (Figure 1), then by the second term of the green trinomial (Figure 2) and finally by the third term of the green trinomial (Figure 3).

Figure 1

Figure 1

Figure 2

Figure 2

Figure 3

Figure 3

The next step is to simplify each of these new terms and find their sum:

Simplify the first term.

Simplify the first term.

Simplify the second term.

Simplify the second term.

Simplify the third term.

Simplify the third term.

The final step is to check and see if you can COMBINE LIKE TERMS. In this example, there are no like terms, so you can conclude that:

Final Answer:

Figure 2

Figure 2


Multiplying Polynomials Example 2: Multiplying Binomials

Notice that -30x and 12 are like terms.

You can use the distributive method for multiplying polynomials just like the last example!

Start by multiplying the first term of the first binomial (3x) by the entire second binomial (Figure 1).

Then multiply the second term of the first binomial (-5y) by the entire second binomial (Figure 2).

Figure 1

Figure 1

Figure 2

Figure 2


The next step is to use the distributive property again to simplify each new term.

Set up two equations (positive and negative) and ditch the absolute value bars.
Snip20200428_27.png
Note that you do not need the plus sign between -6xy and -40xy.

Note that you do not need the plus sign between -6xy and -40xy.


The final step is to COMBINE LIKE TERMS and simplify:

Original Function
Snip20200428_32.png
Snip20200428_33.png
Snip20200428_36.png

Final Answer:

 
Left: replace x with 3. Right: replace x with -9


Multiplying Polynomials Example 3: Multiply a Binomial by a Trinomial

Figure 1

Figure 1


Remember that you are still just multiplying two things together! And you can do that by using the distributive method again as follows:

Figure 3
Snip20200428_43.png
 

Now you can use the distributive method again to simplify the new terms:

Snip20200428_44.png
Snip20200428_45.png
Snip20200428_47.png

The final step is to COMBINE LIKE TERMS and simplify:

Snip20200428_49.png
-42x^2 and -27x^2 combine to make -69x^2

-42x^2 and -27x^2 combine to make -69x^2

+14x and +54x combine to make +68x

+14x and +54x combine to make +68x

Snip20200428_55.png

Now that you have combined like terms, you can conclude that:

Final Answer:

Snip20200428_54.png
 

Still Confused?

Check out this animated video tutorial on multiplying polynomials:


Looking for more practice with multiplying polynomials?

Check out the following free resources:

Free Tutorial

Free Tutorial

Have thoughts? Share your thoughts in the comments section below!

(Never miss a Mashup Math blog--click here to get our weekly newsletter!)

By Anthony Persico

Anthony is the content crafter and head educator for YouTube's MashUp Math. You can often find me happily developing animated math lessons to share on my YouTube channel . Or spending way too much time at the gym or playing on my phone.

Comment

Geometry Transformations: Dilations Made Easy!

Comment

Geometry Transformations: Dilations Made Easy!

Performing Geometry Dilations: Your Complete Guide

The following step-by-step guide will show you how to perform geometry dilations of figures and to understand dilation scale factor and the definition of geometry in math! (Free PDF Lesson Guide Included!)

 
maxresdefault.jpg
 

Welcome to this free lesson guide that accompanies this Geometry Dilations Explained Video Tutorial where you will learn the answers to the following key questions and information:

  • What is the geometry dilation definition and what is definition of dilation in math?

  • What is a dilation scale factor?

  • How can you dilate a figure like a triangle on the coordinate plane?

  • Several dilation geometry examples

This Complete Guide to Geometry Dilations includes several examples, a step-by-step tutorial, a PDF lesson guide, and an animated video tutorial.


*This lesson guide accompanies our animated Geometry Transformations: Dilations Explained! video.

Want more free math lesson guides and videos? Subscribe to our channel for free!


Dilation Geometry Definition

Before you learn how to perform dilations, let’s quickly review the definition of dilations in math terms.

Dilation Geometry Definition: A dilation is a proportional stretch or shrink of an image on the coordinate plane based on a scale factor.

  • Stretch = Image Grows Larger

  • Shrink = Image Grows Smaller

Note that a geometry dilation does not result in a change or orientation or shape!

Dilation Scale Factor

The following notation is used to denote dilations based on a scale factor of K:

Snip20200423_1.png

K represents a number. When K=1 (the dilation scale factor is 1), the image does not change:

A scale factor one 1 is uncommon, because it doesn’t change anything!

A scale factor one 1 is uncommon, because it doesn’t change anything!

But when K>1 (the dilation scale factor K is a number that is larger than 1), the image will be stretched!

If K=2, the image is stretched twice as large as the original!

If K=2, the image is stretched twice as large as the original!

And when K<1 (the dilation scale factor K is a number less than 1), the image will shrink. Note that the scale factor cannot be less than or equal to zero (this would completing eliminate the figure).

If K=1/2, the image shrinks to half of its original size.

If K=1/2, the image shrinks to half of its original size.

When shrinking a figure, the scale factor is greater than zero, but less than one.

When shrinking a figure, the scale factor is greater than zero, but less than one.


Now you are ready to try a few geometry dilation examples!


Geometry Dilation Examples

Example 1: Dilation Scale Factor >1

Notice that -30x and 12 are like terms.

In this example, you have to dilate ▵OMG by a scale factor of 2 to create a new triangle: ▵O’M’G’.

Start by writing down the coordinates of the vertices of ▵OMG as follows:

Snip20200423_9.png

The next step is to take the scale factor (2 in this example) and multiply it by the x and y-value of points O, M, and G, as follows:

Snip20200423_10.png
Now you have the coordinates of O’, M’, and G’

Now you have the coordinates of O’, M’, and G’

You can now draw ▵O’M’G’ on the coordinate plane by plotting the points that you just found:

 
Set up two equations (positive and negative) and ditch the absolute value bars.
 

You have just constructed ▵O’M’G’, which is the image of ▵OMG after a dilation of 2.

<><><>


Example 2: Dilation Scale Factor <1

Left: replace x with 3. Right: replace x with -9

In this example, you have to dilate figure MASH by a scale factor of 1/3 to create a new figure: M’A’S’H’

Since the dilation scale factor is less than one, the new figure will be smaller version of the original (shrink).

Start by writing down the coordinates of the vertices of figure MASH as follows:

Both equations are true.

The next step is to take the scale factor (1/3 in this example) and multiply it by the x and y-value of points M, A, S, and H, as follows:

Snip20200423_18.png
Now you have the coordinates of M’, A’, S’, and H’

Now you have the coordinates of M’, A’, S’, and H’

You can now draw figure M’A’S’H’ on the coordinate plane by plotting the points that you just found:

Snip20200423_20.png

You have just constructed M’A’S’H’, which is the image of MASH after a dilation of 1/3.

<><><>


Free Geometry Dilations Lesson Guide

Free PDF Lesson Guide

Free PDF Lesson Guide

Looking for more help with geometry dilations?

Click the link below to download your free PDF lesson guide that corresponds with the video lesson below!

Click here to download the Your Free PDF Lesson Guide

Still Confused?

Check out this animated video tutorial on geometry dilations and scale factors:


Looking for more practice with Geometry Transformations?

Check out the following free resources:

Free Tutorial on Reflections!

Free Tutorial on Reflections!

Have thoughts? Share your thoughts in the comments section below!

(Never miss a Mashup Math blog--click here to get our weekly newsletter!)

By Anthony Persico

Anthony is the content crafter and head educator for YouTube's MashUp Math. You can often find me happily developing animated math lessons to share on my YouTube channel . Or spending way too much time at the gym or playing on my phone.

Comment