Parallel Slopes and Perpendicular Slopes: Complete Guide

Comment

Parallel Slopes and Perpendicular Slopes: Complete Guide

Finding Slopes of Parallel and Perpendicular Lines (and Graphing): Complete Guide

The following step-by-step guide will show you how to use parallel slope and perpendicular slope to graph parallel and perpendicular lines

 
Insert.jpg
 

Welcome to this free lesson guide that accompanies this Graphing Parallel and Perpendicular Lines Using Slope Tutorial where you will learn the answers to the following key questions and information:

  • What is parallel slope?

  • What is perpendicular slope?

  • How can I graph parallel lines?

  • How can I graph perpendicular lines?

This Complete Guide to Parallel and Perpendicular Lines and Slope includes several examples, a step-by-step tutorial and an animated video tutorial.


*This lesson guide accompanies our animated Graphing Parallel and Perpendicular Lines Using Slope video.

Want more free math lesson guides and videos? Subscribe to our channel for free!


Parallel Slope and Perpendicular Slope

Before you learn how to graph parallel and perpendicular lines, let’s quickly review some important information:
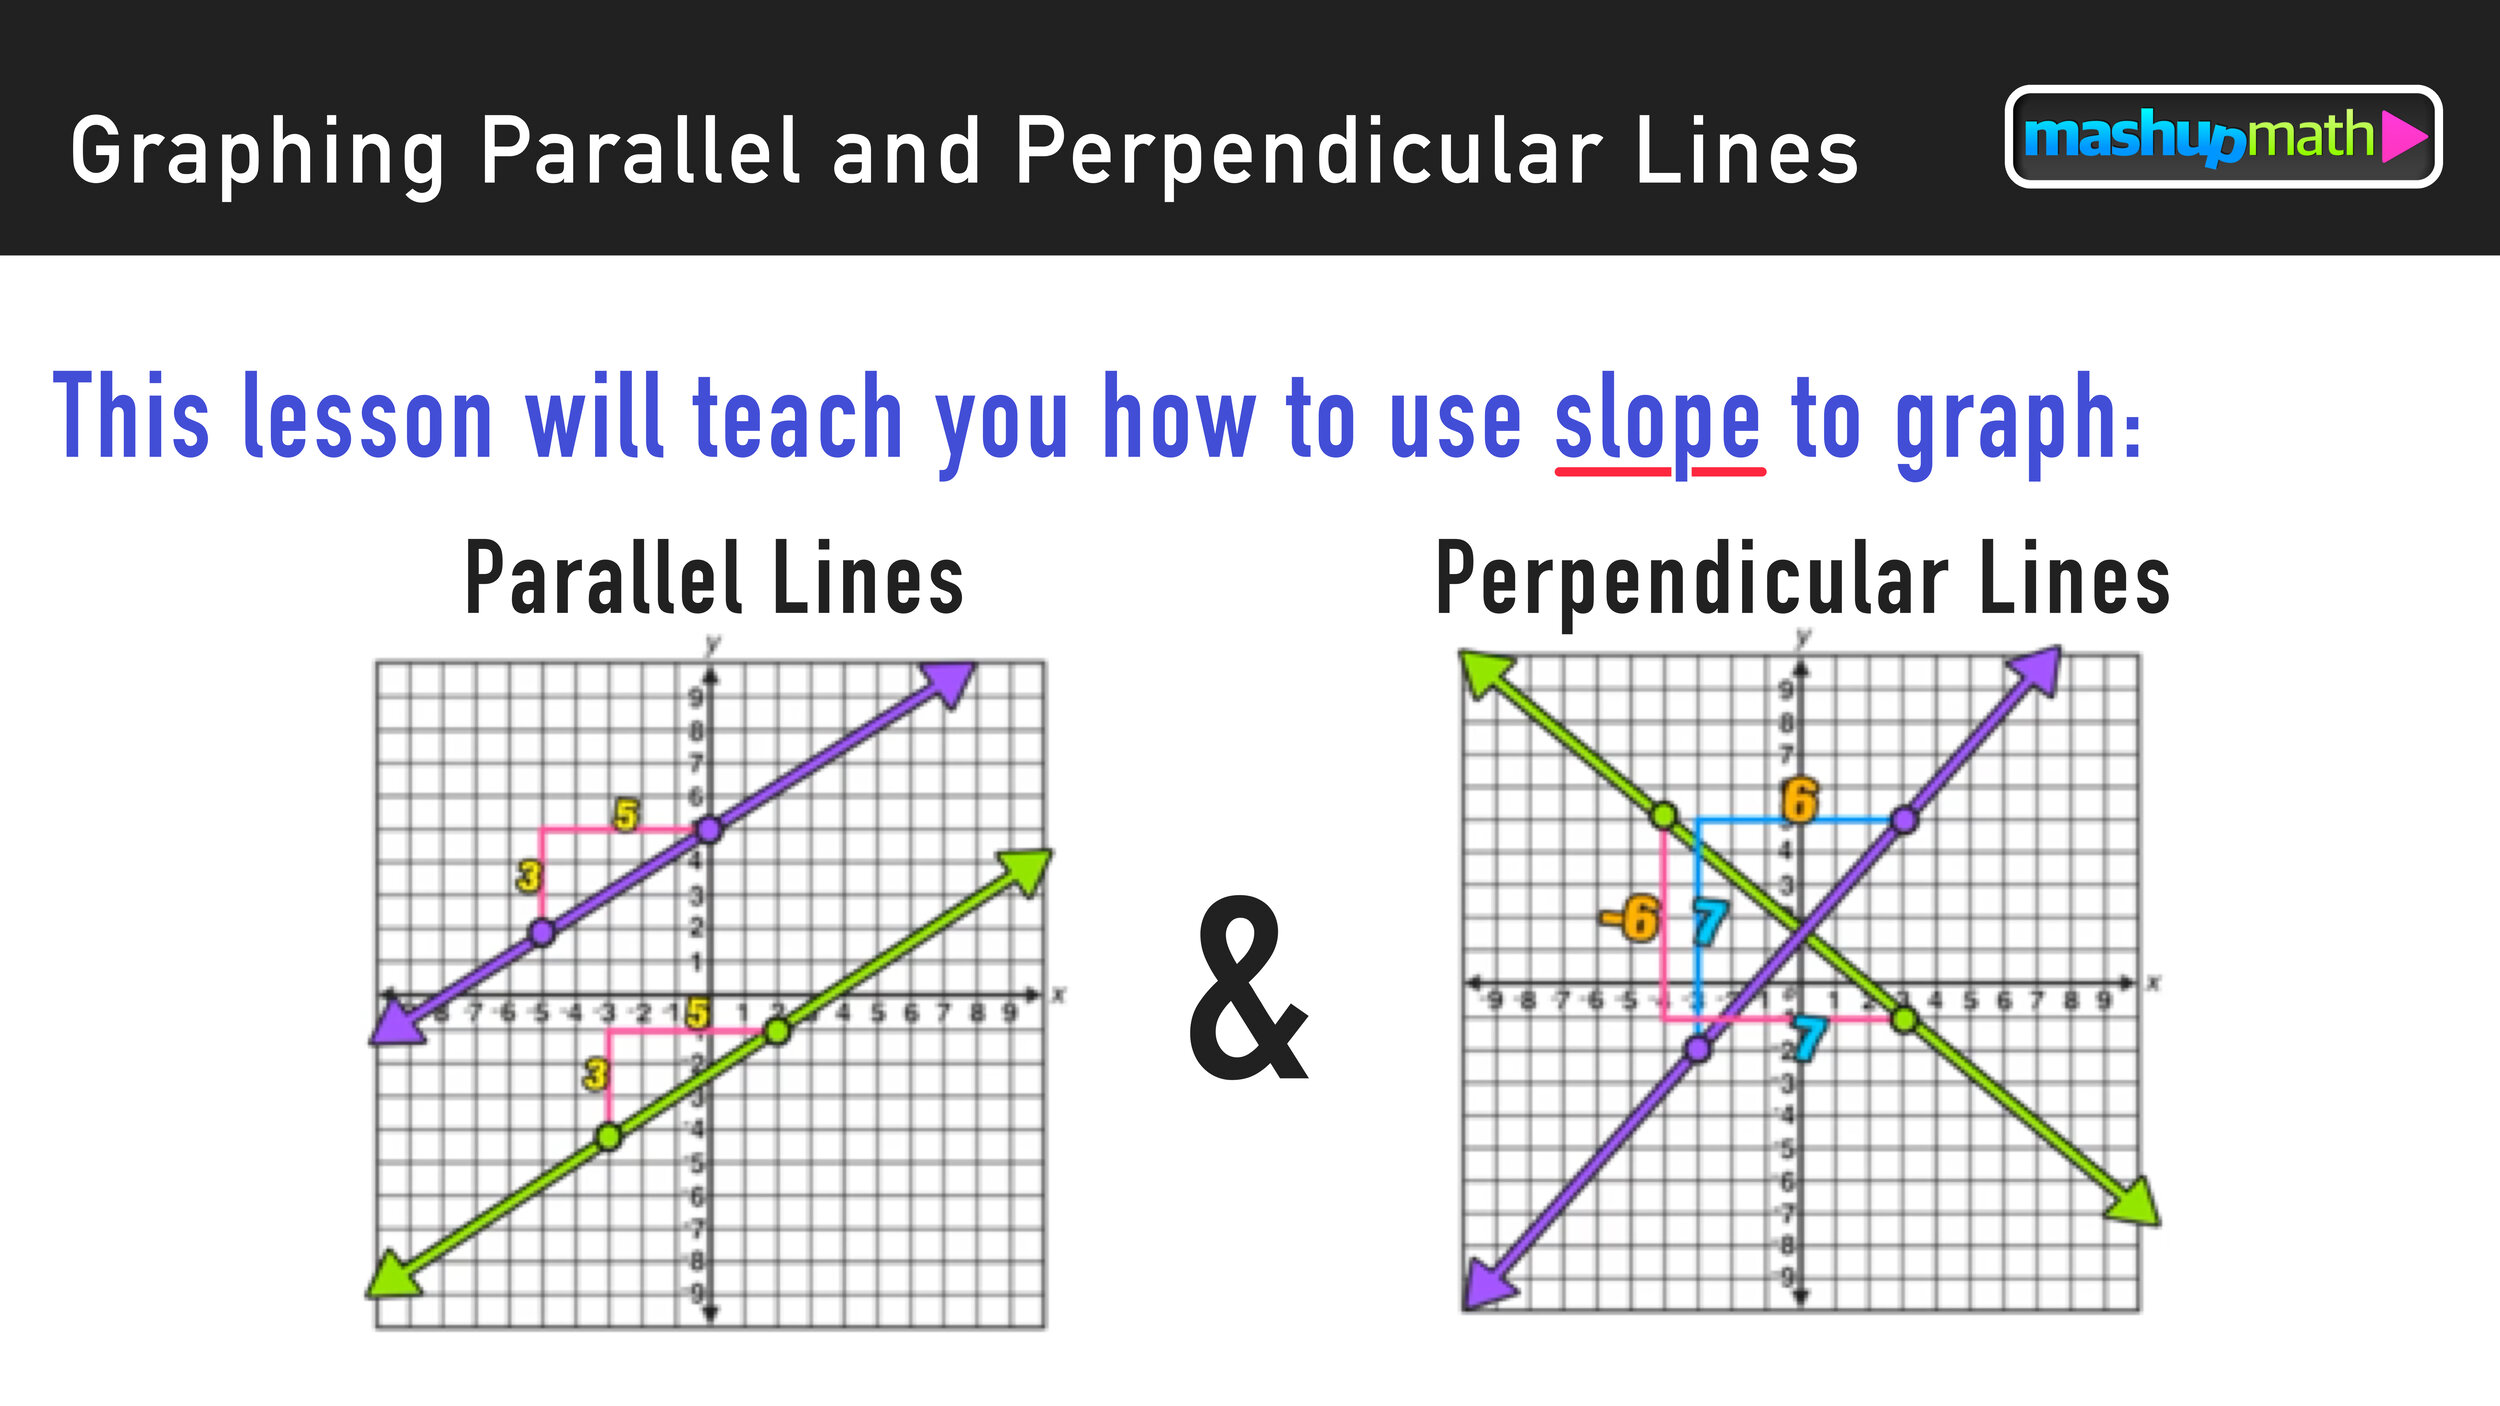
Parallel Lines

  • Never intersect

  • Have the SAME SLOPE (m)

For example, observe the purple line and the green line in Figure 1 below. These lines are parallel and have the same slope of m=3/5.

This is true for all parallel lines.
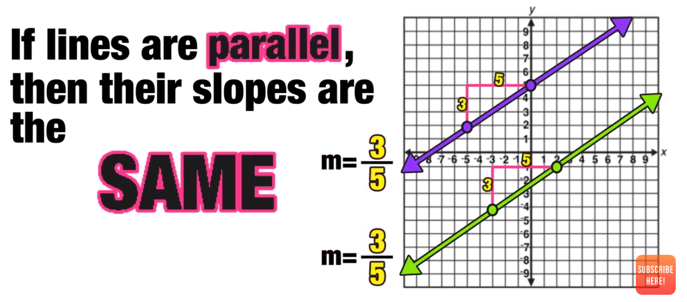
Figure 1

Figure 1

Perpendicular Lines

  • Intersect to Form Right Angles

  • Have the NEGATIVE RECIPROCAL SLOPES (m)

For example, observe the purple line and the green line in Figure 2 below. These lines are perpendicular and have negative reciprocal slopes.

Another way of saying negative reciprocal is FLIP AND SWITCH, which means to take the slope of the first line, flip the fraction and switch the sign (positive to negative or vice versa).

In this case, the green line slope is -(6/7) and the purple line slope is +(7/6)

This is true for all perpendicular lines.
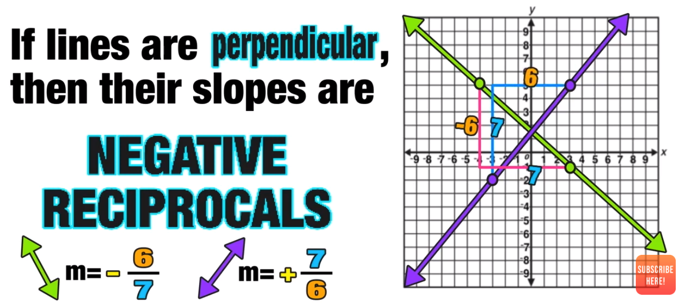
Figure 2

Figure 2


Parallel Slope Example

Example:

Notice that -30x and 12 are like terms.

Let’s start by identifying the key information:

Snip20200418_15.png
 

Since you have to graph a line through point J that is PARALLEL to line S, then you know that you will be dealing with SAME SLOPE.

Start by finding the slope of line S by finding the slope between the two given points (-4,0) and (5,2). You can find the slope by counting “rise over run” or by using the slope formula.

In this example, Line S has a slope of m=2/9.

Set up two equations (positive and negative) and ditch the absolute value bars.
 

Again, since parallel lines have the same slope, you can build your new line through point J by repeating the slope m=2/9 starting at point J as follows:

Original Function
 

Now that you have plotted a new point using the same slope, the final step is to construct a line that passes through the new point and point J as follows:

Left: replace x with 3. Right: replace x with -9
Both equations are true.

And you have graphed your parallel line using slope!


Perpendicular Slope Example

Example:

Figure 1

Figure 1


Start by identifying the key information.

Figure 3
 

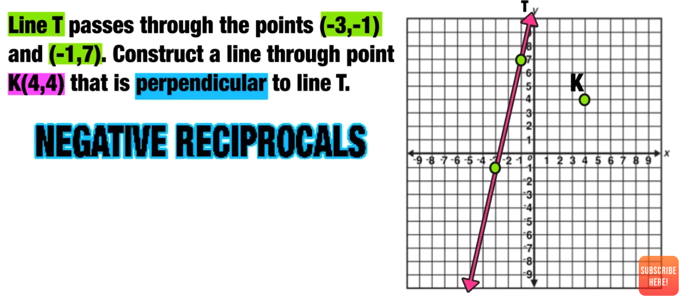
Since you have to graph a line through point K that is PERPENDICULAR to line T, then you know that you will be dealing with NEGATIVE RECIPROCAL SLOPES (also known as “flip and switch”).

Start by finding the slope of line T by finding the slope between the two given points (-3,-1) and (-1,7). You can find the slope by counting “rise over run” or by using the slope formula.

In this example, Line T has a slope of m= +8/2, which simplifies to m=+4/1

Snip20200418_26.png
Snip20200418_27.png
Snip20200418_28.png

Now that you know that the slope of Line T is m=+(4/1), you are ready to find the slope of the new line by finding the negative reciprocal.

You can do this taking the slope of Line T and doing “flip and switch”.

To do this, flip the fraction and switch the sign as follows:

Snip20200418_29.png

The las step is to use the negative reciprocal to build your new line. You can do this by starting at point K and going down one unit and to the right four units (rise: -1, run: +4) and then plot a new point.

Snip20200418_30.png

Now that you have plotted a new point using the negative reciprocal slope, the final step is to construct a line that passes through the new point and point K as follows:

Snip20200418_31.png

And you have graphed your parallel line using slope!


End.jpg

Still Confused?

Check out this animated video tutorial on slopes of parallel and perpendicular lines and graphs:


Looking for more practice with graphing and slope?

Check out the following free resources:

Free Tutorial

Free Tutorial

Have thoughts? Share your thoughts in the comments section below!

(Never miss a Mashup Math blog--click here to get our weekly newsletter!)

By Anthony Persico

Anthony is the content crafter and head educator for YouTube's MashUp Math. You can often find me happily developing animated math lessons to share on my YouTube channel . Or spending way too much time at the gym or playing on my phone.

Comment

Finding the Inverse of a Function: Complete Guide

Comment

Finding the Inverse of a Function: Complete Guide

Learn How to Find the Inverse of a Function Using 3 Easy Steps

The following step-by-step guide will show you how to find the inverse of any function! (Algebra)

 
InverseFunction.jpg
 

Welcome to this free lesson guide that accompanies this Finding the Inverse of a Function Tutorial where you will learn the answers to the following key questions and information:

  • What is the inverse of a function?

  • What does the graph of the inverse of a function look like?

  • How can I find the inverse of a function algebraically?

  • How can I find the inverse of a function graphically?

This Complete Guide to Finding the Inverse of a Function includes several examples, a step-by-step tutorial and an animated video tutorial.


*This lesson guide accompanies our animated How to Find the Inverse of a Function in 3 Easy Steps video.

Want more free math lesson guides and videos? Subscribe to our channel for free!


Intro to Finding the Inverse of a Function

Before you work on a find the inverse of a function examples, let’s quickly review some important information:

Notation: The following notation is used to denote a function (left) and its inverse (right). Note that the -1 use to denote an inverse function is not an exponent.

Notice that the terms are in reverse order!

What is a function?

By definition, a function is a relation that maps X onto Y.

And what is the inverse of a function?

An inverse function is a relation that maps Y onto X.

Notice the switch?

Figure 1: The parent function for absolute value.
Snip20200417_10.png
 

You can think of the relationship of a function and its inverse as a situation where the x and y values reverse positions.

For example, let’s take a look at the graph of the function f(x)=x^3 and its inverse.

Snip20200417_11.png
 

Take a look at the table of the original function and its inverse. Notice how the x and y columns have reversed!

Definition: The inverse of a function is its reflection over the line y=x.

Keep this relationship in mind as we look at an example of how to find the inverse of a function algebraically.


Finding the Inverse of a Function Example

Notice that -30x and 12 are like terms.

We will be using the following 3-step process that can be used to find the inverse of any function:

Snip20200417_16.png
 

STEP ONE: Rewrite f(x)= as y=

If the function that you want to find the inverse of is not already expressed in y= form, simply replace f(x)= with y= as follows (since f(x) and y both mean the same thing: the output of the function):

Set up two equations (positive and negative) and ditch the absolute value bars.
Snip20200417_15.png
 

STEP ONE: Swap X and Y

Now that you have the function in y= form, the next step is to rewrite a new function using the old function where you swap the positions of x and y as follows:

Original Function

Original Function

New inverse function!

New inverse function!


This new function with the swapped X and Y positions is the inverse function, but there’s still one more step!

STEP THREE: Solve for y (get it by itself!)

The final step is to rearrange the function to isolate y (get it by itself) using algebra as follows:

Left: replace x with 3. Right: replace x with -9
Both equations are true.
It’s ok the leave the left side as (x+4)/7

It’s ok the leave the left side as (x+4)/7

Snip20200417_23.png
 

Once you have y= by itself, you have found the inverse of the function!

Final Answer: The inverse of f(x)=7x-4 is f^-1(x)=(x+4)/7

Snip20200417_25.png


Graphs of Inverse Functions

Remember earlier when we said the inverse function graph is the graph of the original function reflected over the line y=x? Let’s take a further look at what that means using the last example:

Below, Figure 1 represents the graph of the original function y=7x-4 and Figure 2 is the graph of the inverse y=(x+4)/7

Figure 1

Figure 1

Figure 2

Figure 2


Now let’s take a look at both lines on the same graph. Note that the original function is blue and the inverse is red this time (Figure 3) and then add the line y=x to the same graph (Figure 4).

Figure 3

Figure 3

Figure 4

Figure 4


Can you see the reflection over the line y=x?

This relationship applies to any function and its inverse and it should help you to understand why the 3-step process that you used earlier works for finding the inverse of any function!


Still Confused?

Check out this animated video tutorial on how to find the inverse of any function!


Looking for more practice with functions?

Check out the following free resources:

Free Tutorial

Free Tutorial

Have thoughts? Share your thoughts in the comments section below!

(Never miss a Mashup Math blog--click here to get our weekly newsletter!)

By Anthony Persico

Anthony is the content crafter and head educator for YouTube's MashUp Math. You can often find me happily developing animated math lessons to share on my YouTube channel . Or spending way too much time at the gym or playing on my phone.

Comment

Solving Absolute Value Equations: Complete Guide

Comment

Solving Absolute Value Equations: Complete Guide

Learn How to Solve Absolute Value Equations in 3 Easy Steps!

The following step-by-step guide will show you how to solve absolute value equations and absolute value functions with ease (Algebra)

 
AbsoluteValueTNAIL.jpg
 

Welcome to this free lesson guide that accompanies this Solving Absolute Value Equations Tutorial where you will learn the answers to the following key questions and information:

  • How to solve an absolute value equation

  • How to solve an absolute value function

  • How to find both solutions to an absolute value equation

  • Why is absolute value always positive?

This Complete Guide to Solving Absolute Value Equations includes several examples, a step-by-step tutorial and an animated video tutorial.


*This lesson guide accompanies our animated Solving Absolute Value Equations Explained! video.

Want more free math lesson guides and videos? Subscribe to our channel for free!


Intro to Solving Absolute Value Equations

Before you work on a few absolute value equations examples, let’s quickly review some important information:

Fact: Any value inside of absolute value bars represents either a positive number or zero.

Notice that the absolute value graph in Figure 1 has a range of y is greater than or equal to 0 (it is never negative)

Notice that the terms are in reverse order!
Figure 1: The parent function for absolute value.

Figure 1: The parent function for absolute value.


Furthermore, consider the example below:

Snip20200416_8.png
 

There are two values that would make this equation true!

Figure 1

The absolute value of 5 AND the absolute value of -5 both equal positive 5.

This should make sense when you graph the line y=5 over the absolute value function graph because you can see that there are two intersection points, and thus two solutions.

Absolute value functions can have up to two solutions!

Absolute value functions can have up to two solutions!


Now you know that ABSOLUTE VALUE EQUATIONS CAN HAVE TWO SOLUTIONS.

Now you are ready to try a few examples.

Solving Absolute Value Equations Example #1

Notice that -30x and 12 are like terms.

We will be using the following 3-step process that can be used to solve any absolute value equation:

222.jpg
 

STEP ONE: Isolate the Absolute Value

In this example, the absolute value is already isolated on one side of the equals sign, which means that there are no other terms outside of the absolute value, so you can move onto step two.

STEP TWO: Solve for Positive AND Solve for Negative

For step two, you have to take the original equation |x+3| = 6 and split it up into two equations, one equal to POSITIVE 6 and the other equal to NEGATIVE 6. You also get rid of the absolute value bars.

Set up two equations (positive and negative) and ditch the absolute value bars.

Set up two equations (positive and negative) and ditch the absolute value bars.


Now you just have to solve each equation for x as follows:

Snip20200416_17.png
Snip20200416_22.png
 

And now you have concluded that there are two solutions to |x+3|=6, x=3 and x=-9.

STEP THREE: Check Your Answer

Finally, do a quick check by plugging both answers into the original equation, |x+3|=6, to make sure that they are correct:

Left: replace x with 3. Right: replace x with -9

Left: replace x with 3. Right: replace x with -9

Both equations are true.

Both equations are true.


Since the checks worked out, you can conclude that:

Final Answer: The solutions to |x+3|=6 are x=3 and x=-9


Solving Absolute Value Equations Example #2

Snip20200416_23.png
 

Again, you will follow the three-step process to solving this absolute value equation:

Is this true???
 

STEP ONE: Isolate the Absolute Value

Unlike the last example, the absolute value is not already isolated on one side of the equal sign, because there is a +8 outside of it that needs to be moved to the other side as follows:

Step One: Isolate the absolute value!

Step One: Isolate the absolute value!

Snip20200416_25.png
Now the absolute value is isolated.

Now the absolute value is isolated.


Now that you have isolated the absolute value on one side of the equal sign, you are ready for the next step.

STEP TWO: Solve for Positive AND Solve for Negative

The next step is to ditch the absolute value bars and solve the following equations:

Positive: 2x-4=2 and Negative: 2x-4=-2

Snip20200416_27.png
Snip20200416_28.png
Snip20200416_29.png
Snip20200416_30.png
Snip20200416_31.png
 

Now you have TWO solutions: x=3 and x=1

STEP THREE: Check Your Answer

The final step is to plug both solutions, x=3 and x=1, into the original equation |2x-4|+8=10 and verify that each solution checks out and you are finished!

Go ahead and check the solution to Example 2 on your own! Did it work out?


Still Confused?

Check out this animated video tutorial on solving absolute value equations!


Looking for more practice with absolute value?

Check out the following free cube root resources:

Free Tutorial

Free Tutorial

Have thoughts? Share your thoughts in the comments section below!

(Never miss a Mashup Math blog--click here to get our weekly newsletter!)

By Anthony Persico

Anthony is the content crafter and head educator for YouTube's MashUp Math. You can often find me happily developing animated math lessons to share on my YouTube channel . Or spending way too much time at the gym or playing on my phone.

Comment

7 Super Fun Math Logic Puzzles for Kids!

3 Comments

7 Super Fun Math Logic Puzzles for Kids!

7 Super Fun Math Logic Puzzles for Kids Ages 10+ (Answers Included!)

A Post By: Anthony Persico

Working on fun math riddles and brain teasers is a great way for kids to develop number sense and improve their mathematical problem-solving skills.

And these same benefits also apply to math logic puzzles, which also help students learn to think algebraically (usually years before they even step foot inside of an algebra class!).

The following collection of 7 math logic puzzles for kids ages 10+ range from basic to advanced make for a great challenge and a fun math learning experience. Enjoy!

(Looking for more free math puzzles, riddles, and brain teasers for kids?)

TitleImagfe.jpg

7 Super Fun Math Logic Puzzles for Kids!

Each of the following math logic puzzles for kids includes an image graphic and there is an answer key at the end!

But if you want more detailed explanations of how to answer every riddle, check out the Math Logic Puzzles Explained! video link below and be sure to give it a thumbs up!

Watch the Math Logic Puzzles Video:


Free Worksheet Included!

Free Worksheet Included!

There is also a link to download a Free Printable PDF Math Logic Puzzles Worksheet and Answer Key that shares all of these logic puzzles at the end of this post!

All of the math logic puzzles below are samples from the best-selling 101 Daily Math Challenges for Engaging Students in Grades 3-8 PDF workbook, which is now available!

7 Super Fun Math Logic Puzzles for Kids:

Math Logic Puzzle #1:

one.jpg

Keep reading to the bottom of this page to see the answer key AND click here to see the video that explains the solution to this problem.

Would you like FREE math resources in your inbox every day? Click here to sign up for my free math education email newsletter (and get a free math eBook too!)


Math Logic Puzzle #2:

two.jpg

Keep reading to the bottom of this page to see the answer key AND click here to see the video that explains the solution to this problem.


MailingList_GIF_Banner-1.gif

Math Logic Puzzle #3:

three.jpg

Keep reading to the bottom of this page to see the answer key AND click here to see the video that explains the solution to this problem.


Are you looking for more super fun Math Riddles, Puzzles, and Brain Teasers to share with your kids?

The best-selling workbook 101 Math Riddles, Puzzles, and Brain Teasers for Kids Ages 10+! is now available as a PDF download. You can get yours today by clicking here.

 
Get Yours Now
 

Math Logic Puzzle #4:

04.jpg

Keep reading to the bottom of this page to see the answer key AND click here to see the video that explains the solution to this problem.


Math Logic Puzzle #5:

05.jpg

Keep reading to the bottom of this page to see the answer key AND click here to see the video that explains the solution to this problem.


Math Logic Puzzle #6:

06.jpg

Keep reading to the bottom of this page to see the answer key AND click here to see the video that explains the solution to this problem.


Math Logic Puzzle #7:

sev.jpg

Keep reading to the bottom of this page to see the answer key AND click here to see the video that explains the solution to this problem.


Math Logic Puzzle Bonus!

BONUSim.jpg


ANSWER KEY:

  1. Peach=8, Watermelon=12, Banana=5

  2. Planet=7, Helmet=4, Rocket=11

  3. Yellow Pot=17, Orange Pot=0, Purple Pot=17

  4. Burger=25, Ketchup=8, French Fries=25

  5. Playstation Controller=6, Gameboy=3, Switch Controller=18

  6. Husky=10, Terrier=17, Poodle=10

  7. Cake=5, Cookie=40, Cupcake=6

    Bonus: Van=12, Dove=0, Heart=6

WKSHT.jpg

Free PDF Worksheet:

Click here to get your Free Math Riddles PDF Worksheet and Answer Key!

And click here to sign up for our math education mailing list to start getting free K-12 math activities, puzzles, and lesson plans in your inbox every week!

Are you looking for more super fun Math Puzzles to share with your kids?

My best-selling workbook 101 Daily Math Challenges for Engaging Students in Grades 3-8 is now available as a PDF download. You can get yours today by clicking here.

Get More Math Puzzles

Did I miss your favorite math riddle for kids? Share your thoughts, questions, and suggestions in the comments section below!

(Never miss a Mashup Math blog--click here to get our weekly newsletter!)

By Anthony Persico

NewBlogImage.png

Anthony is the content crafter and head educator for YouTube's MashUp Math and an advisor to Amazon Education's 'With Math I Can' Campaign. You can often find me happily developing animated math lessons to share on my YouTube channel . Or spending way too much time at the gym or playing on my phone.

You Might Also Like…

 
NewPin08.jpg
PIN.jpg
 
NewPin09.jpg
NewPin10.jpg

3 Comments

Complete Guide to Graphing Cubic Functions and Cube Root Graphs

Comment

Complete Guide to Graphing Cubic Functions and Cube Root Graphs

How to Graph Cubic Functions and Cube Root Graphs

The following step-by-step guide will show you how to graph cubic functions and cube root graphs using tables or equations (Algebra)

 
CubeRootGraph.jpg
 

Welcome to this free lesson guide that accompanies this Graphing Cube Root Functions Tutorial where you will learn the answers to the following key questions and information:

  • How can I graph a cubic function?

  • How can I graph a cube root function?

  • How can I graph a cubic function equation?

  • How can I graph a function over a restricted domain?

This Complete Guide to Graphing Cubic Functions includes several examples, a step-by-step tutorial and an animated video tutorial.


*This lesson guide accompanies our animated Graphing Cubic Functions Explained! video.

Want more free math lesson guides and videos? Subscribe to our channel for free!


Example: Graphing a Cube Root Function

On this example, you will be graphing the function over a restricted domain, but the method we use will work graphing any cubic function.

Example:

Notice that the terms are in reverse order!
 

Since you are graphing this function over a restricted domain, you only care about graphing how the function behaves between -6 and 10.

Snip20200415_5.png
 

Start by building a table that you can use to help yourself find the value of the y-coordinates for all of the x-values from -6 to 10 as follows:

Figure 1

Now you are ready to start finding points on the graph. Let’s start by finding the y-value when x=-6 (the first point on the table).

Plug each x-value into the function and solve for y!

Plug each x-value into the function and solve for y!


To find the value of y when x=-6, just plug -6 in for x into the original function and solve as follows:

Notice that -30x and 12 are like terms.
Snip20200415_7.png
The cube root of -8 is -2.

The cube root of -8 is -2.


Since the cube root of -8 is -2, you can conclude that when x=-6, y=-2, and you know that the point (-6,-2) is on the graph of this cubic function!

(-6,-2) is one of the points this function passes through!

(-6,-2) is one of the points this function passes through!


You can find the rest of the y-values on the table by either:

A.) Repeating the above process for each x-value

or

B.) Using your graphing calculator to input the function into y= and generating the table as follows:


After you fill out your table, you’ll notice that some coordinate points are both integers, while others are decimals:

Snip20200415_17.png
 

To graph the function, you will only plot the points that are integers only (this way, you won’t have to estimate where the decimal points lay on the graph)

Now you can go ahead and plot the following points on the graph:

(-6,-2), (1,-1), (2,0), (3,1), (10,2)

Is this true???
 

The last step is to connect the points with a curved line as follows:

This is the graph of the cubic function over the restricted domain!

This is the graph of the cubic function over the restricted domain!


You can also use your graphing calculator to verify that your graph is correct.


That’s all there is to it!


Still Confused?

Check out this animated video tutorial on graphing cubic functions!


Looking for more practice with cube roots?

Check out the following free cube root resources:

Free Cube Root Reference Guide

Free Cube Root Reference Guide

Have thoughts? Share your thoughts in the comments section below!

(Never miss a Mashup Math blog--click here to get our weekly newsletter!)

By Anthony Persico

Anthony is the content crafter and head educator for YouTube's MashUp Math. You can often find me happily developing animated math lessons to share on my YouTube channel . Or spending way too much time at the gym or playing on my phone.

Comment