How to Simplify a Square Root
Step-by-Step Guide: How to Simplify a Square Root in 3 Steps
Free Step-by-Step Guide: Ready to learn how to simplify a square root?
Simplifying square roots is a useful and important math skill that every student can learn with enough practice. By learning a simple 3-step process for simplifying square roots, you can learn to quickly and correctly simplify any square root (whether it is a perfect square or not), and that is exactly what we will be doing in this free guide.
The sections below will teach you exactly how to simplify a square root using a simple step-by-step method. Together, we will recap some key concepts and vocabulary terms and then work through three examples of how to simplify a square root. Whether you are learning this skill for the very first time or you are an experienced student in need of a quick and comprehensive review, this page will share everything you need to know about how to simplify a square root.
This guide is organized based on the following sections:
You can use the text links above to jump to any section of this guide, or you can work through the sections in order. Let’s get started!

Preview: How to Simplify a Square Root in 3 Steps.
Quick Intro: Square Roots and Perfect Squares
Before we work through examples of how to simplify a square root, let’s quickly recap some important concepts and vocabulary terms related to this topic.
In math, square roots are the inverse (or opposite) operation of squaring a number (i.e. multiplying a number by itself). And, conversely, the square root of a number is the value that, when multiplied by itself, results in the number that you started with.
For example, consider the square root of 16, which can be expressed using square root notation:
√16
We can say that √16 equals 4 because 4 times itself (i.e. 4x4 or 4²) equals 16, therefore:
√16 = 4 → because 4² = 16
Numbers like 16 are called perfect squares because their square roots are whole numbers, which makes them very easy to simplify.
In fact, you are likely already familiar with how to simplify many perfect squares such as:
√4 = 2 → because 2² = 4
√9 = 3 → because 3² = 9
√16 = 4 → because 4² = 16
√25 = 5 → because 5² = 25
√36 = 6 → because 6² = 36
√49 = 7 → because 7² = 49
√64 = 8 → because 8² = 64
√81 = 9 → because 9² = 81
√100 = 10 → because 10² = 100

Figure 01: Perfect Squares up to 144
Make sure that you know all of the perfect squares from 1 to 144 (as shown in Figure 01 above) before moving onto the next section.
While it is relatively easy to simplify a square root of a perfect square, it is more complicated to simplify a square root of a non-perfect square, which is what we will be focusing on in the next section, where, for example, we will look at finding the perfect squares of numbers like 18, 75, and 112.
How to Simplify a Square Root Examples
Now we are ready to use the following simple 3-step method for simplifying square roots to solve three practice problems:
Steps: How to Simplify a Square Root
Step 1: Identify two factors where one of them is a perfect square (choose the largest perfect square factor), and rewrite as a product.
Step 2: Split the product using two square root symbols.
Step 3: Simplify the perfect square and rewrite your final answer.

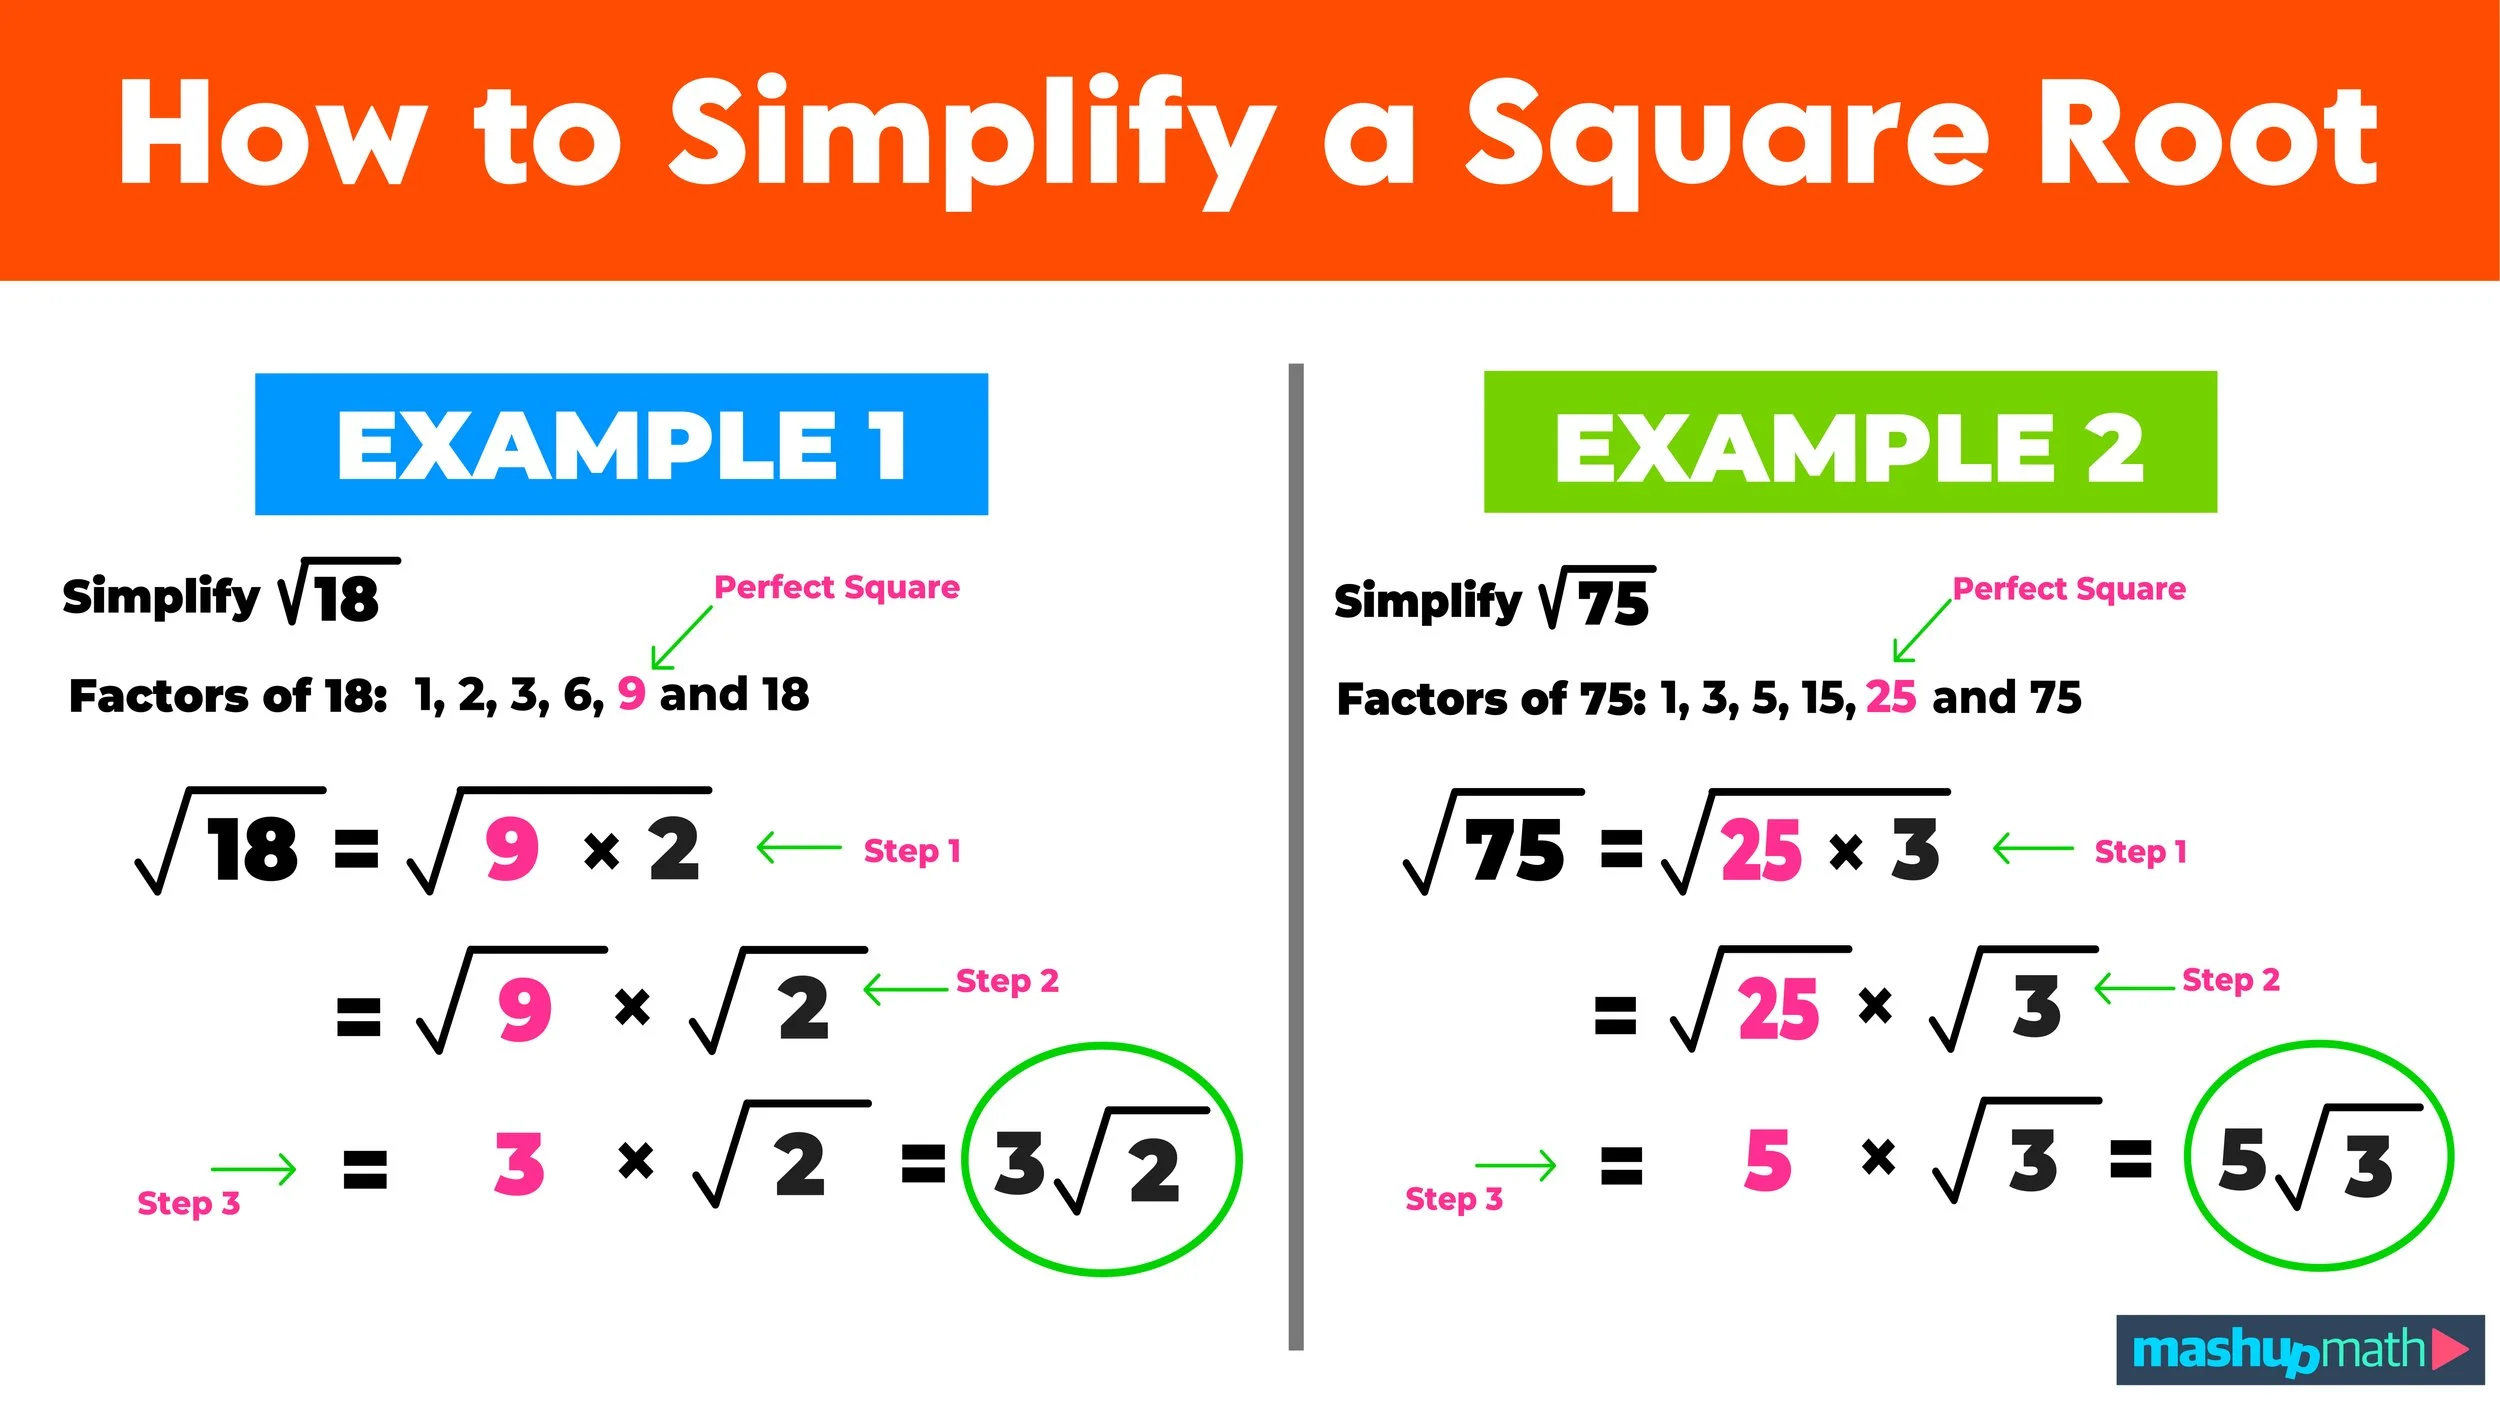
Example A: Simplify √18
Example A: Simplify √18
In our first example, we want to simplify a square root of a non-perfect square: √18.
We can simplify a square root like √18 by using our three step strategy as follows:
Step 1: Identify two factors where one of them is a perfect square.
Let’s start by listing the factors of 18:
Factors of 18: 1, 2, 3, 6, 9 and 18
Notice that 18 has one factor that is a perfect square: 9, and that:
9 x 2 = 18
Since 9 x 2 equals 18, the two numbers that we are going to use for Step 2 are 9 and 2.
Step 2: Split the product using two square root symbols.
For the second step, we can use the factors from Step 1 to rewrite √18 as follows:
√18 = √(9 x 2) = √9 x √2
We can “split” the square root in this way because of the product property of square roots, which says that:
√(A x B) = √(A) x √(B)
(provided that A and B are non-negative numbers).
So we now have a new equivalent product that represents √18, which is…
√9 x √2
Step 3: Simplify the perfect square and rewrite your final answer.
For our final step, notice that one of the square roots in our new expression, √9, is a perfect square. Since we know that √9 = 3, we can rewrite √9 as 3 as follows:
√9 x √2 = 3 x √2
Now, all that we have to do is rewrite the result, 3 x √2, as 3√2 , and we have solved the problem!
Final Answer: √18 = 3√2
Figure 02 below shows the step-by-step process for simplifying this square root.

Figure 02: How to Simplify a Square Root in 3 Steps.
Now that you have learned how to simplify a square root, let’s gain some more experience by working through another example.

Example B: Simplify √75
Example B: Simplify √75
We can solve this next example by using the three steps that we used to solve the previous example.
Step 1: Identify the factors of 75 and determine the largest perfect square factor.
We can begin by listing the factors of 75:
Factors of 75: 1, 3, 5, 15, 25 and 75
Notice that 75 has one perfect square factor, 25, and that:
25 x 3 = 75
Step 2: Split the product using two square root symbols.
Next, we can use the factors from Step 1 to rewrite √75as follows:
√75 = √(25 x 3) = √25 x √3
Step 3: Simplify and solve.
Finally, we can simplify √25 as 5 (since √25=5) and rewrite the expression as follows:
√25 x √3 = 5 x √3
We can now rewrite 5 x √3 as 5√3 and we can conclude that:
Final Answer: √75 = 5√3
The entire process for solving this problem is shown in Figure 03 below.

Figure 03: Multiplying fractions with whole numbers Example B solved.

Example C: Simplify √112
Example C: Simplify √112
For our final step-by-step example of how to simplify a square root, let’s take on a triple-digit number using our three-step method.
Step 1: Identify the factors of 112 and pick out the largest perfect square factor.
Factors of 112: 1, 2, 4, 7, 8, 14, 16, 28, 56 and 112
Notice 112 has two perfect square factors: 4 and 16. In cases like this, always choose the largest perfect square factor (16 in this case).
Now that we have identified our perfect square factor, we can say that:
w16 x 7 = 112
Step 2: Split the product using two square root symbols.
Next, we can write √112 as follows:
√112 = √(16 x 7) = √16 x √7
Step 3: Simplify and solve.
For the final step, we can simplify √16 as 4 and rewrite the expression as follows:
√16 x √7 = 4 x √7
Now we just have to rewrite 4 x √7 as 4√7 and we have solved the problem!
Final Answer: √112 = 4√7
The three-step process for solving Example C is shown in Figure 03 below

Figure 03: How to Simplify a Square Root in 3 Steps.
Looking for Free Math Worksheets?
Download hundreds of free PDF Math Worksheets with complete answer keys.

More Free Math Resources: