How to Factorize a Cubic Polynomial

1 Comment

How to Factorize a Cubic Polynomial

How to Factorize a Cubic Polynomial

Step-by-Step Guide: How to Factor a Cubic Polynomial in 3 Easy Steps


Free Step-by-Step Guide: How to factor a polynomial with a specific number of terms


In algebra, a cubic polynomial is an expression made up of four terms that is of the form:

  • ax³ + bx² + cx + d

Where a, b, c, and d are constants, and x is a variable. Polynomials in this form are called cubic because the highest power of x in the function is 3 (or x cubed).

Unlike factoring trinomials, learning how to factorize a cubic polynomial can be particularly tricky because using any type of guess-and-check method is extremely difficult. However, you can easily learn how to factor a cubic polynomial by using the grouping method described in this guide.

This free Step-by-Step Guide on How to Factorize a Cubic Polynomial will cover the following key topics:

While learning how to factor cubic polynomials can be challenging at first, you can develop your skills pretty quickly just by working through practice problems step-by-step until you become more comfortable with factoring cubic polynomials. So, this guide was designed to teach you everything you need to know about how to factor a cubic polynomial. We recommend that you read through this guide from start to finish and work through each example by following along step-by-step. By the end, you will be able to quickly and accurately factorize a cubic polynomial.


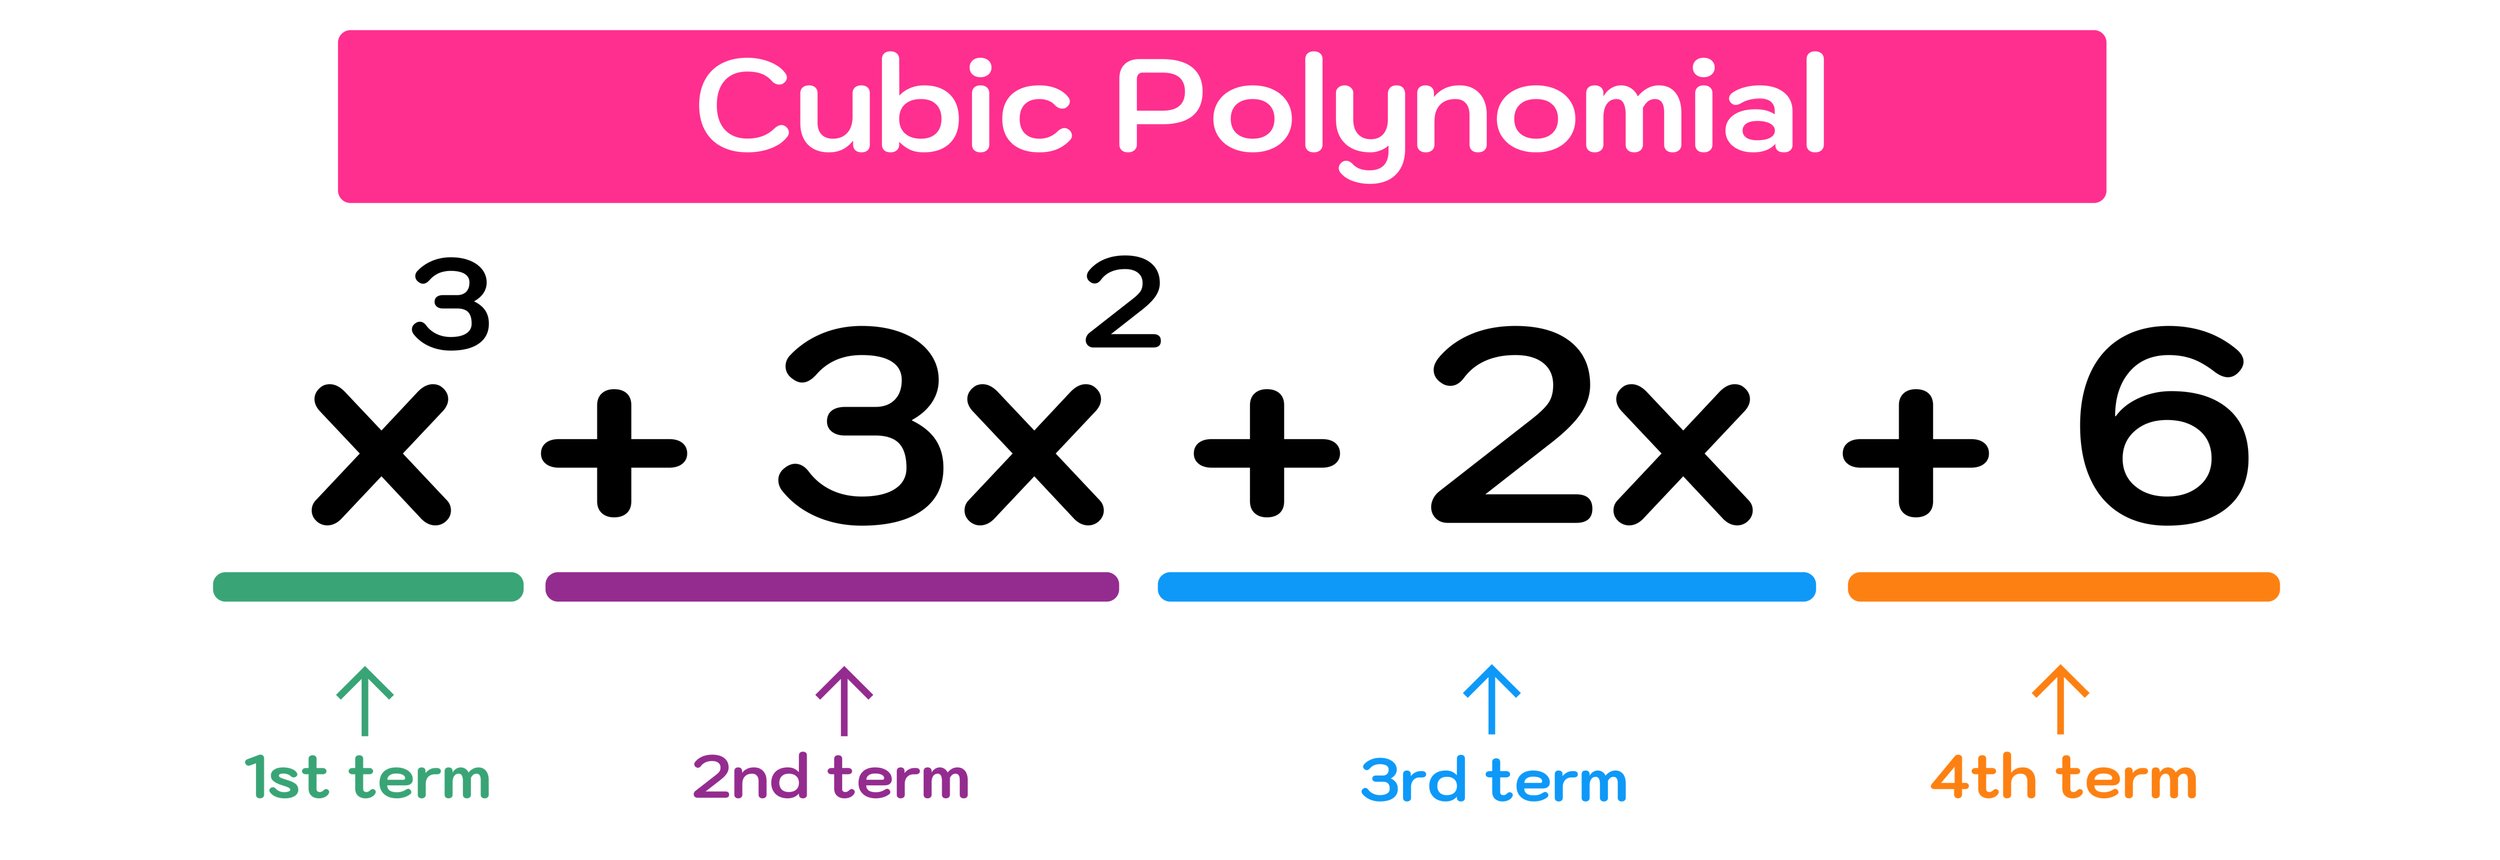
Figure 01: How to Factorize a Cubic Polynomial


What is a cubic polynomial?

As previously mentioned, a cubic polynomial is a math expression that is of the form ax³ + bx² + cx + d, where a, b, c, and d are all constants and x is a variable, and typically has four terms. Note that x is not the only letter that can be used as a variable in a cubic polynomial. Also, the number in front of any variable is referred to as a coefficient.

Additionally, the terms of a cubic polynomial are the individual “pieces” of the expression, separated by an addition or subtraction sign.

For example, the cubic polynomial in Figure 01 above, x³ + 3x² + 2x + 6 has four terms:

  • 1st Term:

  • 2nd Term: 3x²

  • 3rd Term: 2x

  • 4th term: 6

Before you can learn how to factor a cubic polynomial, it is extremely important that you know how to recognize that given polynomial is cubic, so make sure that you deeply understand what a cubic polynomial is before moving forward in this guide.


Figure 02: Factoring a Cubic Polynomial


What does it mean to factorize a cubic polynomial?

In math, the factors of any polynomial represent components or “building blocks” of the polynomial. Whenever you factor a polynomial (cubic or otherwise), you are finding simpler polynomials whose product equals the original polynomial. Each of these simpler polynomials is considered a factor of the original polynomial.

For example, the binomial x² - 100 has two factors (x + 10) and (x-10).

Why? Lets take a look at what happens when we find the product of the factors by double distributing:

  • (x+10)(x-10) = x² + 10x - 10x - 100 = x² + 0 - 100 = x² - 100

Notice that the result was the original polynomial, x² - 100.

Since cubic polynomials (four terms) are more complex than binomials (two terms), their factors will also be a little more complex, but the idea is still the same—factoring a cubic polynomial involves finding simpler polynomials or “building blocks” whose product is the original cubic polynomial.

And, to factorize a cubic polynomial, we will be using a strategy called grouping that will allow you to factor any cubic polynomial (assuming that it is factorable at all) using 3 easy steps. So, lets go ahead and work three practice problems to give you some experience with factoring cubic polynomials by grouping.

Now that you understand the key terms and the difference between a polynomial with 2 terms, 3 terms, and 4 terms.

For factoring each type of polynomial, we will look at two methods: GCF, direct factoring, and, sometimes, a combination of the two.

Let’s get started!


How to a Factorize a Cubic Polynomial Examples

Now, you will learn how to use the follow three steps to factor a cubic polynomial by grouping:

Step One: Split the cubic polynomial into two groups of binomials.

Step Two: Factor each binomial by pulling out a GCF

Step Three: Identify the factors

As long as you follow these three steps, you can easily factor a given polynomial, though note that not all cubic polynomials are factorable."

We will start by factoring the cubic polynomial shown in Figure 01: x³ + 3x² + 2x + 6

Example #1: Factor x³ + 3x² + 2x + 6


Figure 03: We have to find the factors of x³ + 3x² + 2x + 6


To factorize this cubic polynomial, we will be applying the previously mentioned 3-step method as follows:

Step One: Split the cubic polynomial into groups of two binomials.

To factor this cubic polynomial, we will be using the grouping method, where the first step is to split the cubic polynomial in half into two groups.


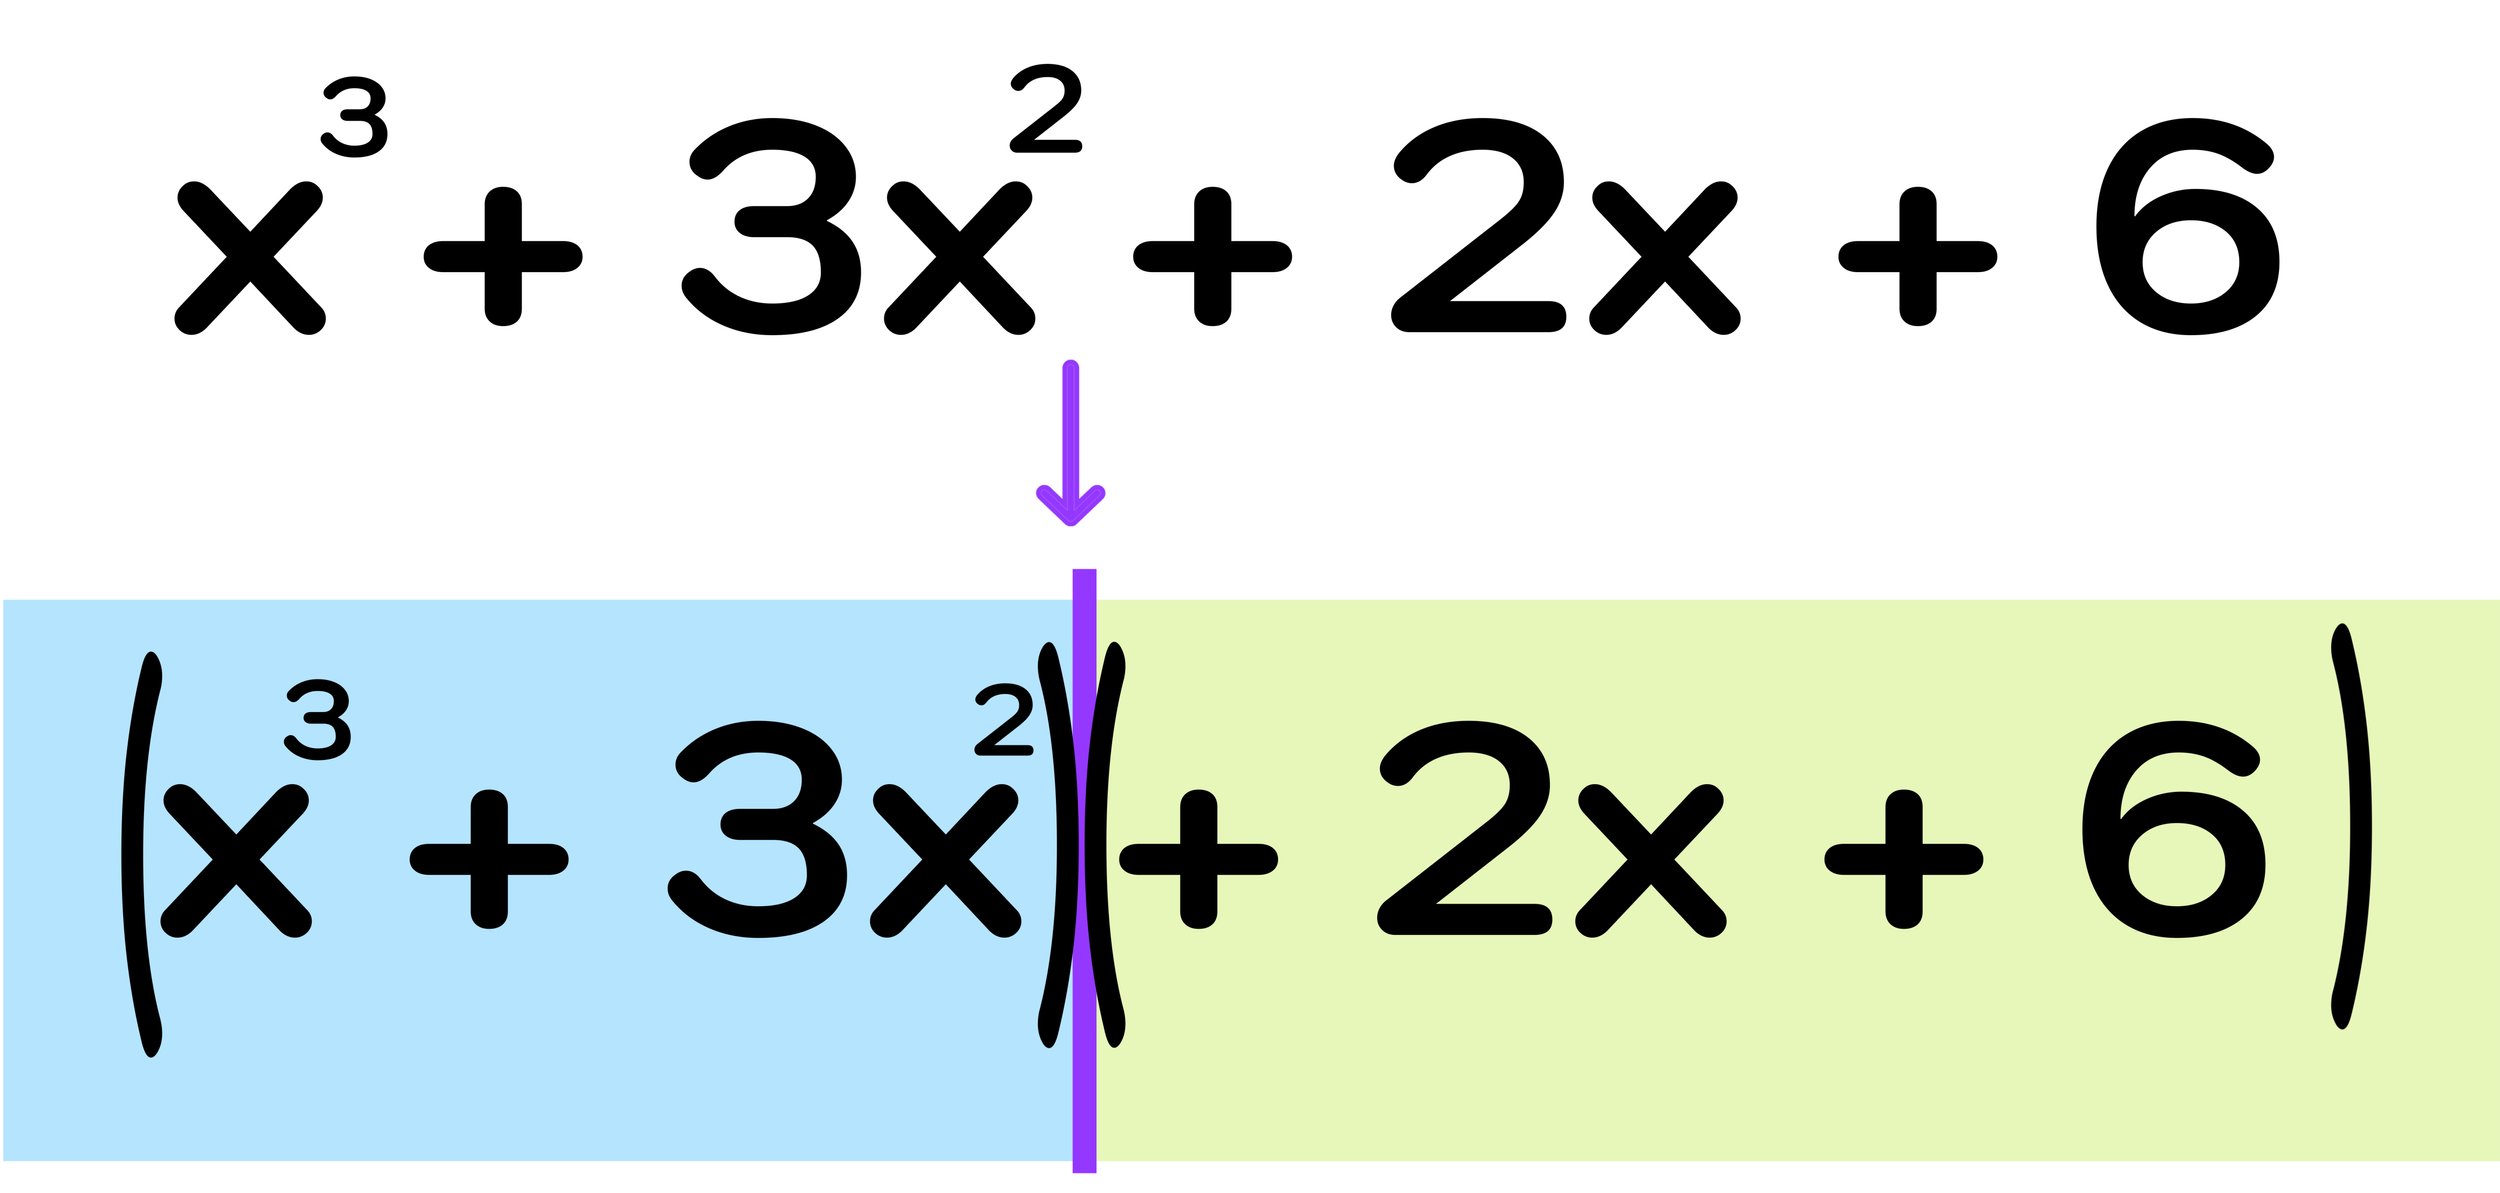
Figure 04: The first step to factoring a cubic polynomial is to split it into groups of two binomials.


For Example #1, at the end of the first step, you have split the cubic binomial down the middle to form two groups of binomials:

  • (x³ + 3x²)

  • (2x + 6)

Why are you splitting the cubic polynomial like this? Notice that it is not possible to pull a Greatest Common Factor (GCF) out of the original cubic polynomial x³ + 3x² + 2x + 6. The goal of the first step is to create two separate binomials, each with a GCF that can be “pulled out.”


Figure 05: Make sure that each individual binomial has a GCF before moving onto the next step.


Step Two: Factor each binomial by pulling out a GCF

Again, the purpose of the first step is to split the cubic polynomial into two binomials, each with a GCF. Before moving forward, ensure that each individual binomial has a GCF; otherwise, you may need to swap the positions of the middle terms (3x² and 2x). Swapping these middle terms is not required for this first example; however, we will work through an example later on where this is required.

Now, for step two, you can divide the GCF out of each grouping as follows:

  • (x³ + 3x²)→ x²(x +3)

  • (2x + 6) → 2(x + 3)

This process of pulling the GCF out of each binomial is illustrated in Figure 05 below.


Figure 06: To factorize a cubic function, split it into two groups and then pull a GCF out of each group.


Step Three: Identify the factors

After completing the second step, you are left with:

  • x²(x +3) + 2(x+3)

Notice that both groups share a common term, which, in this case, is (x+3). This result is expected and is a signal that you are factoring the cubic polynomial correctly. If the groups do not share a common terms, then it is likely that the cubic polynomial is not factorable or that you made a mistake pulling out the GCF.

However, since you factored each group and ended up with a common factor of (x+3), you can move on to determining the factors of the cubic polynomial.

The illustration in Figure 06 above color-codes how you use the results from step two to determine the factors of the cubic polynomial.

You already know that one of the factors is (x+3). To find the other factor, you can simply take the two “outside” terms, in this case, x² and +2.

  • (x +3) + 2(x+3) → (x²+2)(x+3)

Final Answer: The factors of x³ + 3x² + 2x + 6 are (x²+2) and (x+3)

The entire 3-step method that we just used to factor a cubic polynomial by grouping is shown in Figure 07 below:


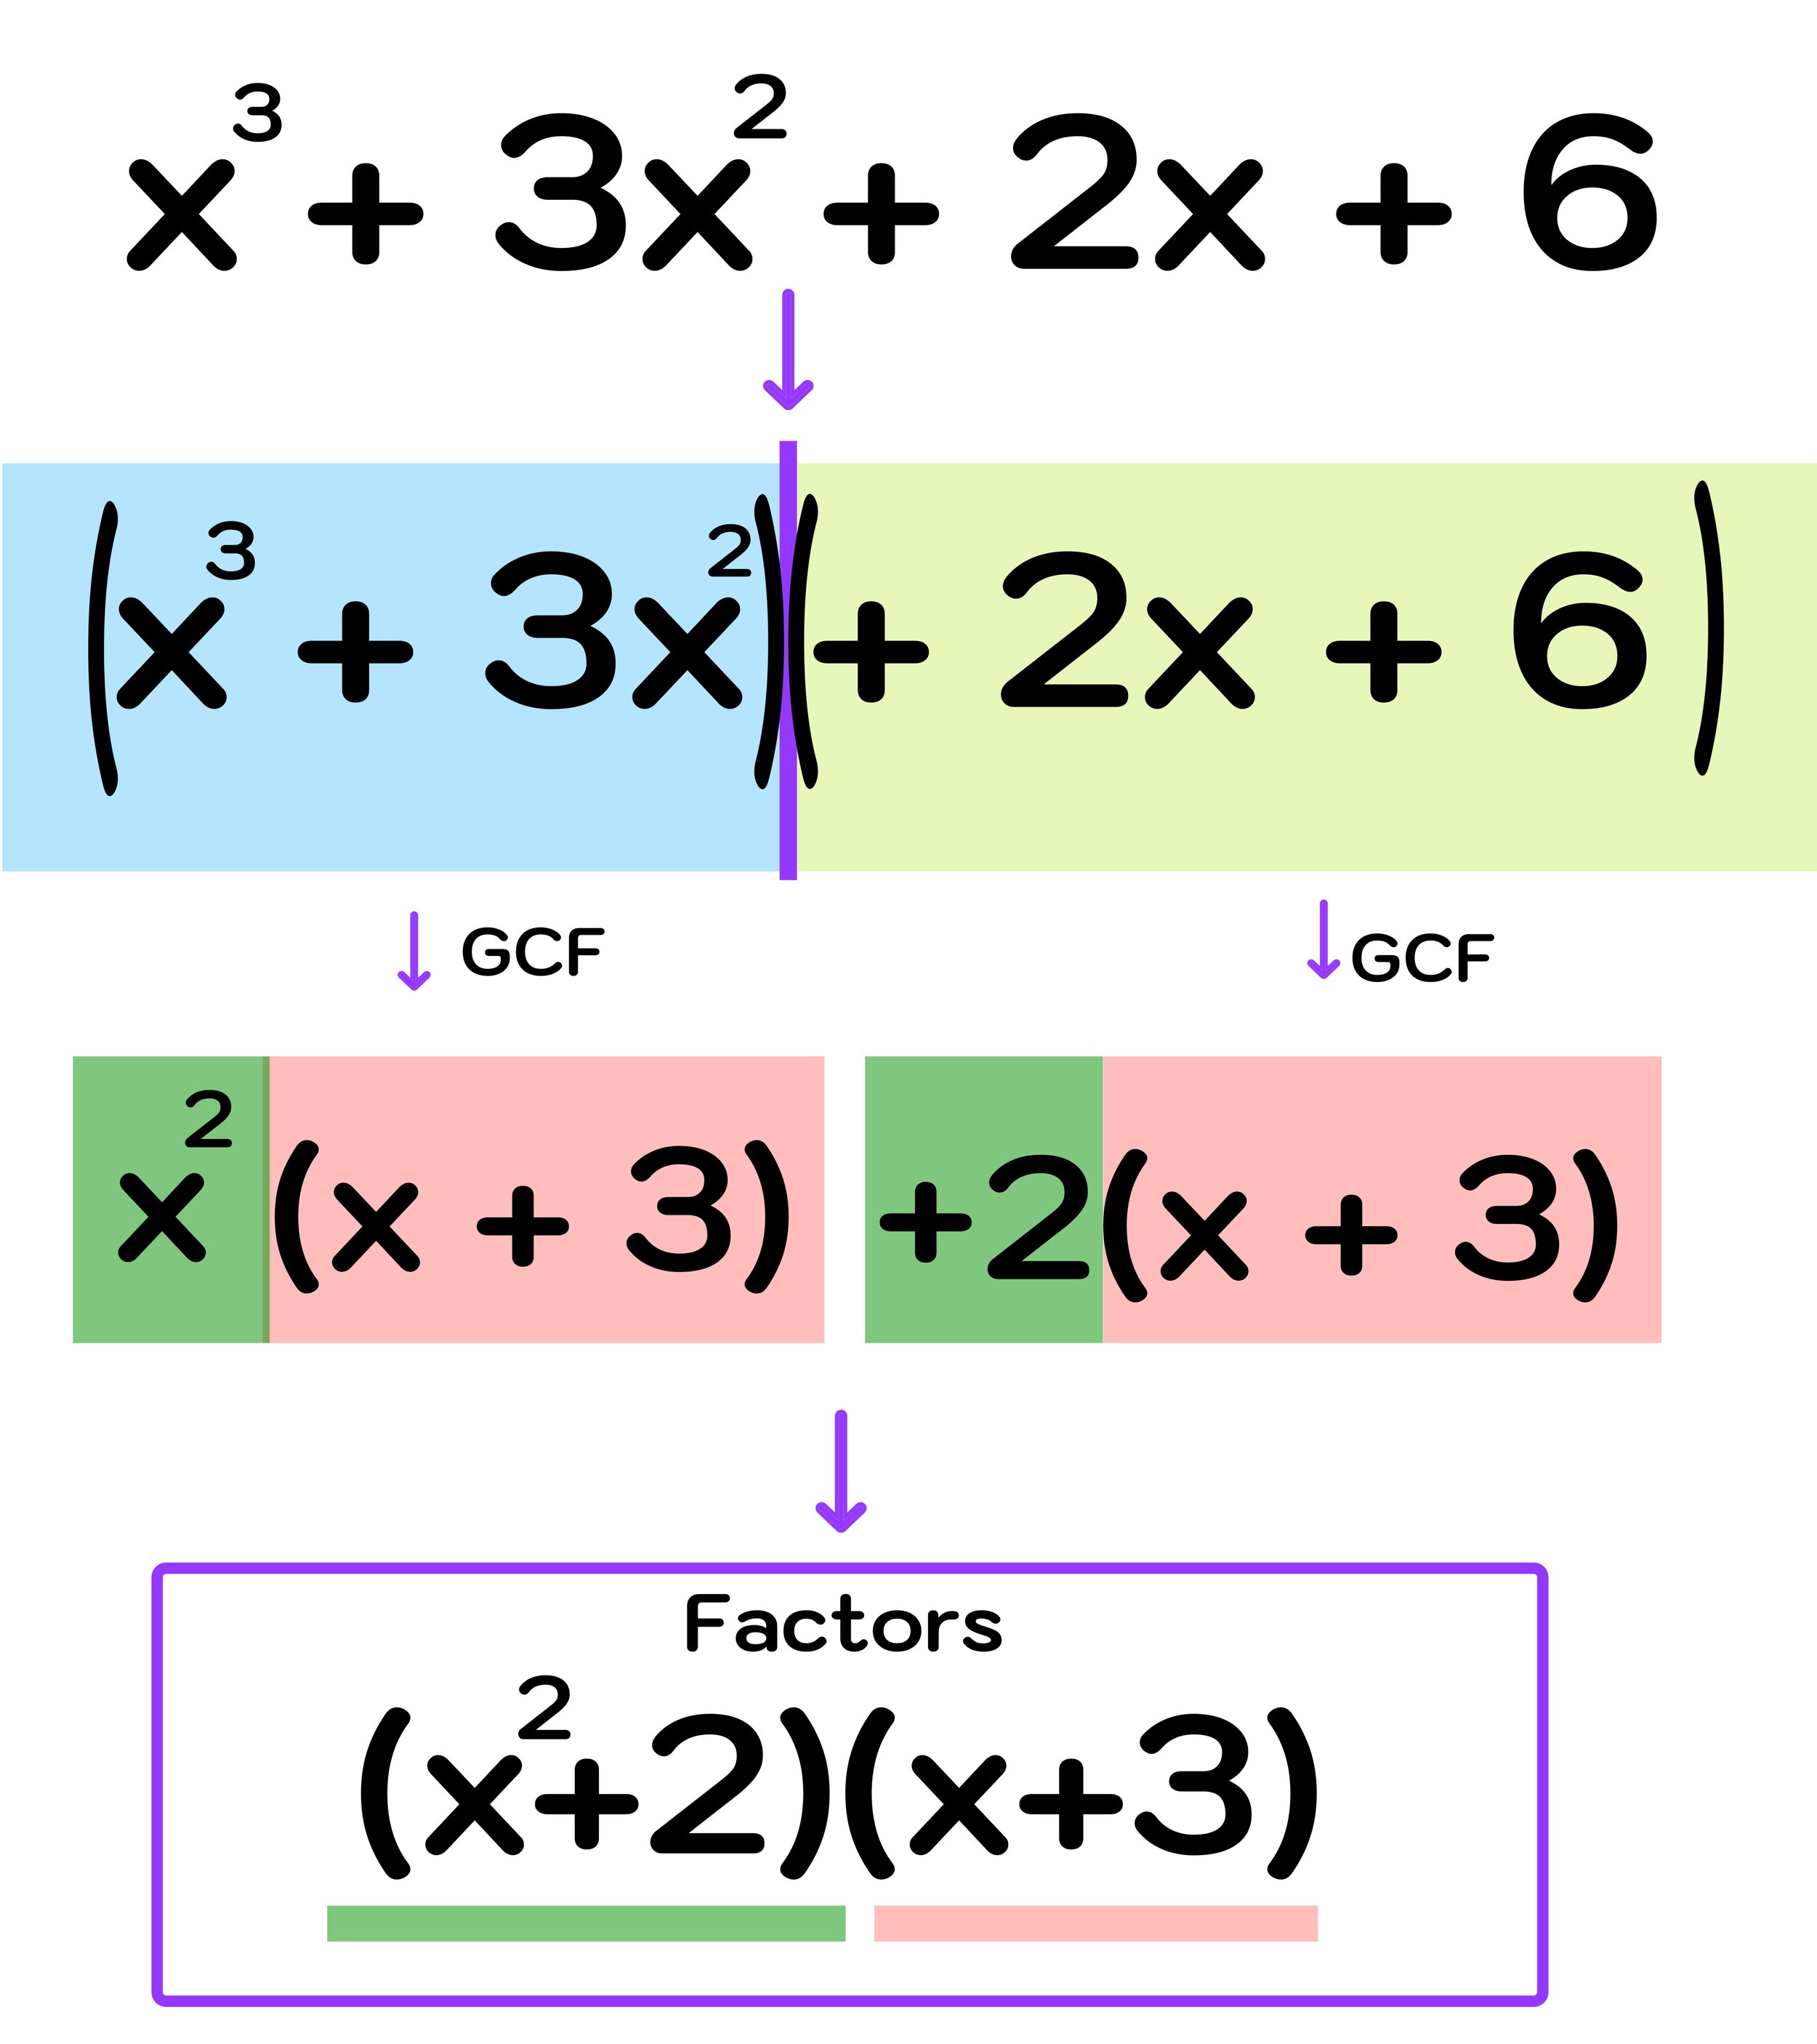
Figure 07: How to factorize a cubic polynomials step-by-step


How can you check if your factors are actually correct? You can perform double distribution to multiply the binomials together to see if the result is indeed the cubic polynomial that you started with. If it is, then you know that you have factorized correctly.

You can see in Figure 08 below that multiplying the factors together does indeed result in the original cubic polynomial, so you know that your factors are correct:

  • (x²+2)(x+3) = x³ + 3x² + 2x + 6


Figure 08: Check your answer using double distribution


Now, lets go ahead and work through another example of how to factor a cubic polynomial.


Example #2: Factor 2x³ - 3x² + 18x - 27

Just like in the first example problem, you can use the 3-steps for factoring a cubic polynomial by grouping as follows:


Figure 09: Find the factors of the cubic polynomial 2x³ - 3x² + 18x - 27


Step One: Split the cubic polynomial into groups of two binomials.

After splitting this cubic polynomial, you end up with these two groups: (2x³ - 3x²) and (18x-27)


Figure 10: Step One: Split the cubic polynomial into two groups


Step Two: Factor each binomial by pulling out a GCF

Next, divide a GCF out of each group (if possible) as follows:

  • (2x³ - 3x²) → x²(2x - 3)

  • (18x - 27) → 9(2x - 3)

This process of pulling a GCF out of each group is illustrated in Figure 11 below:


Figure 11: Factorize a cubic polynomial


Step Three: Identify the factors

Since both factors have a common term, (2x-3), you know that you have likely factored correctly and you can move onto identifying the factors.

Final Answer: (x²+9) and (2x-3) are the factors of the cubic polynomial 2x³ - 3x² + 18x - 27.

All of the steps for solving Example #2 are illustrated in Figure 12 below.


Figure 12: The factors are (x²+9) and (2x-3)


Just like the last example, you can check to see if your final answer is correct by multiplying the factors together and seeing if the result equals the original cubic polynomial.

Example #3: Factor 3y³ + 18y² + y + 6

Finally, lets work through one more example where you have to factorize a cubic polynomial.

Step One: Split the cubic polynomial into groups of two binomials.

Again, the first step is to split the cubic polynomial down the middle into two binomials as shown in Figure 13 below.


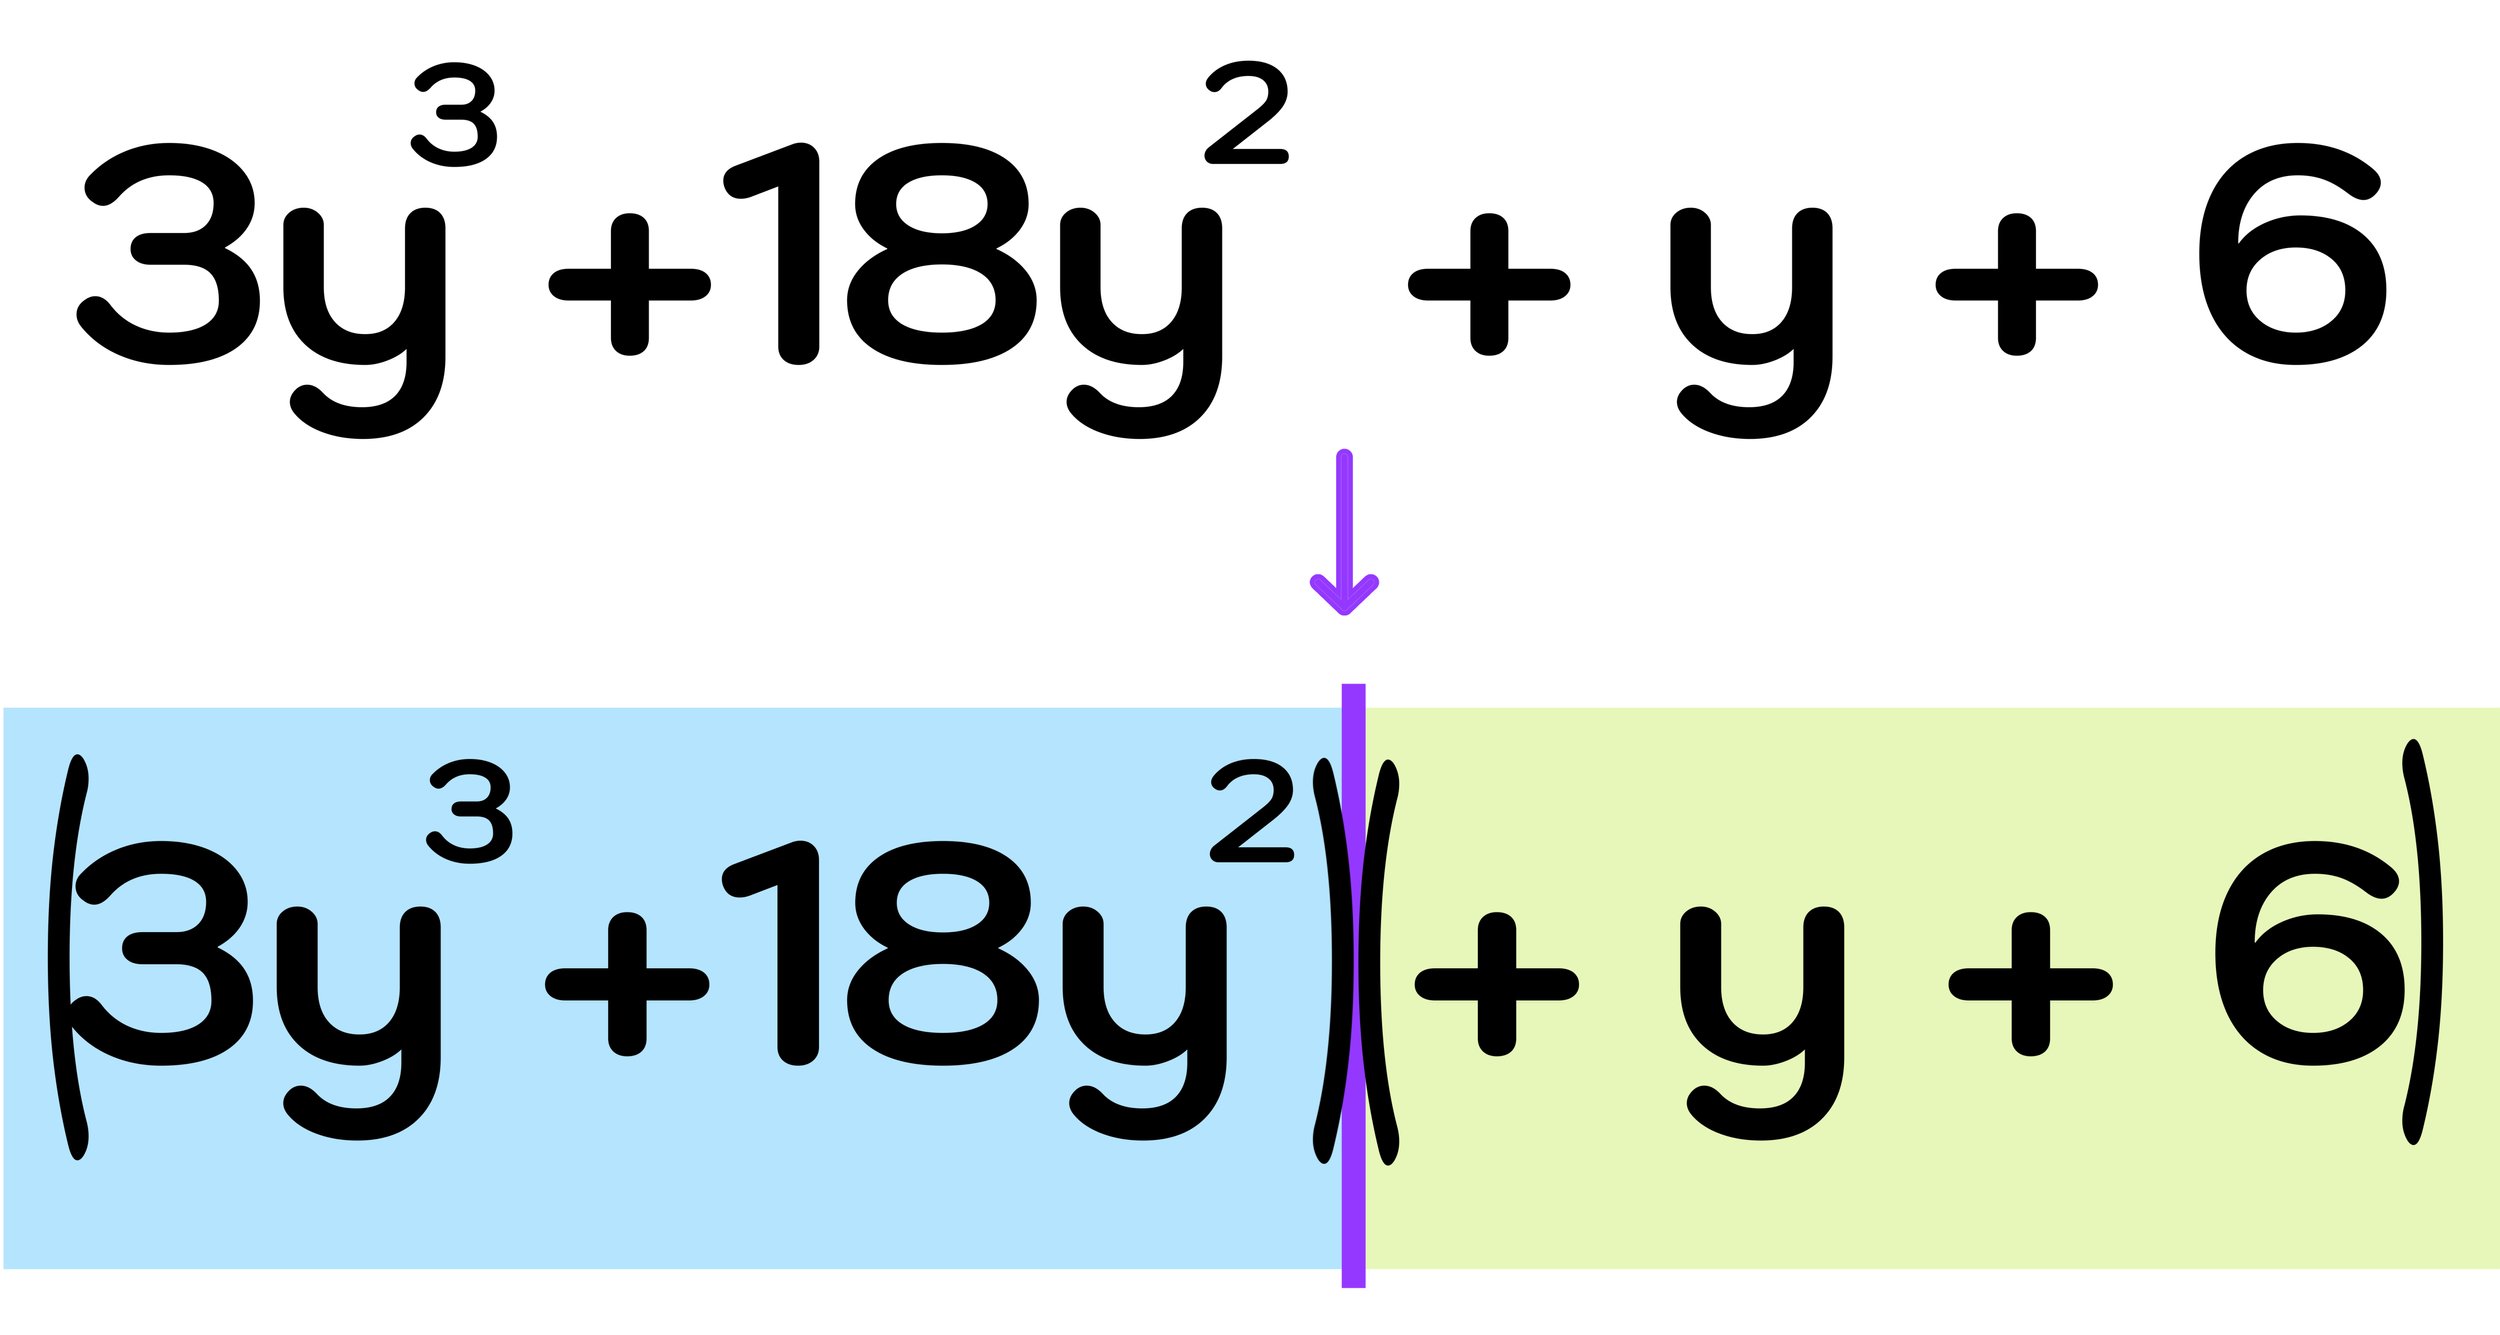
Figure 13: Factoring a cubic polynomial by grouping.


As shown in Figure 13 above, splitting the polynomial down the middle leaves you with these two groups: (3y³ +18y²) and (y+6)

Remember that the whole point of splitting the cubic polynomial is to create two binomials that each have a GCF. But notice that the second binomial, (y+6), is not factorable because there is no GCF between +y and +6.

But, as previously mentioned, this doesn’t mean that you can not solve this problem further. In fact, the commutative property of addition allows you to swap the positions of the two middle terms (18y² and +y).

This extra step of swapping the two middle terms is illustrated in Figure 14 below.


Figure 14: Sometimes you have to swap the positions of the middle terms in order to factorize a cubic polynomial.


After swapping the positions of the middle terms, you can now apply the 3-step method to factoring the equivalent polynomial: 3y³ + y + 18y² + 6 (this new cubic polynomial is equivalent to the original because the commutative property of addition allows you to rearrange the terms without changing the value of the expression).

Now, you actually can split the new cubic polynomial into groups that can be factoring by dividing out a GCF: (3y³ + y) and (18y² + 6)


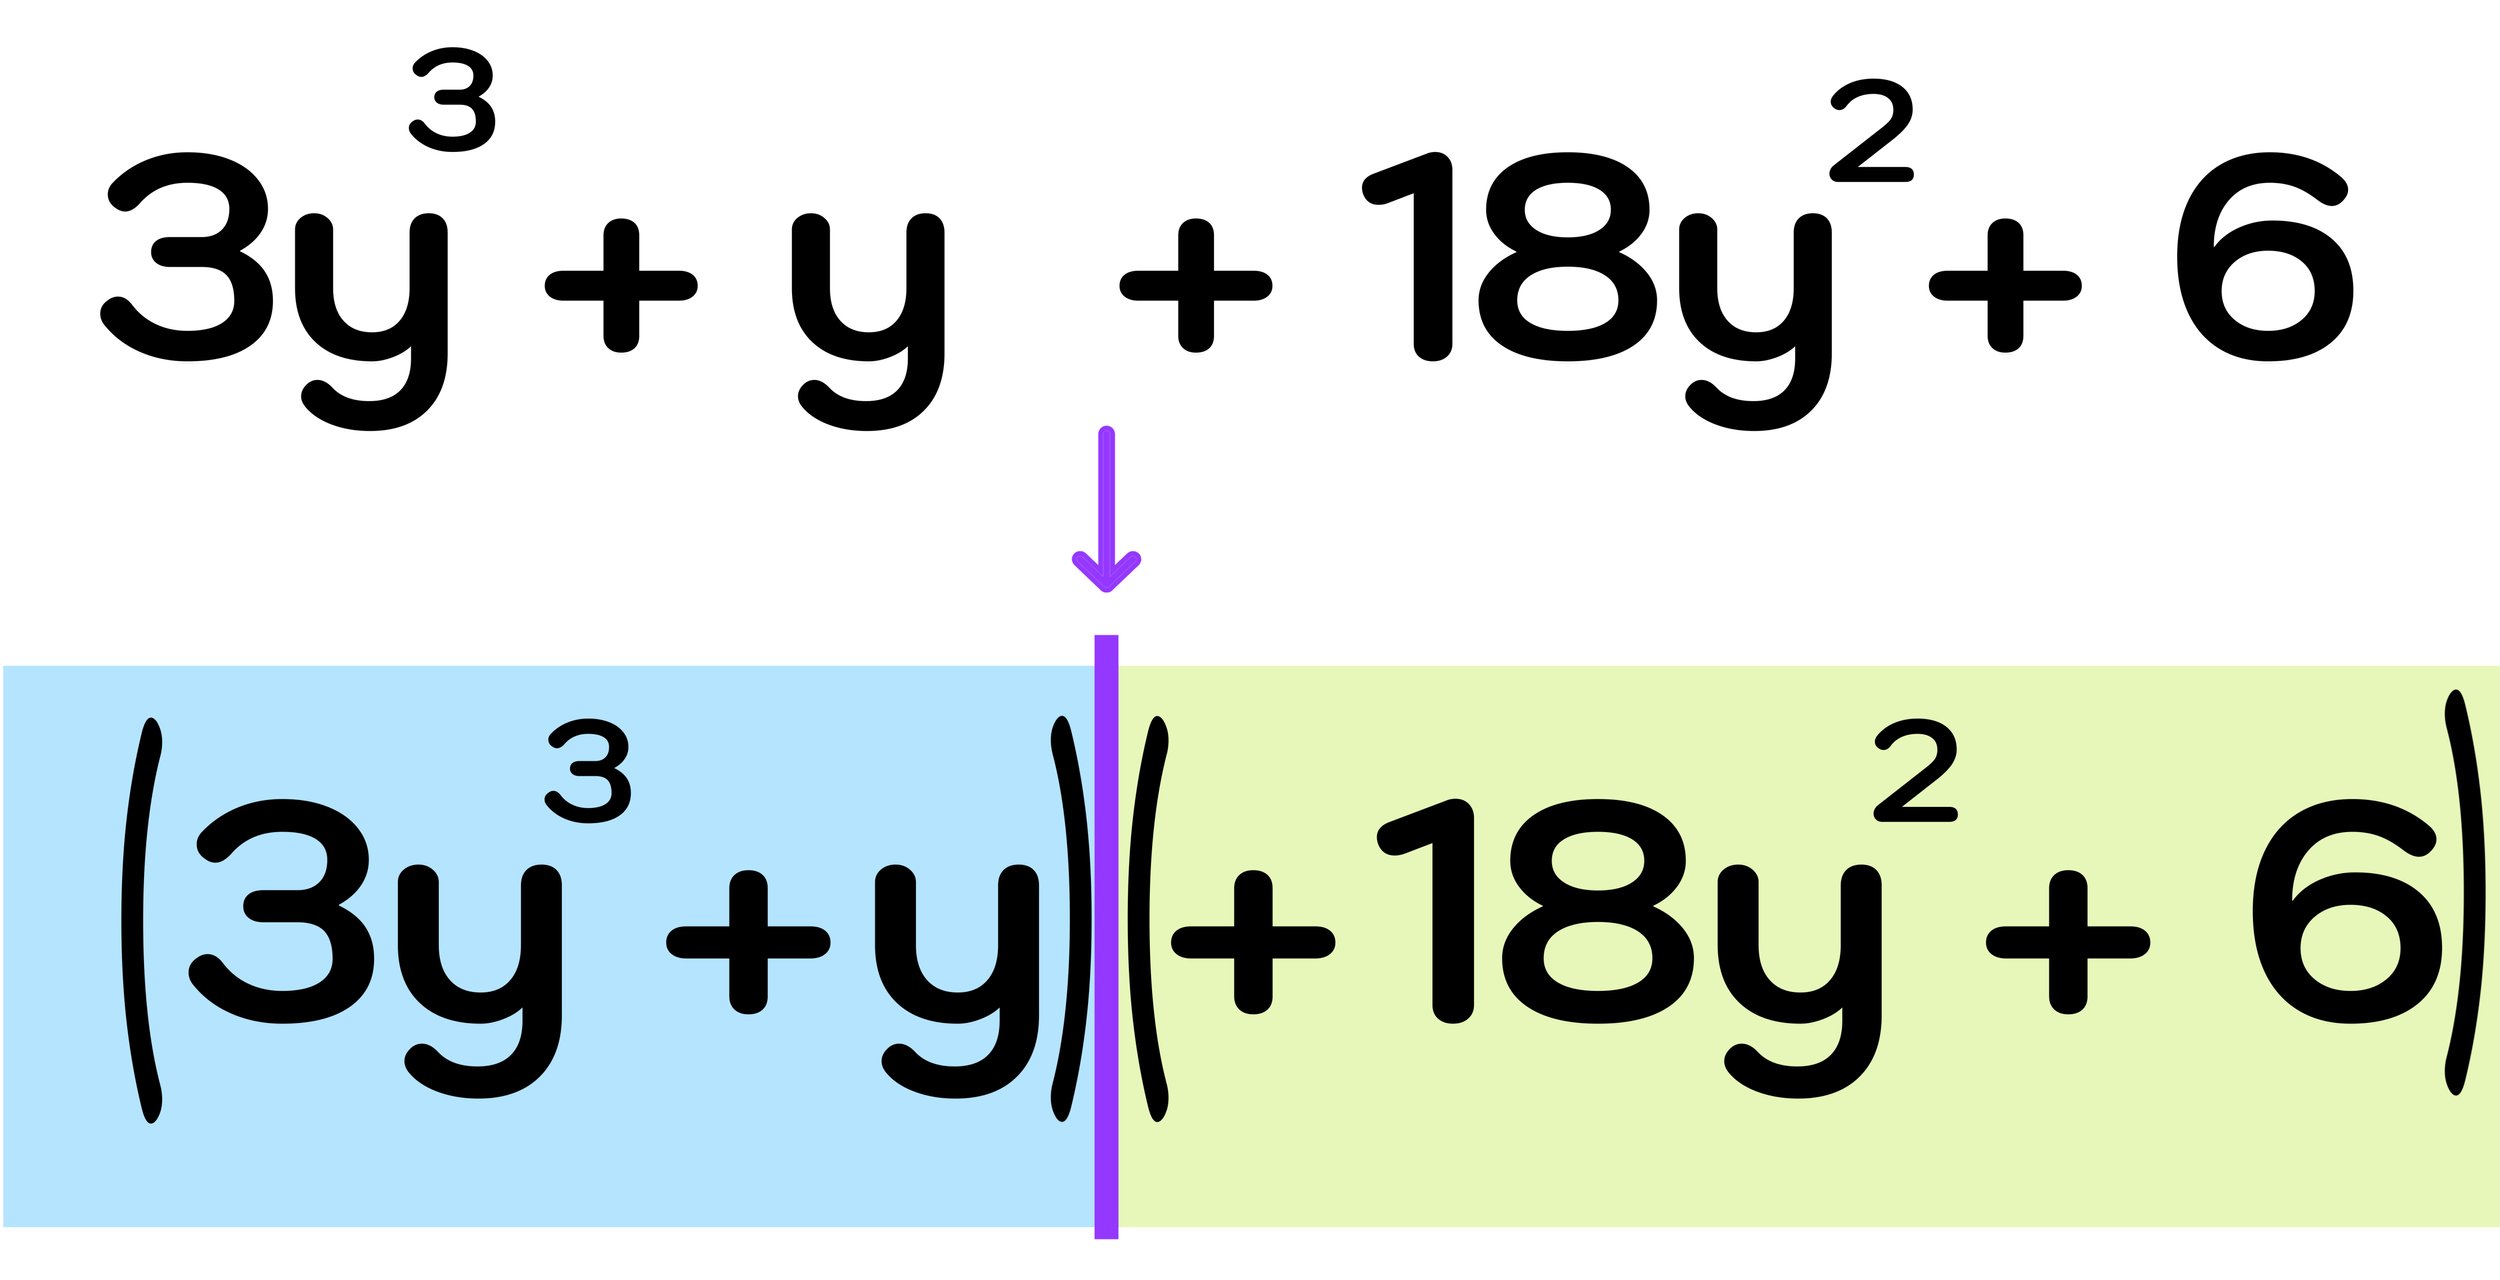
Figure 15: After swapping the positions of the middle terms, you can continue on with factoring the cubic polynomial.


Step Two: Factor each binomial by pulling out a GCF

As shown in Figure 15 above, you can factor each group by pulling out a GCF as follows:

  • (3y³ + y) → y(3y² + 1)

  • (18y² + 6) → 6(3y² + 1)

Step Three: Identify the factors

Finally, you can conclude that:

Final Answer: The factors are (y+6) and (3y² + 1)

The step-by-step process to solving this 3rd example are shown in Figure 16 below. Again, you can make sure that your final answer is correct by multiplying the factors together and verifying that their product is equivalent to the original cubic polynomial.


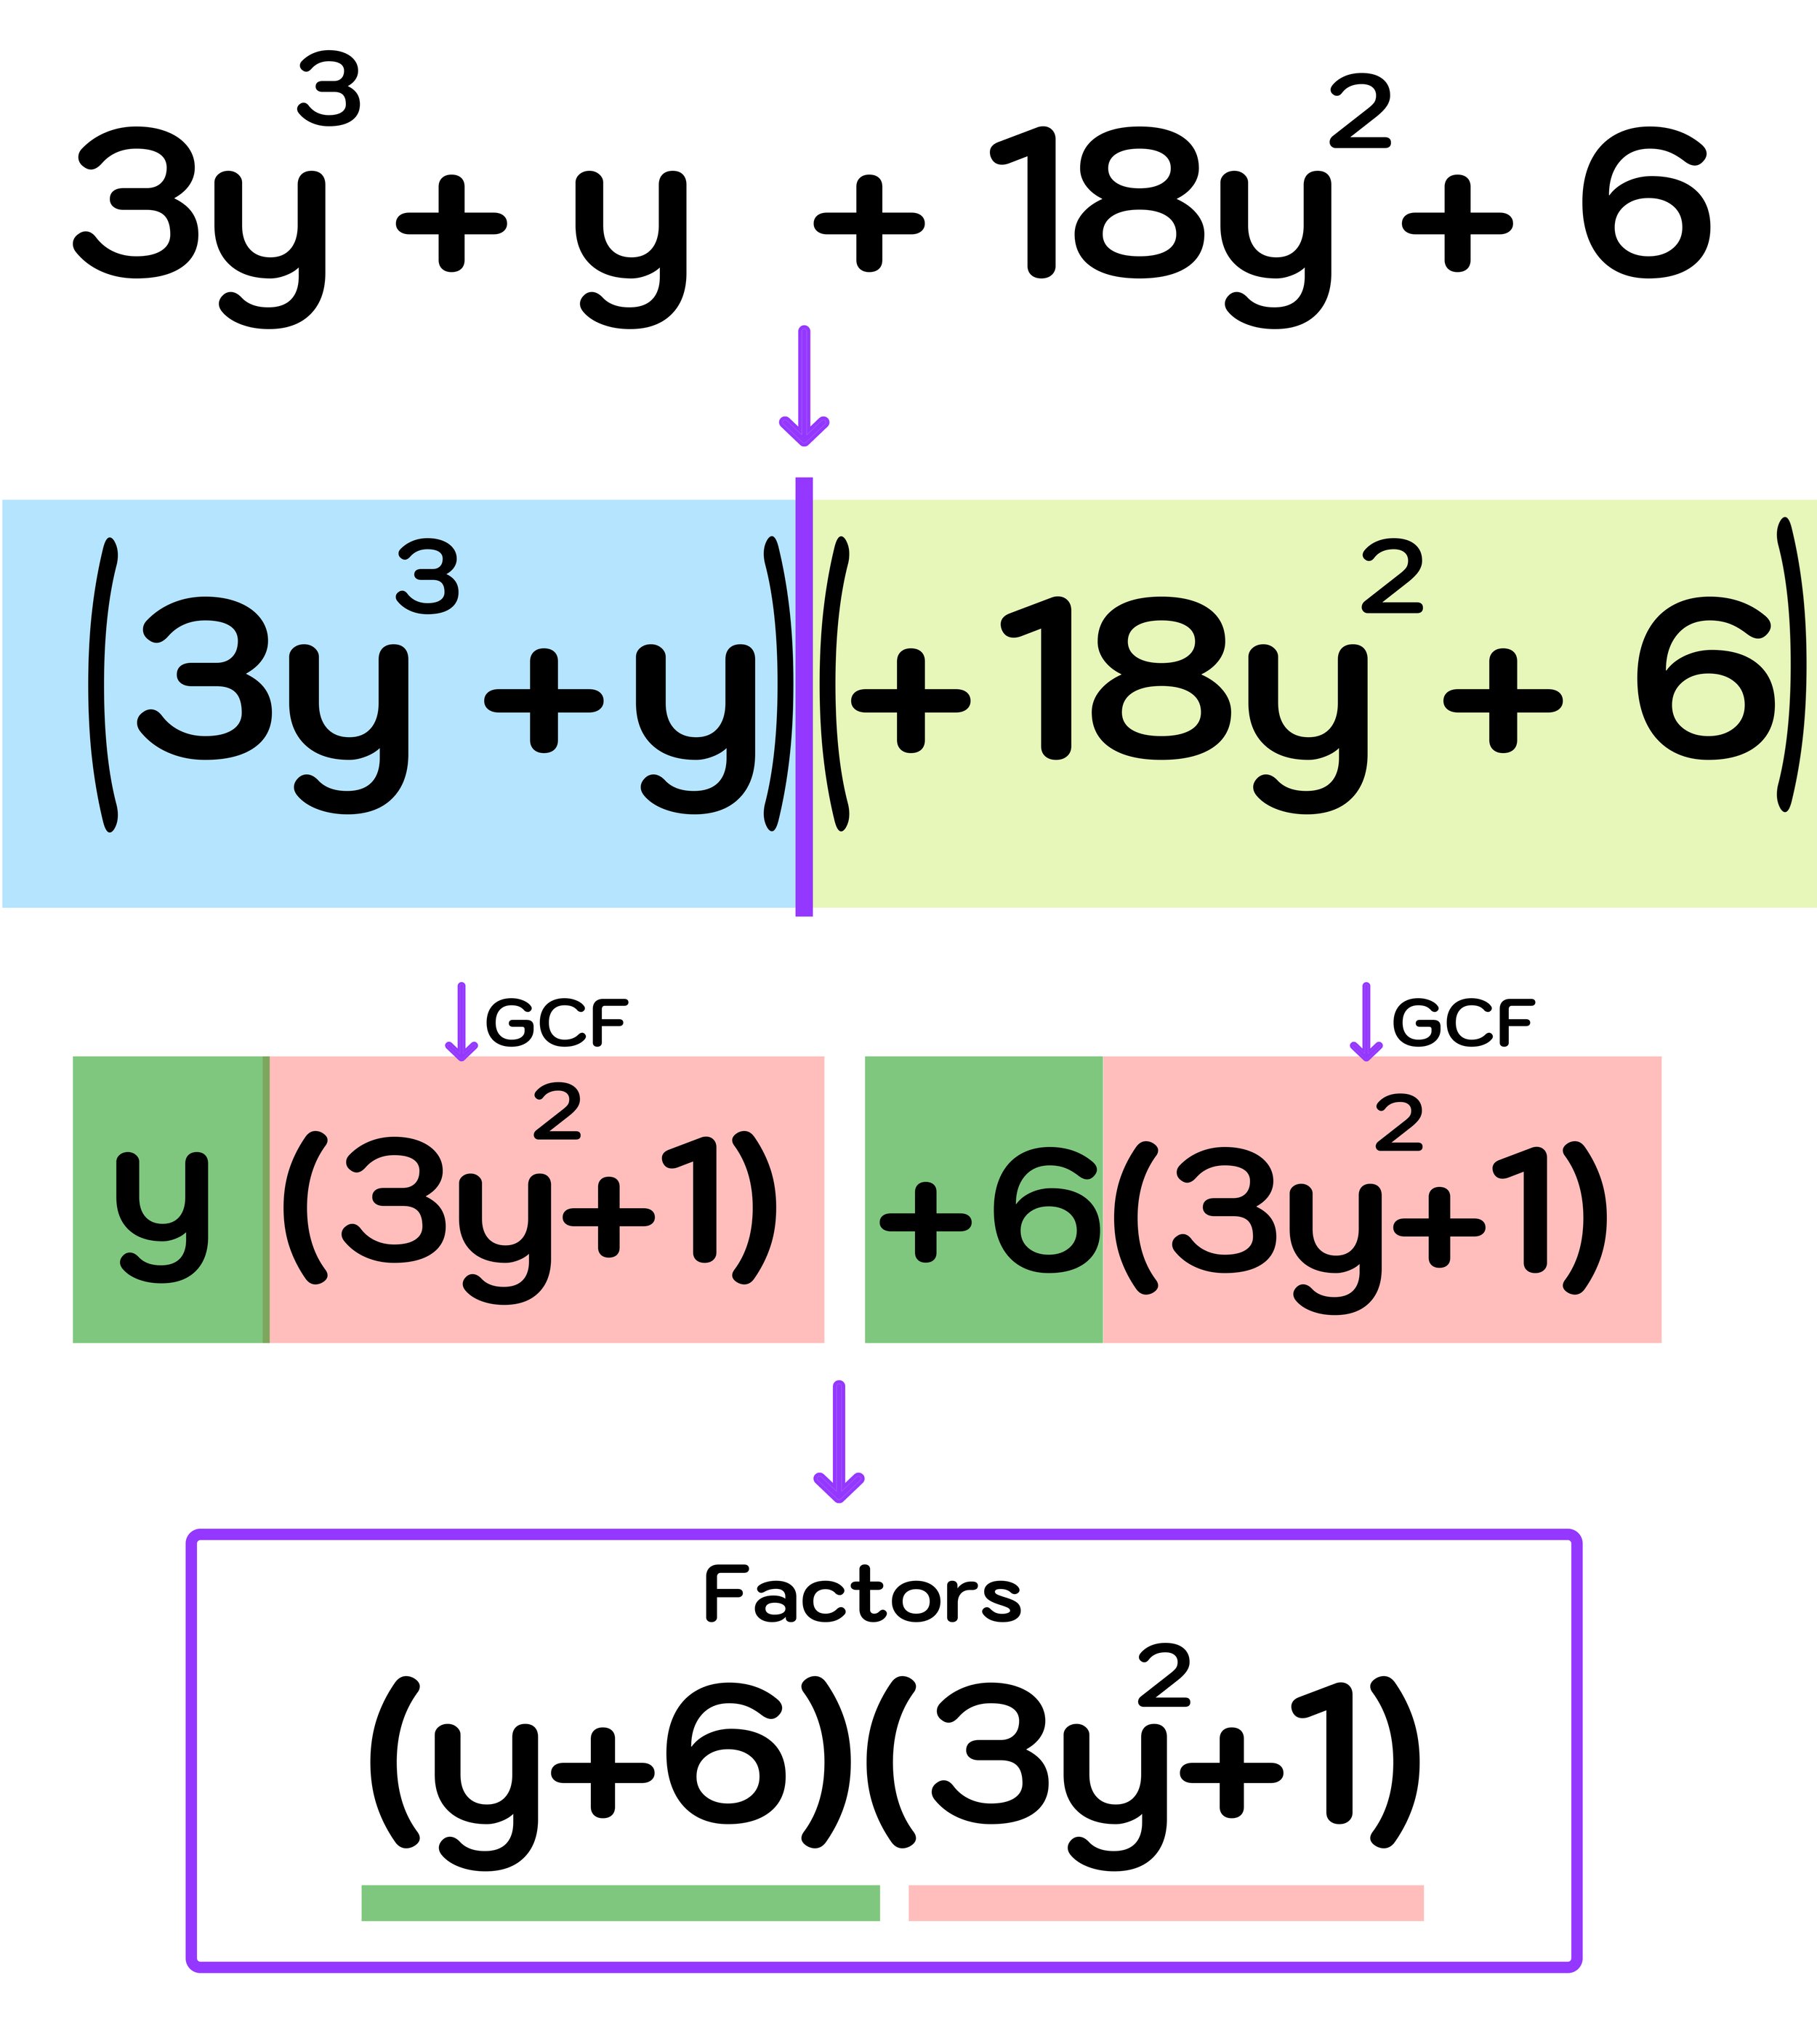
Figure 16: How to factorize a cubic polynomial when you have to swap the middle terms.


How to Factorize a Cubic Polynomial: Conclusion

It is beneficial to understand how to factorize a cubic polynomial because the skill will allow you to simplify and understand the behavior of cubic functions as you continue onto higher levels of algebra and begin to explore topics like finding roots, analyzing graphs, and solving cubic equations.

Factoring cubic functions can be challenging, but you can always use the following 3-step grouping method described in this guide to successfully factor a cubic polynomial (assuming that it is factorable in the first place):

Step One: Split the cubic polynomial into groups of two binomials.

Step Two: Factor each binomial by pulling out a GCF

Step Three: Identify the factors

Keep Learning:


1 Comment

March Madness Perfect Bracket Odds—What are the Chances?

1 Comment

March Madness Perfect Bracket Odds—What are the Chances?

What are the March Madness Perfect Bracket Odds?

The Chances of a Perfect March Madness Bracket are Crazier Than You Might Think


Is this possible? What are the March Madness perfect bracket odds?


The annual NCAA College Basketball Tournament—known as March Madness—is one of the most exciting times of the year for college basketball fans. Every year, millions of fans across the United States fill out their tournament brackets, hoping to predict the winners of all 63 games. But what are the chances of filling out a perfect March Madness bracket? Is it even possible?

Let’s explore the math behind why a predicting a perfect March Madness bracket is essentially impossible by diving into the answers to the following questions:


Every year, millions of fans fill out a tournament bracket. What what are the chances of a perfect March Madness bracket?


What are the March Madness Perfect Bracket Odds?

Filling out a perfect March Madness bracket means correctly predicting the winner of all 63 NCAA basketball tournament games. Having a perfect bracket means that must be 100% correct in all of your picks, including all of the inevitable upsets (when a lower ranked team defeats a higher ranked team) that occur every year.

The mathematical probability of a perfect March Madness bracket are:

1 : 9,200,000,000,000,000,00.

You read that correctly. The chances of correctly predicting a perfect March Madness bracket are astronomically low. In fact, some mathematical models estimate the odds of having a perfect March Madness bracket at one in 9.2 quintillion.

To put it another way, you are more likely to win the lottery multiple times in a row or get struck by lightening twice on the same day than to fill out a perfect bracket.


Given the low odds of a perfect March Madness bracket, is it even possible? Photo by Hannah Gibbs on Unsplash


Is a March Madness perfect bracket even possible?

The short answer is no, it is not possible to fill out a perfect March Madness bracket given the insanely high odds of correctly predicting the winner of all 63 games.

The reason for saying that a March Madness perfect bracket is impossible is simple—there are just too many variables at play in every game that make predicting winners incredibly difficult.

Even the most talented and experienced basketball analysts and sports statistics experts can not predict with complete accuracy how a given tournament game will play out. Factors such as injuries to key players, momentum swings, and elements of chance can all play a role in the outcome of a basketball game. And when you consider that there are 63 games in the tournament, the chances of getting correctly predicting the winner of every single game is virtually zero.

Of course, the fact that a perfect March Madness bracket is essentially impossible should not discourage you from filling out a bracket and attempting to correctly predict the outcome of as many games as possible. Why? Because filling out a bracket and chasing this impossible dream is what makes March Madness such a fun time of year for die-hard and casual basketball fans alike.

Even if you don't have a perfect bracket, you can still compete with your friends and colleagues to see who can get the most games right. And who knows? You might just run into some luck and make some accurate predictions that others did not.


Has there ever been a perfect March Madness bracket? Photo by Jacob Rice on Unsplash


Has There Ever Been a Perfect March Madness Bracket?

Millions of basketball fans have been filling out March Madness brackets since the tournament’s inception in 1939, but has anyone ever had a perfect March Madness bracket?

The answer is no.

Remember that the odds of predicting the winners of all 63 tournament games are astronomically low, with some estimates placing the odds of a perfect bracket at around 1 in 9.2 quintillion.

Even with the rise of advanced analytics and machine learning algorithms, no one person has ever been able to achieve a perfect March Madness bracket, and they likely never will.

How Can You Use Math to Improve Your Bracket Predictions?

Mathematically speaking, filling out a perfect bracket is virtually impossible. But, what are your chances of getting a certain number of games right?

Let’s take a look at some statistics that will shed some light on this question.

According to the NCAA, the chances of correctly predicting the outcome of the first round (the 32 games played during the first two days of the tournament) are about 1 in 4.3 billion. While those odds are not very much in your favor, they are still way better than the odds of predicting a perfect March Madness bracket. In fact, there have been several occasions where someone correctly predicted the winners of all 32 first-round games.


The chances of predicting the winner of any NCAA tournament game depend on many factors including matchups, injuries, and past performance. Photo by Markus Spiske on Unsplash


But, as the tournament continues on into the later rounds, the odds of correctly predicting every winner become exponentially smaller. By the time you get to the third round (known as the Sweet 16), the chances of predicting all the games correctly are about 1 in 75.6 million.

As for the point in the tournament when only four teams remain (known as the Final Four), the odds of predicting all games correctly drop to about 1 in 2.4 million.

These odds are only estimates, and the actual chances of getting each game right can vary depending on many factors. The point is that, while the chances of a perfect March Madness bracket are essentially zero, it is still possible to correctly predict winners and have fun competing with others.

In fact, if you were to simply guess the winner of every March Madness game at random, without any knowledge or analysis of college basketball, you would be mathematically expected to correctly predict around half of the total games (about 31.5 out of the 63 games).

So, what should you keep in mind when filling out your March Madness bracket? The best advice we can give is to focus more on making educated based on information such as a teams’ record, matchups, current injuries, and recent performance. You can also take advice from trusted sports analysts and experts that can offer valuable insights that will help you make decisions when filling out your bracket.


Given that the March Madness perfect bracket odds are pretty much impossible, you can let yourself off the hook and simply have fun filling out your bracket. Photo by Ben Hershey on Unsplash


Another thing to keep in mind about filling out your bracket is the occurrence of upsets—when a lower ranked team wins against a higher ranked team. Upsets are incredibly common in the NCAA tournament and they are one of the most fun and exciting aspects of March Madness.

With this in mind, don't be afraid to pick a few lower-seeded teams to defeat a higher-seeded opponent, especially during the first two rounds.

On a final note, given that the March Madness perfect bracket odds are impossible, you can let yourself off the hook and simply have fun filling out your bracket, knowing that it will likely get busted during the first round.

The unpredictability of the tournament is what contributes to the 'Madness'—so have fun and good luck!

More Free Resources You Will Love:

Search Tags: march madness perfect bracket odds, chances of a perfect march madness bracket, perfect march madness bracket, odds of having a perfect march madness bracket, march madness perfect bracket, perfect march madness bracket odds, has there been a perfect march madness bracket, has anyone ever had a perfect march madness bracket, odds of a perfect march madness bracket, perfect bracket march madness

1 Comment

Exploring Positive and Negative Numbers: Elevation Activity

5 Comments

Exploring Positive and Negative Numbers: Elevation Activity

How to Use Positive and Negative Numbers to Represent Quantities in the Real-World

Exploring Elevation Above/Below Sea Level is Great Way to Explore Positive and Negative Numbers


Are you looking for a fun way to teach your students about the relationship between positive and negative numbers in a real-world context?

On its own, a mathematical topic such as how positive and negative numbers can be used together to describe opposite directions or values can be confusing and uninteresting to kids who often struggle to see how a topic applies to their world.

Relating mathematics to the real world helps students to understand the practical everyday applications of math, which makes learning math fun, engaging, and, most importantly, meaningful. Plus, understanding the connections between mathematics and real life can spark student interest in math and allow them to see how useful the subject truly is.

In this post, you will learn about a fun activity that explores the relationship between positive and negative numbers in the context of their elevation above or below sea level in comparison to other geographical locations.

(Do you want free K-8 math resources and activities in your inbox every week? Click here to sign up for our free math education email newsletter)


Positive and Negative Numbers Activity: What is My Current Elevation? (Image: Mashup Math FP)


What is My Current Elevation?

Math Activity: What is My Current Elevation Above/Below Sea Level Compared to Other Locations?

Grade Level(s): 5th Grade, 6th Grade, 7th Grade

Learning Standard(s): Understand that positive and negative numbers are used together to describe quantities having opposite directions or values (e.g., temperature above/below zero, elevation above/below sea level, credits/debits, positive/negative electric charge); use positive and negative numbers to represent quantities in real-world contexts, explaining the meaning of 0 in each situation.

This activity helps students understand the concept of elevation, especially in the context of U.S. cities like New Orleans and Miami, which are at or below sea level, and Denver, known for being thousands of feet above sea level.


Click the link below to download the free pdf guide that accompanies this lesson.


The following activity lets students take a deeper look into finding the elevation of geographic locations with sea level as a reference point. In this case, the measurement tool will be a vertical number line where sea level is at zero. All locations above sea level will have positive elevation values and all locations below sea level will have negative elevation values.

To find the difference in elevation between two locations, students will have to add positive and negative numbers.

For example, to find the difference in elevation between Denver, Colorado (5,690 feet elevation) and New Orleans, Louisiana (-3 feet elevation), students would have to perform the following calculation:

  • 5,690 - (-3) = 5,690 + 3 = 5,693 foot difference in elevation

Why is Denver, Colorado called the Mile High City?

Photo by Nils Huenerfuerst on Unsplash

Why is New Orleans at such high risk of flooding?

Photo by Stella He on Unsplash

The lesson is interactive and calls on kids to use Google Maps to research their own elevation and figure out how many feet higher or lower they are than my location in Rocky Mountain National Park in Colorado, which is where the video that corresponds with this lesson was filmed!

The lesson also has real world extension questions related to science, geology, and climate change.

Click the video link below to watch the free What is Your Elevation video guide for students and click here to download the free pdf student guide that accompanies the video lesson.


5 Comments

Combining Like Terms Explained—Examples, Worksheet Included

2 Comments

Combining Like Terms Explained—Examples, Worksheet Included

Combining Like Terms Explained

How to Combine Like Terms Quickly and Easily (Worksheet Included)


Free Step-by-Step Guide: Combining Like Terms


Combining like terms is an important math skill that involves simplifying an expression by combining terms that have the same variables and/or exponents. You combine like terms when you want to make an expression simpler and easier to read and solve.

This free Step-by-Step Guide to Combining Like Terms will walk you through how to quickly and easily combine like terms and it includes examples and a free practice worksheet. This guide will cover the following topics:

Before we dive into how to combine like terms, lets do a quick review of some important math vocabulary related to combining like terms (this quick recap will help you to better understand the examples in this guide).

What are Terms in Math?

In math, a term is one single number or algebraic expression that is part of a larger expression or equation.

For example, the mathematical expression 6x + 8y - 4z + 5 has four terms:

  • 6x

  • 8y

  • -4z

  • 5


What are Terms in Math?


Each of the first three terms consists of a coefficient (a number in front of a variable) and variable letter (x, y, or z in this example). The fourth term is called a constant because it is a single number without a variable.

It is also important to note that a term can have multiple variables as well. For example, 6xy or 10xyz could be terms (more on this later on).

What are terms in math? The important thing to understand right now is that each individual part of an expression (separated by mathematical operation signs like + or -) is a term and, when terms are like, they can be combined to create a simpler result that is easier to work with.


Combining Like Terms Definition

Now that you understand what are terms in math, you are ready to learn how to combine like terms.

Combining Like Terms Definition: Combining like terms is the act of simplifying an algebraic expression by either adding or subtracting terms that have the same variables and/or exponents.

Before we look at a simple numerical example, lets take a look at the fruit expression in Figure 01 below.


Figure 01: The fruit expression has three terms: pomegranates, avocados, and lemons.


The fruit expression has three terms: pomegranates, avocados, and lemons.

You can read this expression verbally as: 14 pomegranates plus 8 lemons plus 5 avocados minus 6 pomegranates plus 4 avocados minus 2 lemons.

By looking at this expression, it should be clear that you can make it simpler by combining like fruits. We can easily do this by color coding the terms as follows:

  • Highlight pomegranates in pink

  • Highlight lemons in yellow

  • Highlight avocados in green

Now, you can make the following combinations of like fruits:

  • Pomegranates: 14 + - 6 = 8 pomegranates*

  • Lemons: 8 + -2 = 6 lemons

  • Avocados: 5 + 4 = 9 avocados

*Note that you simplify an expression like 8+-2 as 8-2.

So, after combining like terms, the new expression would be: 8 pomegranates plus 6 lemons plus 9 avocados

Figure 02 below illustrates how we just combined like terms (fruit) to simplify a complicated expression by using color-coding.


Figure 02: Combine Like Terms Using Color Coding


How to Combine Like Terms

The fruit expression is a good first introduction to combining like terms. Obviously, in math, you won’t be dealing with fruit, but variables like x, y, and z instead.

For example, consider the expression 3x + 2y + 5x -3z + 7y + z

To combine like terms, we can color coordinate the x-terms, y-terms, and z-terms and then combine them together group by group as follows:

  • x-terms: 3x + 5x = 8x

  • y-terms: 2y + 7y = 9y

  • z-terms: -3z + z = -2z

After combining like terms, the new expression would be: 8x +9y - 2z.

This example is illustrated in Figure 03 below.


Figure 03: How to combine like terms.


Now, lets work through 3 more step-by-step examples of combining like terms.


Combining Like Terms Examples

Example #1: Combine Like Terms 5x + 9 + 2x

For this first example, you have to combine like terms 5x + 9 + 2x

This expression has 2 terms. To combine like terms, we can color coordinate the x-terms and constant terms, and then combine them together group by group as follows:

  • x-terms: 5x + 2x = 7x

  • constant terms: 9

After combining like terms, the new expression would be: 7x + 9

This example is illustrated in Figure 04 below.


Figure 04: Combine Like terms 5x + 9 + 2x


Example #2: Combine Like Terms: 7q + 5r -4 +3s -3q +5r - 3

This expression has 4 terms. To combine like terms, we can color coordinate the q-terms, r-terms, s-terms, and constant terms, and then combine them together group by group as follows:

  • q-terms: 7q + (-3q) = 4q

  • r-terms: 5r + 5r=10r

  • s-terms: 3s

  • constant terms: -4 + (-3) = -7

Notice that there is only one s term, so you can not combine it with another like term.

After combining like terms, the new expression would be: 4q+10r+3s-7

This example is illustrated in Figure 05 below.


Figure 05: How to Combine Like Terms


Example #3: Combine Like Terms: -5xy^2 +2x^2 + 4xy^2 - 2x^2 - y

This expression has 3 terms. To combine like terms, we can color coordinate the xy^2-terms, x^2 terms, and y-terms, and then combine them together group by group as follows:

  • xy^2-terms: -5xy^2 + 4xy^2 = -1xy^2

  • x^2-terms: 2x^2 + (-2x^2) = 0 (they cancel each other out)

  • y-terms: -y

After combining like terms, the new expression would be: -xy^2 - y

This example is illustrated in Figure 06 below.


Figure 06: Combining Like Terms


Free Combining Like Terms Worksheet

Combining Like Terms Worksheet Preview

Are you looking for more practice with combining like terms?

Click the link below to download our free Combining Like Terms worksheet as a pdf file (full answer key included). We highly recommend using colored pencils or highlighters to color code the terms in each example.

→ Download your free Combining Like Terms Worksheet PDF File (with Answer Key)

Keep Learning:


Search Tags: combining like terms, combine like terms, combining like terms worksheet, how to combine like terms, combine like terms worksheet, combine line terms 5x + 9 + 2x, combine like terms definition, combining like terms examples, combining like terms worksheet pdf

2 Comments

Is a Rhombus a Parallelogram? Yes or No?

2 Comments

Is a Rhombus a Parallelogram? Yes or No?

Is a Rhombus a Parallelogram? Yes or No?

Explore the unique features of a rhombus and a parallelogram to determine whether or not a rhombus is both


Is a rhombus a parallelogram? Is a parallelogram a rhombus? Let’s explore!


It’s time to explore and answer the controversial math question: Is a rhombus a parallelogram? Yes or No? This short guide will help you to understand the following concepts:

What is a Rhombus?

Why was the geometry student late for school? Because he took the rhombus!

Okay, jokes aside, let’s quickly explore the features and characteristics of a rhombus and a parallelogram.

In geometry, a rhombus is a four-sided figure (quadrilateral) where all four sides have the same length and opposite sides are parallel to each other. Additionally, the opposite interior angles of any rhombus are equal to each other (congruent).


Is a rhombus a parallelogram? Start by knowing exactly what a rhombus is.


What is a Parallelogram?

In geometry, a parallelogram is a four-sided figure (quadrilateral) where opposite sides have the same length and are parallel to each other, but all four sides do not have to be equal. Similar to a rhombus, the opposite interior angles of any parallelogram are congruent.

The key feature of a parallelogram is that the opposite sides are both equal in length and parallel to each other—hence the name parallelogram.


Is a rhombus a parallelogram? Continue by learning the definition of a parallelogram.


What is the Difference Between a Rhombus and a Parallelogram?

Now that you know the key characteristics of a rhombus and a parallelogram, let’s explore what sets them apart.

For starters, a rhombus and a parallelogram are similar in that they are both quadrilaterals, meaning that they are four sides figures. They also both have opposite sides that are equal in length to each other and they both have sets of opposite interior angles that are congruent to each other.

However, the key differences between a rhombus and a parallelogram are that a parallelogram has two sets of parallel sides that are equal in length, while a rhombus has four sides that are all equal in length.

So, a parallelogram is like a rectangle that doesn’t have right angles, while a rhombus is like a square that doesn’t have right angles.


What is the Difference Between a Rhombus and a Parallelogram?


The key takeaway concerning the difference between a rhombus and a parallelogram is that they both have opposite sides that are parallel and congruent (and opposite interior angles that are congruent), but a rhombus has to have four equal sides, but a parallelogram does not.


Is a Rhombus a Parallelogram? Yes or No?

The answer is YES—by definition, a rhombus is a parallelogram.

Again, by definition, a parallelogram is quadrilateral with two pairs of parallel sides with opposite interior angles that are congruent. A rhombus is just a special type of parallelogram where all four of the sides are equal in length. As for interior angles, the opposite interior angles of a rhombus are congruent just as they are in a parallelogram.

Is a rhombus always a parallelogram?

To say that every rhombus is a parallelogram would be true.

Since the properties of a rhombus satisfy the definition of a parallelogram and we can conclude that:

  • Is a rhombus always a parallelogram? Yes!

  • A rhombus is a special type of parallelogram—namely, one where all four sides are equal in length.

  • All rhombuses are parallelograms.


Is a rhombus always a parallelogram? Yes, a rhombus is a special type of parallelogram—namely, one where all four sides are equal in length.


It is important to note that the conclusion that we just made is not an opinion, but a mathematical fact.

All rhombuses are parallelograms. In fact, a rhombus is a subset of a parallelogram in that it is special because it is a parallelogram with four congruent sides.

This explanation is very similar to our exploration of the question is a square a rectangle?, where we similarly concluded that a square is a special type of rectangle and that all squares are rectangles.

Next, let’s consider if the opposite is true: is a parallelogram a rhombus?


Is a Parallelogram a Rhombus? No. All Oreos are cookies, but not all cookies are Oreos (because Oreos are a special type of cookie). Similarly, every rhombus is a parallelogram, but every parallelogram is not necessarily a rhombus.


Is a Parallelogram a Rhombus? Yes or No?

We have just applied the mathematical definition of a rhombus and parallelogram to prove that a rhombus is indeed a parallelogram. We concluded that a rhombus is a special type of parallelogram that has all of the characteristics of a parallelogram and four congruent sides.

But, is a parallelogram a rhombus?

No. By definition, a parallelogram does not necessarily have to be a rhombus.

Remember that a parallelogram is a quadrilateral with two pairs of sides that have to be parallel and equal in length, but it does not need to have all four sides be congruent.

Again, a rhombus is like a square and a parallelogram is like a rectangle. Similarly, all squares are rectangles, but not all rectangles are squares.

To say that every parallelogram is a rhombus would be false.

Therefore, while every rhombus is a parallelogram, not all parallelograms are rhombuses.

Conclusion: Is a Rhombus a Parallelogram?

In this short lesson, you learned that both a rhombus and a parallelogram are quadrilaterals with opposite sides that are equal in length and opposite interior angles that are congruent. You also learned that a rhombus is a special type of parallelogram—namely one that has four congruent sides.

As for the question, is a rhombus a parallelogram? The answer is yes! All rhombuses are parallelograms, but not all parallelograms are rhombuses.

More Math Education Insights You Will Love:

2 Comments