Viewing entries tagged
who put letters in math

How to Address an Envelope—Explained with Examples

How to Address an Envelope—Explained with Examples

How to Address and Envelope Step-by-Step

Your Quick Guide on How to Write the Address on an Envelope


Learn how to write an address on an envelope in 3 easy steps.


Knowing how to address an envelope is a valuable life skill that every person should learn how to do at some point.

Sending and receiving letters containing important information, financial documents, and notifications is a part of adult life and you will need to know how to write an address on an envelope correctly. Luckily, addressing an envelope is relatively easy to do and you can learn how very quickly.

This free Life Skills Guide on How to Write an Address on an Envelope will cover the following topics and examples:

Note that you do not have to follow this guide in order, and you can use the text links above to skip to any particular section that interests you.

Now, let’s start with a quick explanation of why letters and useful and why being able to properly address an envelope is an important life skill like knowing how to write a check.


How to Address an Envelope: Many couples still send physical thank you cards through the mail to individuals who attended their wedding. (Image: Mashup Math MJ)


What are Letters and Why are They Useful?

Communicating via letters sent in envelops has been done for hundreds of years and, even in today’s digital world, remains a useful and popular way of sending and exchanging information.

Today, letters have many uses such as sending someone a physical card to commemorate an event or to share condolences, important notifications and information, and legal and financial documents.

For example, the Internal Revenue Service (IRS), relies primarily on sending letters through the mail to communicate with and notify individuals. In fact, the IRS’ first point of contact with a customer will always be through the mail, since sending letters is a secure and traceable form of communication.

Since sending and receiving letters continues to be prevalent, learning how to address an envelope is an important life skill because you will certainly want to know that anything that you send—whether it be a birthday card with a check enclosed or your tax return documents—will reach its intended recipient.

How to Address and Envelope: Step-by-Step


How to Address and Envelope in 3 Easy Steps


Now you are ready to learn how to write an address on an envelope.

Note that there are three key steps to correctly addressing an envelope:

  • Return Address (Top-Left Corner)

  • Recipient’s Address (Center)

  • Stamp (Top-Right Corner)

Next, we will walk through each step of how to put the address on an envelope so it reaches its intended destination.

While it is not a requirement, we highly recommend that you use black or blue ink whenever you are addressing an envelope and always write clearly and legibly so that postal workers are not confused or unable to deliver your envelope.

Start with a Blank Envelope

Before you do anything, make sure that you are starting with a blank envelope that is appropriately sized to fit your letter or card.

Note that the standard white envelope for letters is 4.125 x 9.5 inches, but envelopes come in many shapes, sizes, and colors. Greeting cards typically come with an envelope to hold the card as well. No matter what type of envelope you are using, the process below will apply.

However, make sure that you are writing the address on the front side of the letter. The front side is totally blank and empty, while the back side has a flap/opening (see Figure 01 below for a visual reference).

Figure 01: How to Address an Envelope: Start with a blank envelope that is large enough to hold your letter, card, or documents.


Step One: Write the Return Address in the Top-Left Corner

The first step is to write the return address in the top-left corner of the envelope.

The return address is your address (i.e. you, the sender). Putting a return address on a letter serves two purposes:

  1. It lets the recipient know who the letter is from before they open it

  2. If the letter can’t be delivered for any reason, it will be returned to this address

For example, let’s say that our sample letter is being sent by Alexander Johnson who lives at the following address:

  • 135 Pine Street, Denver, CO 80203

In the top left-hand corner of our blank envelope, we will write the following as our return address:

  • Alexander Johnson

  • 135 Pine Street

  • Denver, CO 80203

Individuals who send letters often will sometimes have custom envelopes with the return address already printed on them while others will purchase stickers/labels with their return address printed on them. Either of these are exceptional alternatives to handwriting the return address.

Figure 02 below shows what our envelope will look like after writing the return address in the top left-hand corner.

Figure 02: How to Write the Address on an Envelope: Start by writing the return address at the top left-hand corner.


Step Two: Write the Address of the Recipient in the Center

The next step is to write the name and address of the recipient in the center of the envelope.

The recipient is the person or organization you are sending the envelope to.

Make sure that you write the name and address clearly and correctly and make sure that any numbers are legible and obvious to understand. If you make a mistake or if your handwriting is not readable, the letter will not make it to its intended destination.

In this example, we will be sending our letter to our friend Amanda Lee who lives at the following address:

  • 4917 River Avenue, Aspen, CO 81611

In the center of our envelope, in large font, we will write our recipient’s address as follows:

  • Amanda Lee

  • 4917 River Avenue

  • Aspen, CO 81611

Our letter after completing this second step is illustrated in Figure 03 below.

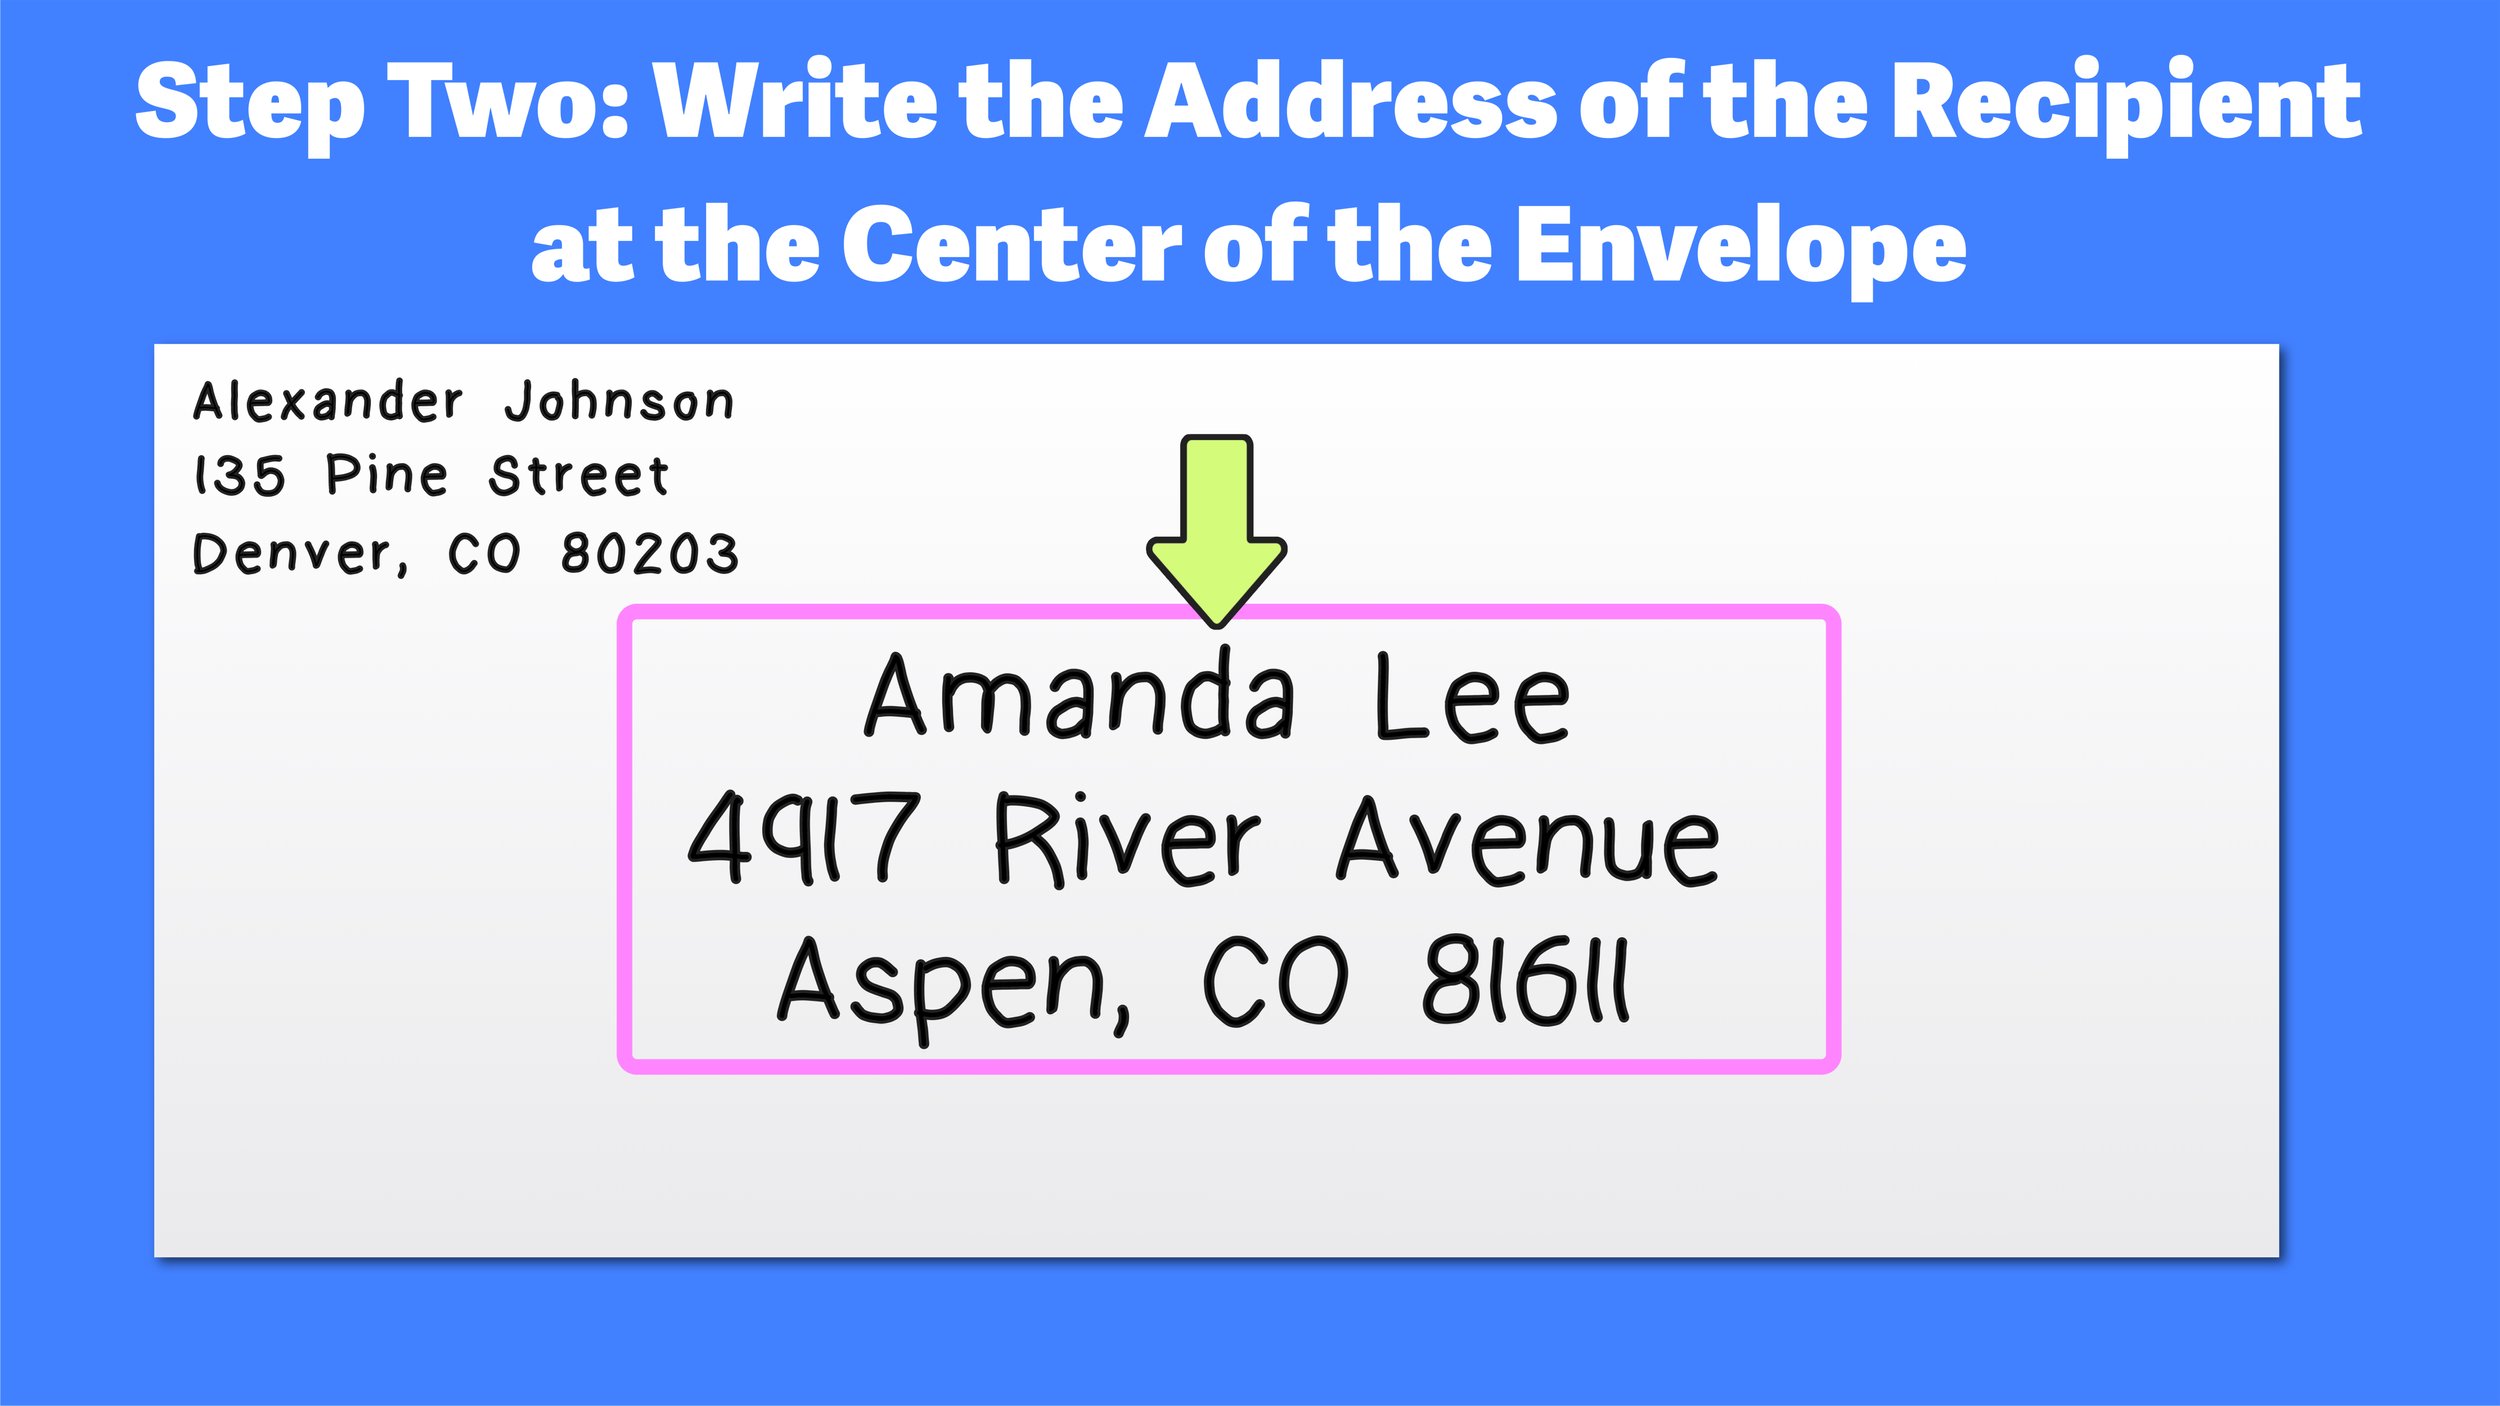
Figure 03: How to Address an Envelope: Clearly and legibly write the address of the recipient in the center of the envelope.


Step Three: Stamp and Seal Your Envelope

Now, all that you have to do is place a valid stamp in the top right-hand corner of the envelope and seal the flap on the backside.

Once you have completed this third and final step, your envelope is ready to be mailed.

There are several ways to mail a letter inside of a stamped envelope including:

  • Dropping the letter off at the post office

  • Placing the letter in an official USPS postal box

  • Leaving the letter in your mailbox for your mail carrier to receive

Figure 04 below shows what our envelope will look like after the final step has been completed.

Figure 04: How to Properly Address an Envelope


That’s all there is to it! You have just learned how to write the address in an envelope in a way that ensures that your letter or card will be delivered to the intended recipient. And, because you included a return address, your letter will be sent back to you in the event that it can not be delivered for any reason.

Figure 05 below shows what our completed envelope should look like. Once you have completed all three steps (return address, recipient’s address, and stamp), you are ready to send!

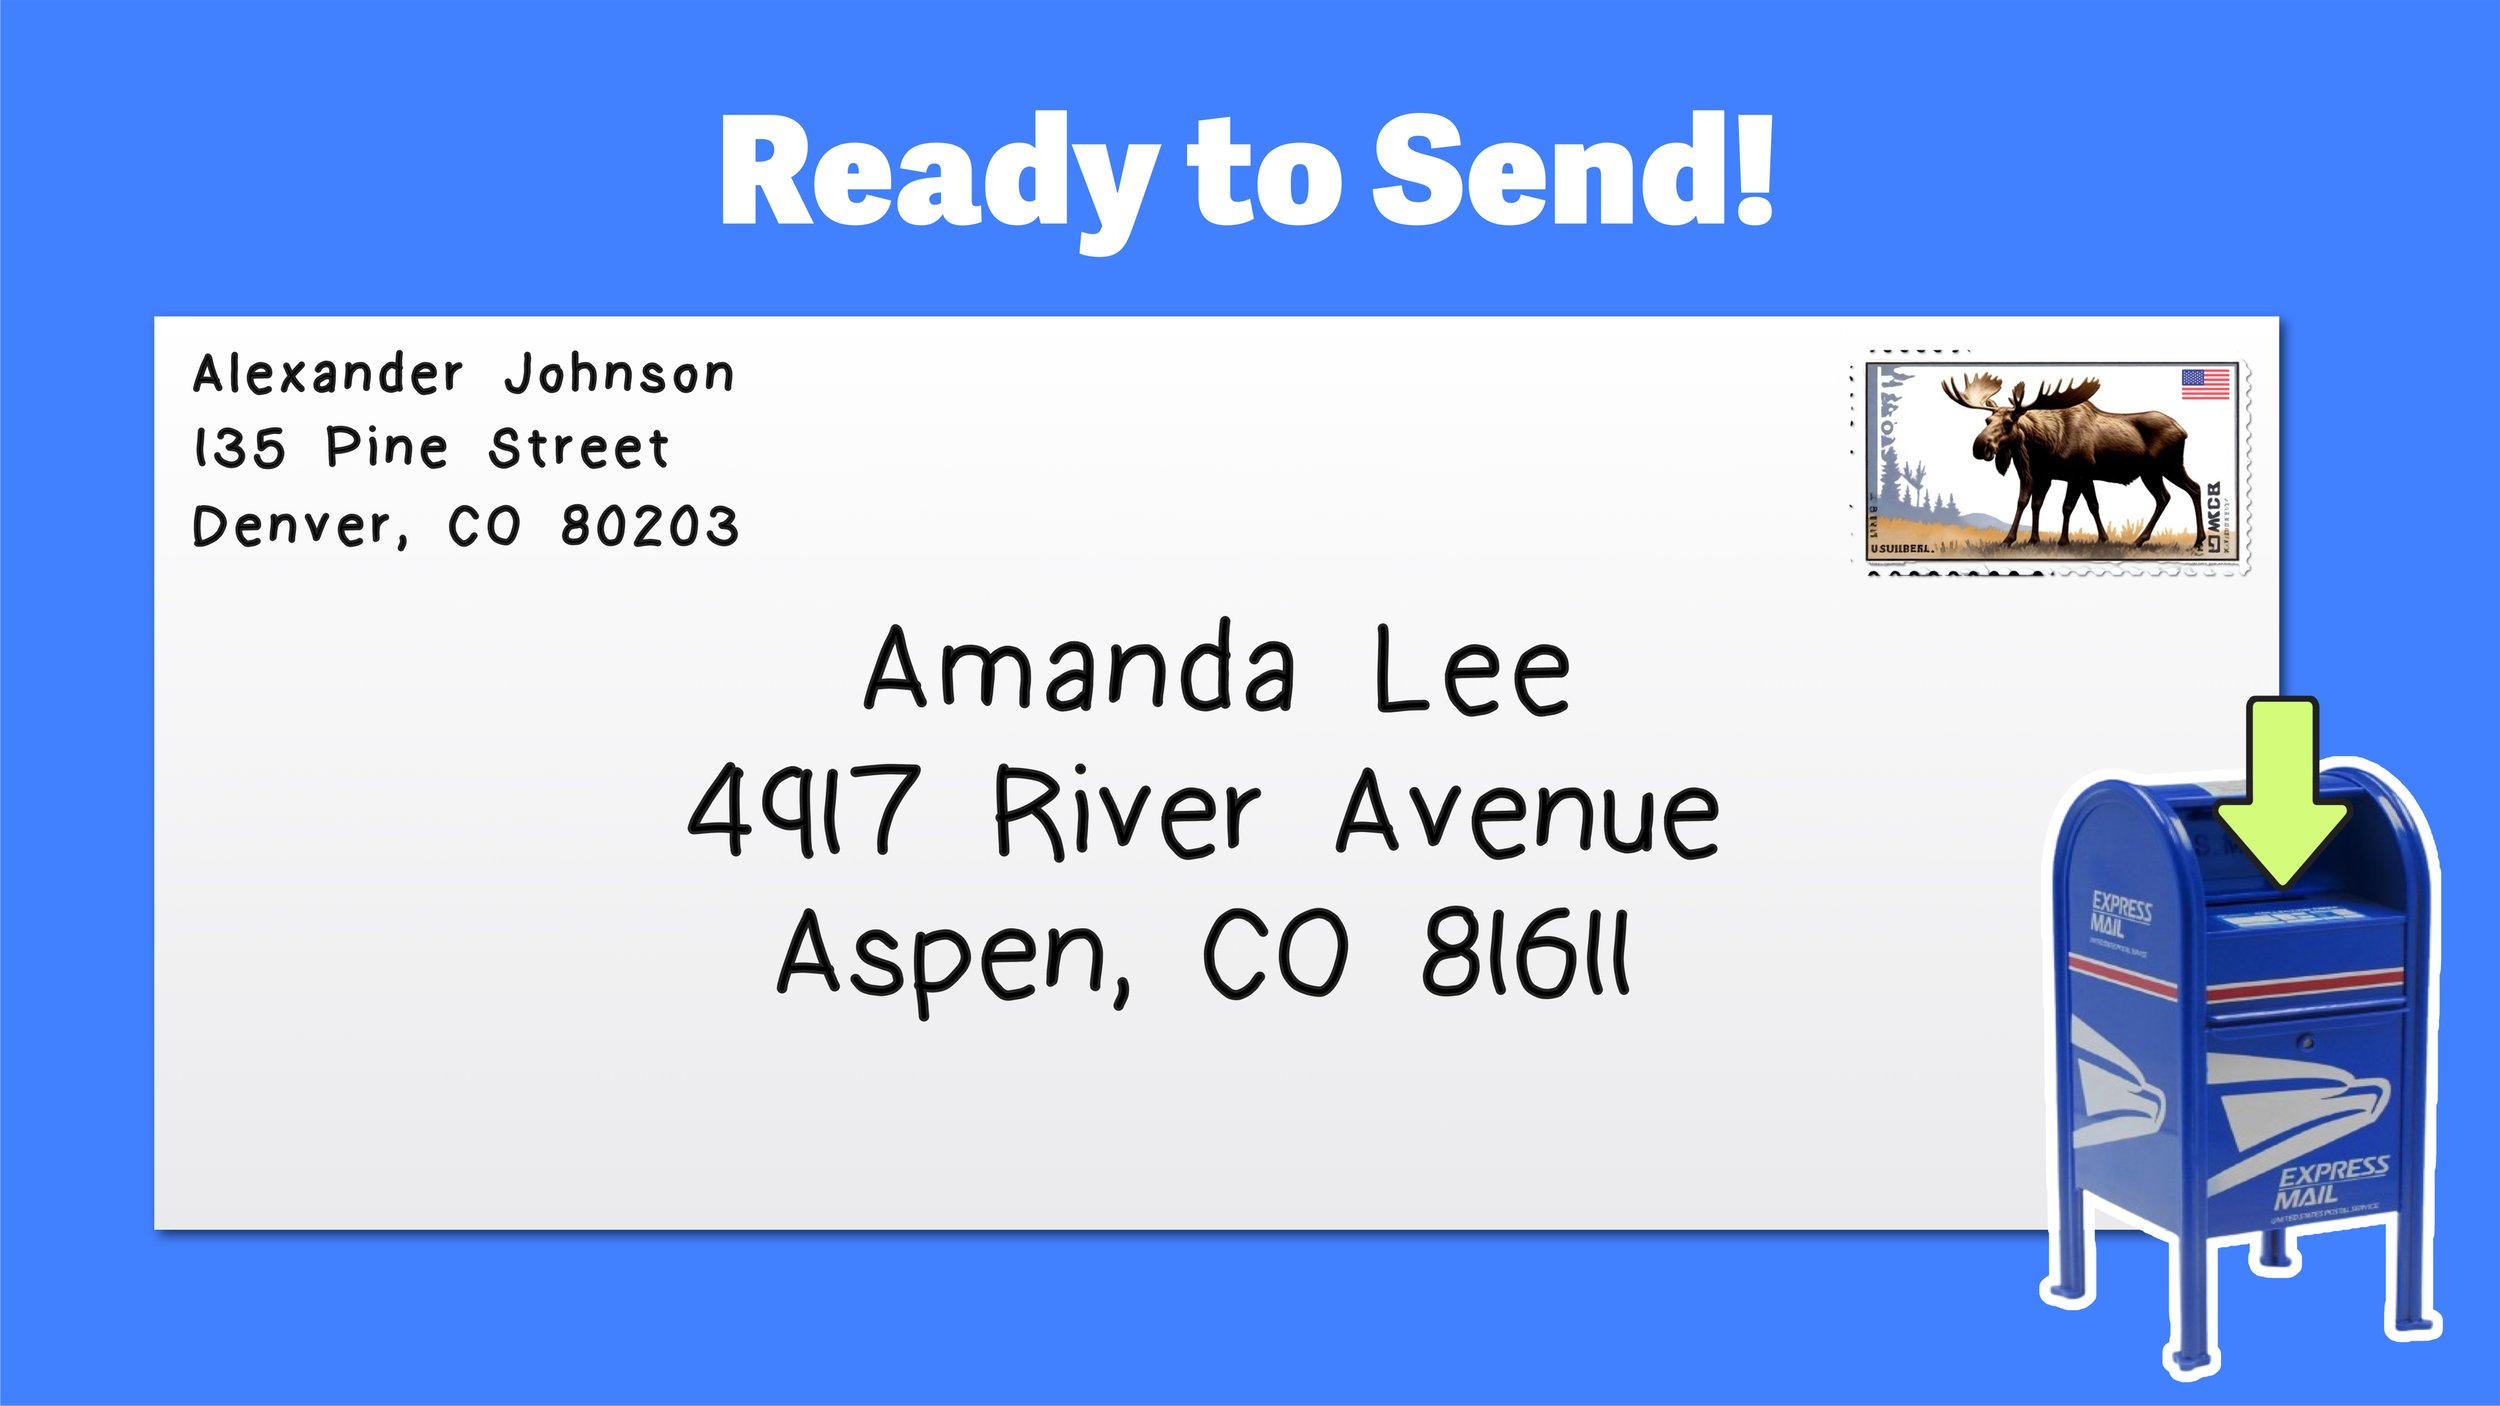
Figure 05: How to Address an Envelope: When your envelope looks like this, it is ready to send!


Example: How to Address an Envelope to a Family

Now that you know how to address an envelope to an individual, let’s take a look at a case where you want to address an envelope to an entire family.

For example, let’s say that Alexander Johnson who lives at 135 Pine Street, Denver, CO 80203 is sending invitations to a New Year’s Eve Party at his house and he wants to invite all six members of the Miller family.

Rather than sending each member their own invitation, he can send one invitation that is addressed to the entire family.

To address an envelope to a family, you will follow the same steps for addressing an envelope that we covered in the previous section, except that the name of the recipient will not be an individual or organization, but the name of the family (i.e. The Miller Family).

Let’s start by writing our return address in the top left-hand corner so that the family knows who the letter is from before opening it, as shown in Figure 06 below.

Figure 06: How to address a letter to a family: always include a return address.


Now, we are ready to write the address of the recipients, The Miller Family, at the center of the envelope.

Let’s say that the Miller family lives at 5242 Olive Tree Way, Evergreen, CO 80439. We would write the recipient’s address as:

  • The Miller Family

  • 5242 Olive Tree Way

  • Evergreen, CO 80439

By addressing the envelope this way, it implies that the card/invite inside of the envelope is meant for the entire family and that the message inside can be shared by all family members.

Finally, we just have to stamp our letter and we are all finished.

Figure 07 below shows how to address an envelope to a family as a completed letter ready to be sent!

Figure 07: How to Address an Envelope to a Family


That’s all there is to it. Once your envelope has been stamped and sealed, it is ready to send.


Example: How to Address an Envelope to a PO Box

This next example will teach you how to address an envelope to a PO Box.

A PO Box (or a Post Office Box) is a secure mailbox located at a post office or postal facility that can only be accessed by authorized individuals with a key. PO boxes are often used by individuals or businesses who want a private and secure location to receive mail.

The process for addressing an envelope to a PO Box is exactly the same as step-by-step process for addressing an envelope described in the first section of this guide, except that the address of the recipient will be a P.O. Box address instead of a street address.

For this example, let’s say that Alexander Johnson who lives at 135 Pine Street, Denver, CO 80203 is sending a letter with important financial documents to Gary Smith who works at Green Stripe Bank Headquarters.

Rather than having a traditional address, Green Stripe Bank has a PO Box Address.

To properly address an envelope to a PO Box, we first have to write our return address in the top left-hand corner as shown in Figure 08 below.

Figure 11: How to Address an Envelope to a PO Box: Start by writing the return address in the top left-hand corner.


Next, we are ready to write the PO Box address of the recipient, Gary Smith at Green Stripe Bank, at the center of the envelope.

Let’s say that the PO Box address of Green Stripe Bank is PO Box 247, Dallas, TX 75201:

  • Gary Smith

  • Green Stripe Bank

  • PO Box 247

  • Dallas, TX 75201

Notice that the address in this example has four lines, including the name of an individual (Gary Smith) and the business he is associated with (Green Stripe Bank). Note that some PO Box address will only include the name of the individual, while others will only include the name of the organization.

All that we have to do now is write this address on the center of our envelope and stamp our letter, as shown in Figure 09 below.

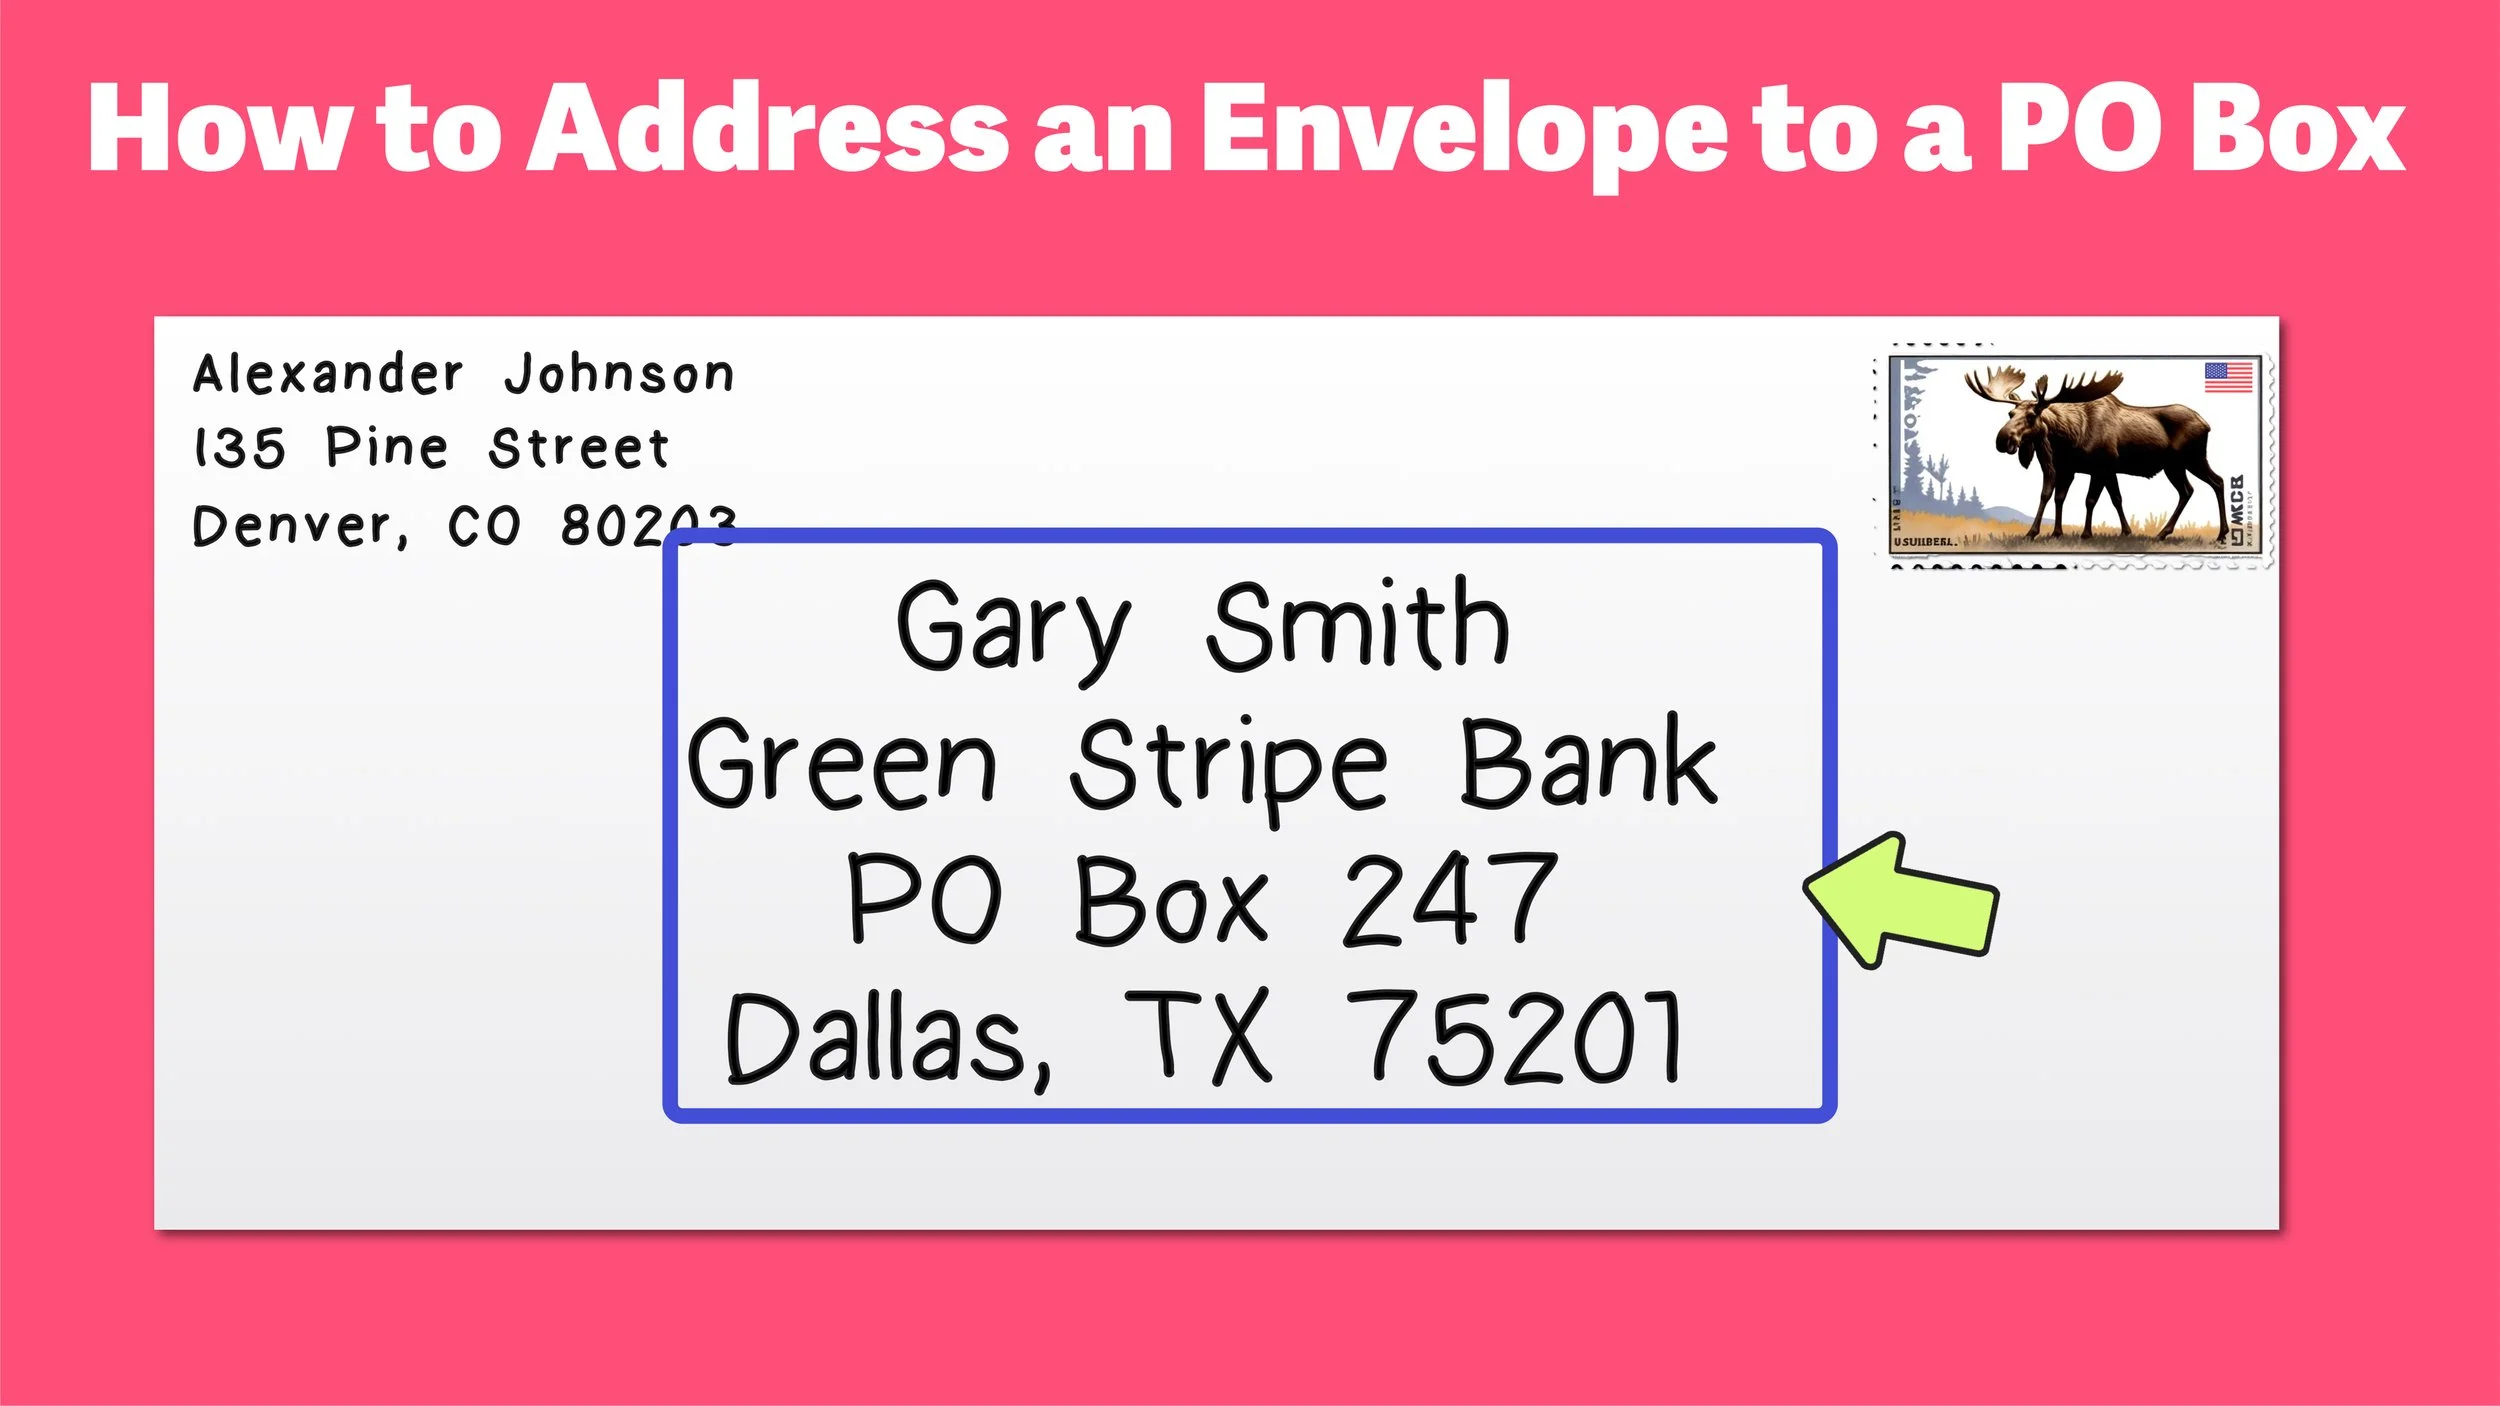
Figure 09: How to Address an Envelope to a PO Box Example.


Now we have successfully addressed an envelope to a PO box and we are ready to send.


How to Address an Envelope (Image: Mashup Math FP)


Conclusion: How to Put the Address on an Envelope

There are many reasons why you may have to send a letter, documents, or a card inside of an envelope through the mail and knowing how to address an envelope is an important life skill that you can easily learn.

This free guide taught you how to address an envelope in three easy steps:

  • Step One: Write the return address in the top left-hand corner

  • Step Two: Write the address of the recipient in the center of the envelope

  • Step Three: Place a valid stamp in the top right-hand corner

In addition to our broad explanation of how to write the address on an envelope, we also walked through two specific examples—how to address an envelope to a family and how to address an envelope to a PO box. Both of these examples have useful and practical applications, which is why we gave them a special focus.

In conclusion, by learning how to properly address and envelope, you are able to communicate through the mail in any way that you need to, and you can ensure that whatever you are sending—whether it be cards, letters, or important documents—reaches its intended destination as planned.


Keep Learning:

How to Write a Check in 6 Easy Steps

Knowing how to write a check is an important life skill that every person should know how to do. This free step-by-step guide will teach you everything you need to know about writing checks.


How to Write a Check—Explained with Examples

How to Write a Check—Explained with Examples

How to Write a Check Step-by-Step

Your Quick Guide on How to Write a Check for Any Reason


Learn how to Write a Check in 6 Simple Steps (Image: Mashup Math FP)


Knowing how to write a check is an important life skill that every person should know how to do.

While learning how to write a check can seem complicated, it’s actually a relatively simple process that you can learn in just a few minutes.

This short step-by-step guide on how to write a check will cover the following topics:

You can click on any of the text links above to jump to any topic or section of this guide, or you can read through each section order.

Are you ready to get started?

Why are Checks Useful?

We live in a digital world where online banking and money transfer apps are prevalent, yet knowing how to write a check is still a useful skill and physical checks are still useful for a variety of reasons.


Learn How to Write a Check (Image: Mashup Math MJ)


Since certain payment transactions can not be made using a credit/debit card or online, paying by check is often your safest option.

For example, if a landlord does not accept credit card or online payments for your monthly rent, then submitting a check payment would be your best option. If you pay with cash, you have no proof that you actually made the payment. However, if you pay with check, your bank can verify that the check was cashed and that you indeed made your payment.

In addition to proof of payment, paying by check offers additional security benefits that cash does not provide. Cash can be lost or stolen and, once cash is submitted, the payment can not be cancelled. Checks, on the other hand, can be cancelled.

Additionally, checks are extremely useful anytime you have to send a payment by mail. If your payment gets lost, you can always send a new check with no harm done. However, if you mail cash and the payment is lost, you are out of luck (and money!).

Also, many formal transactions require payment by check. Such transactions include making a down payment on a house, submitting a tax payment by mail, or paying rent to a landlord.

Finally, many older individuals are not comfortable with digital or online banking transactions and they rely on using checks to transfer and receive money or payments. Since checks are a familiar and trusted payment option for such individuals, it is highly beneficial that you are familiar with how to write a check.

So, whenever you can’t make a financial transaction digitally, it is usually safer to pay with a check than it is to use cash.

How to Write a Check: Step-by-Step

How to Write a Check: Start with a blank check that is linked to your personal checking account. (Image: Mashup Math FP)


Now that you know why checks are a safe and useful payment option, especially whenever digital payment options are not available or when you have to submit a payment by mail, it’s time to learn how to write a check.

Note that there are six different sections on a check that you must fill out:

  • Date

  • Recipient

  • Amount as a Number

  • Amount in Words

  • Memo

  • Signature

Below, we will show you how to complete all six sections and how to properly write a check. Note that these steps can be followed whenever you have to write a check for any reason!

For each step below, make sure you use blue or black ink and that you write using clear and legible handwriting.

Step One: Fill Out the Date

The first step to writing a check is to fill in the date section in the upper-right corner of your blank check. Make sure that you include the month, day, and year when you write the date.

In Figure 01 below, the check has been dated for July 4th, 2024.

Figure 01: How to Write Out a Check: Start by filling in the date at the upper-right corner.


Step Two: Write the Name of the Recipient

Next, you will see a blank line next to text that says PAY TO THE ORDER OF.

On this line is where you write the name of the recipient (i.e. the name of the person, business, or organization you are sending money to).

If you are sending money to another person, write their full first and last on this line.

If you are writing a check to a business or organization, write the name of the business or organization on this line. For example, if you are sending a check as a tax payment, you would write your check out to the Internal Revenue Service.

Note that only the person, business, or organization to whom the check is written out to can cash your check. If the check is lost or stolen, another person would not be able to cash the check.

In Figure 02 below, our check is being made out to a landlord named Alexander Johnson.

Figure 02: How to Write a Check The second step is to fill in the name of the person, business, or organization you are writing the check to.


Step Three: Write the Payment Amount as a Number

The third step is to fill in the box directly below the date, where you have to write in the numerical dollar amount that the check is for.

This amount should always include a decimal and the total number of cents. If the dollar amount is a whole number, you can use .00 to indicate that there are no cents (later on, we will show you how to write cents on a check).

In this example, we are writing a check for $900.00, as shown on our check in Figure 03 below.

Figure 03: How to Write a Check: Fill in the numerical dollar amount that the check is for in the box just below the date.


Step Four: Write the Payment Amount in Words

Next, directly below the line where you wrote the name of the recipient, you will see another blank line.

On this line, you will write the numerical payment amount in words.

In this example, our payment amount was $900.00. So, the payment amount in words would be:

  • $900.00Nine Hundred Dollars and Zero Cents

Figure 04 below shows how this fourth step was completed on our sample check.

Figure 04: How to Write Numbers in Words on a Check


Step Five: Write the Payment Amount in Words

Next, in the bottom left-hand corner of our check, you will see a blank line that that serves as the memo section of the check.

The memo section is where you can write a short description for what the check is for. Some examples of memos include:

  • Rent Payment for July

  • Happy Birthday or Congratulations! (for a Gift)

  • First Quarter Tax Payment

  • Landscaping

  • Babysitting

While this section is optional, we highly recommend writing something down as a reference for what your check was for the sake of keeping good financial records.

Since our sample check is being made out to our landlord for July’s rent payment, we will write July 2024 Rent in the memo section as shown in Figure 05 below.

Figure 05: How to Write Out a Check: Complete the memo section in the bottom-left corner.


Step Six: Sign the Check

The last thing that we need to do is sign the check on the signature line at the bottom-right corner.

In order for the check to be valid, you must sign your name on this line (the check can not be cashed without a valid signature).

Figure 06 below shows our example check with an authorized signature.

Figure 06: Your check is not valid until you sign it.


Once you have completed these six steps, your check is valid and ready to be used as a payment method.

Note that you must have the dollar amount that your check is written for available in whatever checking account the check is linked to, otherwise the check will bounce when the recipient tries to cash it and you will incur a penalty fee.

Figure 07 shows what our completed sample check to Alexander Johnson for $900.00 or July’s rent payment would look like.

Figure 07: How to Properly Write a Check


Example: How to Write a Check for 1000 Dollars

Now that you know how to properly write a check, let’s go through another example where we have to write 1000.00 on a check for a particular payment .

In this case, we will say that the check is for a quarterly estimated tax payment to the Internal Revenue Service for the first quarter of 2024.

Just as we did in the step-by-step guide to writing a check above, we will have to complete six sections of the check:

  • Step One: Write the Date

  • Step Two: Write the Name of the Recipient

  • Step Three: Write the Payment Amount as a Number

  • Step Four: Write the Payment Amount in Words

  • Step Five: Write the Memo

  • Step Six: Sign the Check

Let’s start off by completing the first two steps: the date and the recipient. For this example, the date will be April 1st, 2024 and the recipient will be the Internal Revenue Service.

Our check after completing steps one and two is shown in Figure 08 below:

Figure 08:How to Write a Check for 1000: The first step is to write the date and the name of the recipient. (Image: Mashup Math FP)


Writing any check, whether it’s for 1000 or 100,000, starts with writing the date in the top-right corner and the name of the recipient on the Pay to the Order Of line.

Next, we are ready to add a dollar amount to our check, which means that we are ready to complete steps three and four.

Start by writing 1,000.00 as a number in the box next to the $ sign on the right side of the check. Then, on the line below where you wrote the name of the recipient, write out $1000.00 in words as one thousand dollars and zero cents, as shown in Figure 09 below.

Figure 09: To write 1000.00 on a check, you have to write the dollar amount both as a number and in words.


Finally, the last two steps are to fill in the memo section and then to make the check valid by signing it in the bottom-right corner.

Since we said that this check was for making an estimated quarterly tax payment, we will put that as our memo and then sign the check, as shown in Figure 10 below.

Figure 10: How to Write 1000.00 on a Check Explained


Example: How to Write with Cents

In this next section, we will take a look at an example of writing a check with cents involved.

In the case of writing a check in cents, the six step process for writing a check described above is exactly the same:

  • Step One: Write the Date

  • Step Two: Write the Name of the Recipient

  • Step Three: Write the Payment Amount as a Number

  • Step Four: Write the Payment Amount in Words

  • Step Five: Write the Memo

  • Step Six: Sign the Check

For this example, we want to pay our dog groomer, Amanda Lee, using a personal check for a total of $78.26.

Notice that, unlike the last two examples, our payment amount does not end in .00. Rather, the payment amount includes cents.

Now, we will learn how to write a check with cents starting with the first two steps: writing the date and the name of the recipient on our check as shown in Figure 11 below.

Figure 11: How to Write Cents on a Check: Start by filling in the date and the name of the recipient. (Image: Mashup Math FP)


Now you are ready to write the amount as a number and in words.

When it comes to writing a check in cents, you have to first write the payment amount (with cents included) in the box next to the $ sign. In this example, our numerical payment amount is $78.26.

Once we have written the payment amount as a number on the check, we have to write it in words on the line directly below where you wrote the name of the recipient as follows:

  • $78.26 → Seventy-Eighty Dollars and Twenty-Six Cents

Figure 12 below illustrates how we wrote the payment amount in cents both as a number and in words on our check.

Figure 12: How to Write a Check with Cents


Finally, to finish writing a check with cents, you just have to complete the memo (this check is for dog grooming services) and validate the check by signing it.

These final steps are shown in Figure 13 below, which completes this tutorial on how to write a check in cents.

Figure 13: How to Write a Check in Cents Completed


How to Write a Void Check

The last section of this guide on writing checks is about void checks.

A void check is similar to a normal check, except that is has the word “VOID” printed or written boldly across the front of the check. By clearly marking a check as void, it prevents the check from being valid as banks will not allow it to be accepted as a payment or to withdraw money from your account for any reason.

Why would you ever want to write a void check?

Figure 14: How to Write a Void Check


While having to write a void check is uncommon, there are some useful reasons that for writing a void check that include:

  • Setting up Direct Deposit for Paychecks: Many employers will require you to submit a voided check to set up direct deposit of your paychecks (i.e. your paychecks deposit directly into your desired bank account on pay day). The voided check gives your employer your bank accounts routing information that is needed to set up direct deposit.

  • Auto-Pay for Recurring Bills: Sometimes recurring service providers (e.g. internet or cell phone contracts) require users to submit a void check in order to set up automatic payments where the amount owed is drawn from directly from your checking account each month.

  • Account Security and Verification: You may need to provide a void check as a security measure to verify your banking information when you are attempting to complete certain types of financial transactions such as loans.


How to Write a Void Check Explained (Image: Mashup Math FP)


How to Write a Void Check (Step-by-Step):

  1. Get a Blank Check: Start with a blank check that is linked to the checking account that you are dealing with. For example, if you are using a void check to set up direct deposit, make sure that the check is linked to the account that you want your paychecks to direct deposit to.

  2. Write “VOID” Across the Check: In blue or black ink, write out the word “VOID” in large capital letters across the front of the check. The word “VOID” should cover most of the surface of the check and it should be extremely obvious to any observer. Note that you do not need to fill out any sections of a void check.

  3. Identify Important Information: Make sure that the word void is not obscuring any important information that one would need from a void check—namely your name that is printed at the top-left corner of the check and the account numbers and routing information numbers at the very bottom of the check. If these numbers are unreadable, then you will likely have to submit another void check.

Writing the word "VOID" across the front of a blank check is an easy and effective way to give someone a check as a way of sharing important banking details such as your account number and routing number without worrying about any fraudulent or unauthorized access to your checking account.


How to Properly Write a Check (Image: Mashup Math via Getty)


Conclusion: How to Write a Check

While digital online payments and money transfers are extremely commonplace, checks remain a useful and secure option for making payments, especially through the mail or when digital payment options are not available.

In fact, knowing how to write a check remains a necessary life skill that everyone should learn. This guide shared a simple step-by-step process for how to write out a check to a person, company, or organization. We also covered specific examples of writing a check for $1,000.00 and writing a check with cents. Finally, we covered the uses of a void check and how to write a void check if necessary.

By learning how to write a check and how and when you should submit payments using a check, you are building skills that will allow you to make financial transactions that are secure and traceable, thus minimizing risk and giving you peace of mind.


Keep Learning:

How to Address an Envelope in 3 Easy Steps

Whether you are mailing invitations, letters, or important financial documents knowing how to properly address an envelope is an important life skill that everyone should learn.


5 Cause and Effect Examples and Explanations

5 Cause and Effect Examples and Explanations

Cause and Effect Examples and Explanations

5 Examples of Cause and Effect in Life, Nature, Math, and Literature

What are examples of cause and effect relationships? (Image: Mashup Math via Getty)

Whether you realize it or not, the continuous flow of events that make up everyday life are all driven by cause and effect relationships.

Whenever one specific action or event leads to another, cause and effect is at play. This relationship between an action and/or event and the directly resulting consequence or outcome is the foundation of the concept of cause and effect.

In this post, we will analyze 5 unique cause and effect examples to help you to better understand cause and effect relationships and how they work.

What is Cause and Effect?

Before we take an in-depth look at a few cause and effect examples, it’s important that you first understand the exact definition of a cause and effect relationship.

So, what is cause and effect?

Definition: A cause and effect relationship is the interaction between actions or events where one action or event (the cause) is the trigger that results in another action or event (the effect). In a cause and effect relationship, the effect is the result of the cause.


Definition: What is cause and effect?


This A➔B relationship is fundamental to understanding and explaining our world and how all things are connected. Cause and effect not only applies to mathematics, but to nature, life, and beyond.

While these definitions may seem very broad and philosophical, they are actually extremely simple and understanding what is cause and effect is a part of the human experience for every person.

If you are still a bit confused, looking at a few examples will make understanding cause and effect much easier for you. So, let’s go ahead and look at a simple example of a cause and effect relationship.


Example of Cause and Effect

Let’s start with a simple cause and effect example: after a rain storm, there are puddles on the street. In this example, we can consider the rain storm as a cause and the puddles as the effect.

In this case, the puddles forming were a result of the rain storm. If the rain storm never occurred, then the puddles would have never formed.

Examples like this should help you to understand that cause and effect relationships are extremely logical and they apply any situation or field of study concerned with patterns and outcomes.

Furthermore, cause and effect relationships help us to make sense of our world and make safe predictions about future events.

In the next section, we will take a deeper look at 5 unique cause and effect examples related to mathematics, history, nature, and daily life.

5 Cause and Effect Examples & Explanations

#1: Cause and Effect Examples: Learning How to Surf

The saying practice makes perfect is an application of a cause and effect relationship.

Whenever you are attempting to learn a new skill (how to surf in this example), the more time that you spend practicing, the better you become at the skill. This rule is true for learning any new skill, whether it be playing an instrument, speaking a new language, or riding a bike.

In the case of surfing, the amount of time a person spends practicing surfing is the cause and actually being able to surf is the effect. Without the cause (practicing), there would be no effect (knowing how to surf).

Another way of looking at this example is if someone who did not know how to surf hired an instructor and took a surfing classes. After several classes, the person learned how to surf. In this case, taking a surfing class would be the cause and being able to surf would be the effect.

Cause and Effect Example #1

A➔B: Taking surf lessons ➔ Being able to surf

Photo by Marvin Meyer on Unsplash

#2: Cause and Effect Examples: Weight Gain

According to the FDA, eating more calories than you burn leads to weight gain.

Whenever a person over-consumes calories without engaging in corresponding rigorous exercise, they can expect the result to be gaining body fat and an increase in body weight.

In this example, eating more calories than you burn is the cause and weight gain is the effect.

#3: Cause and Effect Examples: Deforestation and Climate Change

Cause and effect relationships also apply to nature and civilization.

For example, trees reduce the amount of greenhouse gases in our atmosphere.

Whenever forests are cut down (deforestation), greenhouse gases increase, which causes global warming and climate change.

So, in this example, the act of deforestation is the cause and global warming and climate change is the effect.

Cause and Effect Example #3

A➔B: Deforestation ➔ Global Warming

Photo by roya ann miller on Unsplash

#4: Cause and Effect Examples: Literature and Relationships

In this example, let’s take a look at how cause and effect plays a role in human relationships by examining Shakespeare’s Romeo and Juliet.

In the case of the classic tragedy, the ongoing feud between the Montague and Capulet families is the cause and the tragic deaths of Romeo and Juliet is the effect.

Why? Because the rivalry between the families is what led Romeo and Juliet to believe that they could never be together, thus spurring their decision to take their own lives.

#5: Cause and Effect Examples: Economics

In the case of economics, governments often argue for lowering taxes on businesses in an effort to boost economic growth and employment.

For example, a government may say that cutting taxes placed on businesses (the cause) will result in those businesses having more money on hand for investing. As a result, the government would expect a boost in employment and a spark in economic growth (effect).

Cause and Effect Example #5

A➔B: Lowering Taxes ➔ Economic Growth

Photo by Guilherme Cunha on Unsplash

Conclusion: Examples of Cause and Effect

No matter your current field of study, understanding cause and effect relationships is an extremely simple, yet powerful logic tool that will help you to make sense of basic and advanced concepts and ideas alike. By gaining a deep understanding of cause and effect relationships (which you can do by examining the cause and effect examples in this post), you will be better able to predict outcomes, think logically, solve complex problems, and make informed decisions.

In essence, every action has a reaction and there are consequences to our actions. And so, every action or event that is a cause has its corresponding action or event that is its effect. These simple concepts form the foundation of logical thinking and they will apply to all aspects of life.

Keep Learning

Who Invented Math? A Quick Explanation for Students

The history of math runs deep and spans across a variety of ancient cultures and civilizations, which leads many to wonder who invented math?

Let’s explore who gets the credit and why!


How Long Does It Take to Count to a Million?—Explained

How Long Does It Take to Count to a Million?—Explained

How Long Does It Take to Count to a Million?—Explained

How long would it take to count to a million and can it be done?


How long does it take to count to a million? (Image: Mashup Math via Getty)


So, you’re wondering how long would it take to count to a million. From a mathematical standpoint, the question itself seems simple enough. After all, you’re only interested in how much time it would take for the average person to actually count from one to one million. The answer must be some amount of time expressed in hours, days, or possibly even weeks or months.

And so our journey begins. To figure out how long it takes to count to a million, we will have to explore the number one million itself and perform a few calculations to see just how long it would take the average person to count to a million in both theoretical and practical scenarios.

This post explores two scenarios:

Are you ready to get started?

The Number One Million Explained

Before you learn just how long it takes to count to a million, it’s important that you have a solid understanding of the actual number and how relatively large it actually is. One of the best ways to grasp the magnitude of the number one million is to think of it as one thousand thousands.

In numeric form, this means that:

  • 1,000,000 = 1,000 x 1,000

So, counting to one million is the same thing as counting to 1,000 a thousand times! With this new perspective of a million in mind, it’s obvious that counting to a million is a pretty challenging task that would require a ton of time, effort, patience, and sheer will and dedication.

Now that you have a better understanding of how large a million actually is, you are ready to learn just how long it would take to reach this counting milestone.


How Long Does It Take to Count to a Million? To count to a million, you would have to count to a thousand a thousand times!


Theory : How Long to Count to a Million?

It’s finally time to perform some calculations to figure out how long it would theoretically take a person to count to a million.

We can start by considering the rate at which an average person can count and the total amount of numbers that will need to be counted (one million in this case).

Everyone counts numbers at different rates, but, for the sake of simplicity, let’s just assume that the average person can count one number per second. At this rate, it would take the person 1,000,000 seconds to count to a million.

But how long is 1,000,000 seconds? Well, to put this into perspective, one million seconds is approximately equivalent to 11 days, 13 hours, 46 minutes, and 40 seconds.

This means that, theoretically speaking, if a person were to count numbers at a rate of one number per second, it would require them to count for about 11.5 days straight without sleeping or taking any breaks!

Theoretically speaking, if a person were to count numbers at a rate of one number per second, it would require them to count for about 11.5 days straight without sleeping or taking any breaks!

While this answer to the question How Long Does It Take to Count to a Million? is true in theory, it is unrealistic in practice since it would be nearly impossible for a person to count non-stop all day and all night for nearly 12 consecutive days.

And it should be no surprise that a person has never counted from one to a million without stopping. But has a person ever counted to a million under more realistic conditions?

How long would it take to count to a million without stopping?

Reality : How Long to Count to a Million?

You now know that it would take nearly 12 days of non-stop counting to get from one to a million, which is a feat that is practically impossible for a human being to achieve.

In reality, a person can not count at a constant rate for days at a time since human beings, unlike computers, are subject to becoming tired, hungry, and fatigued.

However, this does not mean that a human being is not capable of counting to a million. It only means that getting there would take longer than 12 days since a human needs to take breaks from counting to eat, sleep, rest, etc.

While it is unknown how many people have counted to a million in their lifetimes, we do know of at least one person who has accomplished the feat—an American man named Jeremy Harper who holds the Guinness World Record for counting to a million.

Harper started counting on June 18, 2007 and reached a million on September 14, 2007. To achieve the milestone, Harper spent 16 hours per day counting and it took him a total of 89 days to complete the task! That means that the world record for counting to a million is nearly 3 months!

The feat was live-streamed daily from Harper’s home in Alabama. During his count, he never left his house or even shaved his face. His efforts raised over $10,000 USD for charity.

The world record for counting to a million is held by Jeremy Harper, who counted for 89 consecutive days for 16 hours a day.


Conclusion: How Long Does It Take to Count to a Million?

At this point, you should have a better appreciation for the magnitude of the number one million and the fact that counting to a million would take you at least 3 months to accomplish.

For the vast majority of people, counting to a million is probably not worth the time or energy, but exploring the question itself has hopefully been a fun and engaging experience.

And, if you ever again come across the question How long does it take to count to a million?, you will be equipped with a response that most will find surprising—the answer is that counting to a million would take you so long that it simply would not be worth attempting!

More Free Resources You Will Love:

Who Invented Math? A Quick Explanation for Students

The history of math runs deep and spans across a variety of ancient cultures and civilizations, which leads many to wonder who invented math?

Lets explore who gets the credit and why!


When Was Chess Invented and Where Did It Originate?

When Was Chess Invented and Where Did It Originate?

When Was Chess Invented and Where Did It Originate?

The History of Chess: Who Invented The Game of Kings?


When Was Chess Invented and Where Did It Originate?


The prominent sound of a marble pawn dragging across the surface of a smooth chessboard resonates throughout the room as you move your pawn forward, starting off the intense battle of mental strategy that is the game of chess.

As you play against your opponent and contemplate your next strategic move, you are engaging in an ancient tradition with a history spanning over a millennium. It’s no wonder why those who love and appreciate the game often wonder “when was chess invented?” and “who invented chess?”

In today’s post, we will explore the enchanting history of the game of chess, tracing its origin and evolution from its birth at the time of the ancient civilizations and to its existence as we know it today.


When was chess invented and how did it become the game as we know it today?


When and Where Did Chess Originate?

Exploring the answer to the questions, “When was chess invented?,” we have to travel back approximately 1,500 years into the past, where the earliest form of the game of chess is believed by historians to have originated from the Gupta Empire in Northern India in the 6th century.

The earliest form of the game was called Chaturanga and it was centered on strategy and military tactics where each game piece represented a different branch of the military.

Considered in ancient times to be a simulation of war, Chaturanga utilized an 8x8 square game board similar to the chess board that is used today. However, unlike chess, the original game involved the use of dice, which were used to determine which piece a player was allowed to move. Also, the game pieces had different movements and the game itself required four players instead of two.

However, this original version of the game would continue to evolve as the use of dice would eventually cease as the game would continue to evolve into what we now call chess, which is primarily focused on strategy and skill rather than chance.

How Old is the Game of Chess?

Answer: The game of chess, in its original form, is approximately 1,500 years old.


Who invented chess? The earliest form of the game of chess was called Chaturanga and it originated in Northern India during the 6th century. It was played on an 8x8 board and focused on military strategy and chance.


Who Invented Chess in Its Early Forms?

As trade routes and military conquest expanded the Gupta Empire, the game known as chaturanga eventually made its way to Persia, where it evolved into its next iteration—a game called shantranj.

The iteration known as shantranj made changes to the rules of the game and the movements of the pieces. Most notably, the Persians changed the game so that it was played between only two players rather than four.

Given the contributions of the Persians, many believe that the answer to the question, "Who invented chess in its early forms?" is not a straightforward one. Scholars credit both the Indian introduction of the game chaturanga and its evolution into the game shantranj by the Persians as playing a crucial role in evolving chess into the strategy game that we know today.


Who Invented Chess in Its Early Forms? The Persians transformed chaturanga into a game known as shantranj, which changed the rules and the movements of the pieces.


How Old Is Chess in its Modern Form?

Shatranj quickly became popular in the Muslim world and it wasn’t long before the game made its way to Europe around the 10th century.

The introduction of the game to Europe marks a major milestone in the history of chess, as Europeans contributed significant changes to the game between the 10th and 15th centuries. During this era, the modern Queen, Bishop, and Pawn game pieces movement patterns were established and are still used hundreds of years later in the modern version of chess.

The game of chess and its modern rules were essentially established in Europe by the end of the 15th century. It was during this time that the foundation of advanced game strategy and theory was born and gave way to the rise of chess Grandmasters—players who are recognized for their superior skill and accomplishment in the game of chess.

Eventually, modern organizations like the World Chess Federation (FIDE) were formed and the game’s international popularity would explode as international tournaments became widespread.

By the 20th century, the world would see the rise of chess legends including Anatoly Karpov, Bobby Fischer, and Garry Kasparov, all of whom pushed the boundaries of chess strategy and theory to new heights.


How Old Is Chess in its Modern Form? The Europeans would contribution significant changes to the game between the 10th and 15th centuries


Chess in the 21st Century: Tradition Meets Technology

Deep into the 21st century, chess remains extremely popular on a global scale.

While the game remains true to its ancient traditions, it is also ever-evolving due to the role of modern technology. One of the most incredible developments to the evolution to the game of chess is the application of advanced computing power programs that are capable of evaluating millions of moves and positions in fractions of a second, which allows them to play astronomical amounts of games, learn advanced strategy, and continue to improve.

Such programs have become formidable and often unbeatable opponents for even the best players in the world.

Additionally, the rise of digital chess platforms has made the game more accessible than ever, as players can compete against human or computer opponents on websites, video games, and apps like Chess.com. With the ability to play chess anytime and anywhere, the popularity of The Game of Kings is higher than ever.


How old is the game of chess?


Conclusion

Despite the evolution of the game of chess to its original form, Chaturanga, from 1,500 years ago to the modern version that we know today, the traditional spirit of the game remains intact. The mental strategies and military-like tactics that have been developed over centuries continue to form the true core of chess, and earning the title of Grandmaster remains an incredibly prestigious title.

In the 21st century, the game of chess is now a wonderfully dynamic combination of tradition, timelessness, and technology, as the game continues to adapt and evolve while holding true to its ancient roots.


Keep Learning:

Chess is a Sport—Here’s Why

Can the game of chess be considered a sport? On one hand, many see chess as merely a game of intense strategy and intellectual skill. For others, chess is clearly a sport due to its competitive nature and high stakes competitive nature.